Tuesday, May 31, 2016

Floral over Gradient - Nicole Diary Water Decal Review

Hello Lovelies!  I hope you all had a fun and safe Memorial Day weekend.  I was fortunate enough to spend time with family, and show off our new little guy a bit.  While I was hanging out with my family, I actually had a few minutes of baby free time.  This has become such a rare treat that I do my nails whenever the opportunity arises.  So, I decided to do a design and try out another of the Nicole Diary water decals they had sent me.


These pretty floral decal is Pattern 05.  You can purchase them through either Nicole Diary's Amazon store or their Aliexpress store.

It has been so long since I've created a gradient, I really wanted to do one with this design.  It is one of my favorite techniques.  Gradients are relatively easy but require a little extra prep time.

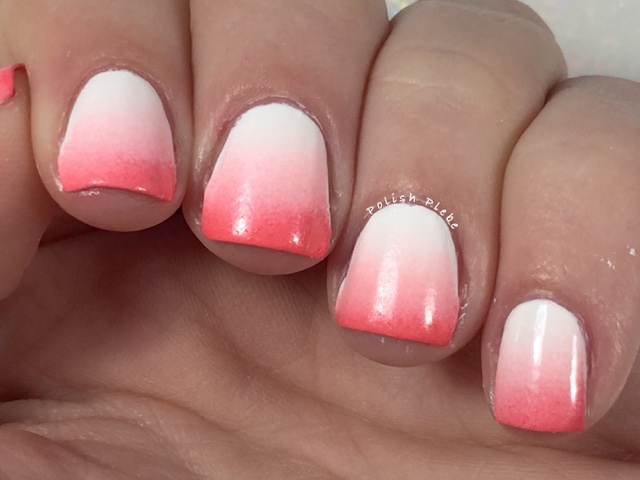
I started off with a white base.  You can either use white or the lightest shade of your gradient combo.  White happens to be the lightest color in my combo.  I also prefer to do a three shade color combo, but you can create a gradient with as few as two colors.


I also prepped my fingers with liquid latex for a quicker clean up.  If you don't have liquid latex (or the equivalent for those with latex allergies) you can also use tape.


To create the gradient, I use a make up sponge.  I dampen the sponge with water, because I feel this helps create a smoother blend.  However, this is not necessary, just a personal preference.  Then load the sponge with polishes, I am creating a horizontal linear gradient with Salon Perfect 'Sugar Cube,' China Glaze 'Spring in My Step,' and 'Strike a Rose.'  Then just dab, dab, dab.  Reload the sponge as necessary. 


I like to remove the latex and do a small bit of clean up with gentle acetone and a brush at this point before proceeding.  Of course, if you don't have or don't want to apply decals you should apply a topcoat to finish.
 

I then applied the water decals, as I have done in the past.  Start by trimming the decals, because my nails are short I trim the decals in half so that I get double the use out of a sheet (in other words I get two full manicures instead of one).  Remove the protective covering, and submerge the decal in water for approximately 20-30 seconds.  Remove the decal from the water, and carefully slide the decal from the backing.  Moisten the nail, and then place the decal on the surface.  Gently smooth out any wrinkles.  Remove excess decal with a brush and gentle acetone.


Of course, you should apply a topcoat to officially seal the decal.  When applying your topcoat I recommend you float the topcoat over the nail.  If you apply the topcoat too thinly there is the potential of damaging the decal design.


I really like these Nicole Diary water decals.  All of the ones that have been sent to me are a pattern over a clear backing.  That means that whatever polish color you choose is the background color of the design.  That leave endless possibilities for creating different designs all with one pattern. 


I really like how this pattern looks over the gradient.  The gradient makes the decals look really unique and the decals take a simple gradient to the next level.


I'm really falling in love with Nicole Diary water decals (in fact, I just ordered a whole bunch).  Their designs are unique and gorgeous, and the prices are reasonable.  If you place an order you can use code Tal2016 for a free gift.  Just type the code in the comments to the seller, to receive a free gift valued between $2-$5.


I hope you enjoyed this nail art design as well as found the tutorial and review useful.  Thanks for stopping by, see you next time.


Your Fellow Plebe,


Friday, May 13, 2016

Nautical Nails - Nicole Diary Water Decal Review

Hello Lovelies!  As many of you know I have been extremely busy lately with our new baby, and our very active three year old.  That means that I don't have a great deal of time to do my nails.  Recently, I was contacted by Nicole Diary asking if I would like to review some of their water decals.  Water decals are a very speedy way to create amazing and beautiful nail art designs, with little effort or skill required, so of course, I said yes.


I love nautical nail designs, that is why I chose this pattern to review for you guys first.  As you can see the packaging is clean and simple.  On the back of the package, the directions are printed clearly, largely, and are very easy to understand.  I feel this is very important because many newbies or inexperienced nail fiends may need these instructions.  I have come across many nail art product instructions that are either in a foreign language (foreign to me), or are translated so poorly that they make no sense at all.  Based on this alone I am already impressed by Nicole Diary.


However, the real proof is in the pudding (yum pudding!), so I tried them on myself.  For the nails I intended to use the decals on I painted them white with Sally Hansen Xtreme Wear "White On."


These decals, as you can see are full nail decal.  On the sheet there are ten decals that vary slightly in size, enough for one full manicure, or if you have short nails like mine, you can probably get two full manicures from this one sheet.  The decals are not individual, meaning that you do need to cut them from the sheet.  If you look closely you can see where one pattern starts and the other ends, making them easy to cut out.


After you select the appropriate size, cut the decals out.  If you have short nails, cut the length of the decals shorter to make the application easier (or to use them on multiple nails).  Some people like to cut one end of the length curved to match the arch of their cuticle line, I always screw this up so I don't bother.

Remove the protective plastic from the surface and submerge the decal in water for about 20-30 seconds.

Remove the decal from the water.  I recommend using tweezers, this allows you to get a good grip without accidentally sliding the decal from the backing before you are ready.  Carefully, slide the decal from the backing.

Though the instructions don't tell you to do this, I recommend you wet the nail that you are placing the decal on.  This allows you to slide the decal on the surface of the nail so that you can achieve the placement you like without wrinkling or ruining the decal.  Place the decal on the nail, and allow to dry for a few minutes.

Because, I didn't trim the decal to the exact size of my nail, I ended up with some of it on my skin.  This is easily removed using gentle acetone and a brush.  I recommend using a dabbing or stippling motion when cleaning the decal from your skin.  Swiping the brush may pull the decal out of place if it isn't dry enough.


Lastly, apply your favorite topcoat, and ta-da!  You have an amazing nail art design without putting in hours upon hours to hand paint it.  I paired these decals with a striped pattern I painted using straight vinyls, Sinful Colors "Endless Blue," and I AM Custom Color Cosmetics "Woop, Woop, Woop!"  You can't have nautical nails without some stripes.


You can find Nicole Diary products through Amazon and Aliexpress.  In addition to their own brand water decals, they also have their own brand of stamping plates for all you stamping lovers out there.  They do offer other supplies as well.  I found the shipping to be surprisingly quick too,  I received the decals about a week after I made my selections.  This is impressive because they shipped from China to New York in that time.


All in all I am very impressed with Nicole Diary and their water decals. I personally love how this design turned out.  The decals were incredibly easy to work with, making my life very easy (well at least made this nail art design very easy).  The pattern choices are beautiful, the packaging is clean and simple, the instructions are legible and make sense, the price is good, and the shipping was quick.  I seriously want every pattern they offer, there really isn't one I don't like.


I hope you liked this nail art design and found the review useful.  Thanks for stopping by, see you next time.

Your Fellow Plebe,


Tuesday, May 10, 2016

Butterfly Water Decals - Ladyqueen.com Product Review

Hello lovelies! Today, I have a two for one post for you, my Smooshy Nails Sunday, Mother's Day edition nails and a product review of ladyqueen.com Butterfly Water Decals, item NA0915.


So, for my base I did my smooshy nails for this past Sunday's Instagram #smooshynailsunday collaboration.  This week the hosts chose white, glitter, and any color of our own choice. I planned on using a blue shade for my color choice, but then I decided to let my daughter choose, because without her I wouldn't be a mother. I ended up using, Sally Hansen Xtreme Wear "White On," Don Deeva's "Jersey Girl," and my daughter's choice Trust Fund Beauty "Elegantly Wasted."


For those of you who have never done smoosh nails, sometimes referred to as smoosh attack nails, they are very easy and great for beginners.  Prep your nails with a white basecoat or the lightest color of your color combo, and protect your skin with either liquid latex, tape or glue, this will make the clean up quicker.  Dot your polishes on to a stamper, and then smoosh directly onto your nail.  Repeat until your satisfied.  I only did one smoosh layer on these nails.
When done smooshing, remove your skin protection, perform any necessary clean up, and apply your favorite topcoat.  It's as simple as that!


Even though this is a beautiful smoosh, I felt they could use a little something more, so I decided to try on some of the cute butterfly decals sent to me for review from ladyqueen.com.  These decals are available in several patterns (not all of them butterflies), these are pattern DS-236.


Applying these decals are also very easy and again make them perfect for beginners or for a quick way to dress up any mani.  After you've prepped your nail, either by simply painting it or by doing something slightly more elaborate like the smoosh above, trim out the decals you'd like to use.  Peal off the protective cover, and submerge it in water for 10-20 seconds.  Remove it from the water and carefully slide the decal from the backing.  I found it best to use tweezers to remove these decals from the backing because they are so small.  Dip your finger in water to moisten the surface, then place the decal on your nail.  Wetting your finger first before application allows you to slide the decal on the surface of the nail so that you can place it easier.  If you do not wet your finger the decal will most likely stick exactly where you place it, so the placement is less forgiving and more likely to wrinkle.  Allow a few seconds for the water to dry, and then apply a final layer of topcoat.


These decals are really pretty and a great way to take your mani to the next level without having to spend hours on end.


Additionally, they are very reasonably priced.  These decals are currently on sale for $0.99 and you can use my code: QJXS15 for 15% off, and did I mention they offer free shipping worldwide.  I think that's a pretty incredible deal if you ask me!


While you are visiting their site be sure to checkout their Daily Deals, Hot Sellers, New Arrivals, and Top Trends for the latest and greatest in nail art supplies and accessories.  Lady Queen has an awesome array of supplies whether your into stamping, decals, or just need basic tools they have it all.  


I hope you enjoyed this smooshy nail art design, and found the tutorial and review helpful.  Thank you for stopping by, see you next time.

Your Fellow Plebe,


Tuesday, May 3, 2016

Finger Paint Swatches and Review

Hello Lovelies! I know it's been a very long time since my last post, I am still alive I've just been really busy. The end of my pregnancy was drawn out for an extra 10 days. On Monday, April 18th at 10:32pm I gave birth to a healthy 8lb 3oz baby boy. We named him Theron Atticus and we are all in love with him. If you follow me on Instagram, I'm sure you've seen pictures. As we are getting settled in with the new babe, I have had little to no time for even the most basic nail care. With the almost obsessive hand washing, my nails look atrocious. They're heavily ridges, splitting, pealing, cracking, and incredibly dry. 

However, before I gave birth I had swatches some polishes I won from Finger Paints back in March. I thought I'd share them with you now.  As usual these swatches are photographed indoors under LED daylight lamps. 


A-Cry-Lic a Girl


This is a super girly bright bubble gum pink. It has a slight iridescent shimmer to it. 


This was mostly opaque with one coat but swatched here in two coats. 


The Mural of the Story 


This is a very pretty mint green creme polish. I have been needing a green like this so I was very excited to get it. 


This is mostly opaque in one coat but swatches here with two coats for good measure. 

Umber-Ella


This is a very glitzy condensed glitter polish. The bronze/gold holo micro glitter pieces are suspended in a slightly gold tinted base. 


I applied this in two brushed on coats, though a sponged application would have intensified the glitter. 


Dye-ing to Know


This is an awesome neon berry red! 


This is swatched in two coats without white undies. The color is still very bright, I think with white undies it would really pop!

To the Plinth Degree


As you can see this is a super bright neon yellow, that requires you wear a pair of shades to look directly at it 😎. 


Regrettably I did not use white undies because I wanted to see how this polish held up on its own. I ended up swatching this in four thin coats. So I would highly recommend using white undies under this polish. 

Clay on Words


Another neon lovely, this orange shade has a pretty iridescent shimmer to it, similar to that in 'A-Cry-Lic a Girl'


This was swatched in three thin coats. Three is one more than I typically like to do, so white undies wouldn't hurt under this polish. 


Off to Collage!


This is a fun hex glitter topper full of random sized pink, blue-ish purple, and iridescent pieces. Swatched here in one brushed on coat over 'A-Cry-Lic a Girl.'

I am so Enameled by You


A similar glitter topper to the previous but without the pink hexes and there are holo hexes instead of iridescent pieces. Swatched in one coat over 'The Mural of the Story.'

These are my first Finger Paints and I really like them. The formulas are very smooth and the glitters are not really thick or too watery. The neons are nice and bright and with some white undies could really be phenomenal. All in all, I am very pleased. 

As for the future of this blog, I am not through with nail art or polish. However, with the new family addition it's difficult to say how often or exactly when I will be posting. For those of you who have stuck with me, through this blog and/or my various other social medias, I thank you for all your support. As things settle in here and I get to catch up on some sleep, I'll be able to post more frequently and consistently. Thank you for stopping by, see you next time. 

Your fellow Plebe,


Social Gadgets

Random Nail Art

Background