Thursday, October 16, 2014

Fail File - Trying to do Too Much

So, I had this great idea to create a layered design using striping tape to create thin lines and then to do some stamping over it. I decided to stick with Halloween colors and add a layer of glow in the dark polish between the stripping layer and the stamping layer.  This project started out great though a bit tedious. Stripping tape is great for a lot of projects but it can be really aggravating to work with.

I started this project off with a solid base of Sinful Colors 'Snow Me White' and applied a quick drying top coat.


Once it was dry I completely covered my nail with stripping tape. This was very time consuming but I felt it was necessary to get the look that I wanted.


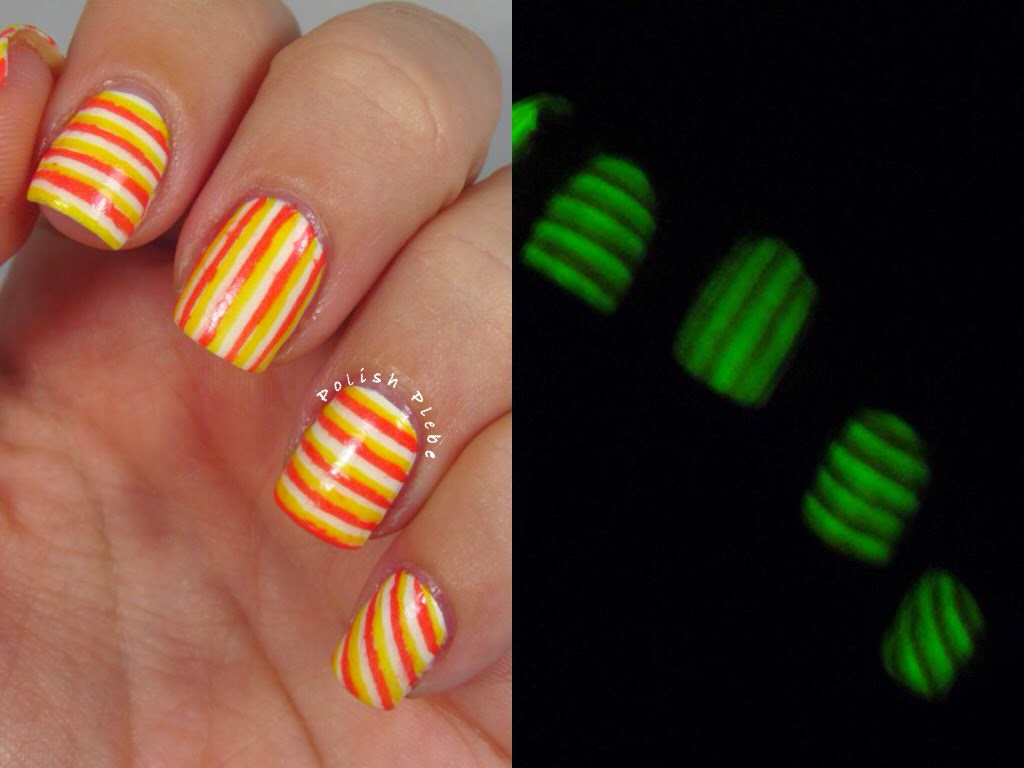
I then removed one tape at a time and with a stripping brush and yellow and orange polish I began creating my thin stripes. For this pattern, I removed a tape and painted a yellow stripe in Sinful Colors 'Let's Meet'. I would then immediately remove the stripes on either side of the yellow to keep the polish from drying and pulling with the tape. I would leave the stripe above the yellow, white but with a stripping brush and orange polish I would carefully fill in the row under the yellow. For my orange I used Sinful Colors 'Sunburnt'. I then proceeded by leaving the tape under the orange stripe and pulled the next one down and then repeat my pattern with the yellow.


I did this same pattern and procedure on all my fingers but changing the direction of the stripping. This took several hours and a lot of tape. I topped this all off with Sinful Colors 'Glow in the Dark' polish. I was really excited about this because it actually glows very well, compared to the other glow in the dark polish.


At this point it was one in the morning and I was exhausted from all the stripping tape that I decided to through in the towel for the evening and pick this back up in the morning.

So, part two and this is where the failing begins. I decided to use my Konad m63 plate and use the loopy image to stamp in black over all the stripping I had already done. I thought this would create an interesting look when it glowed in the dark. To say the least my stamp would not transfer properly.  I can not get a successful stamped image from any Konad plate and it is very frustrating.


After attempting to stamp two fingers I gave up on the stamp all together and using a black nail art stripper touched up the bad stamping and drew a similar pattern on the rest of my fingers (well on my left hand anyways).


Some how while going through all this I inadvertently laid my right hand pinkie in black polish and ruined my stripes. At this pointed I surrendered and decided to give up on this project all together.


Conceptually I thought this was going to be a really cool and different kind of Halloween nail art design but instead I was left with a mess and a whole lot of frustration. I really should have just left it with the stripping or done a plain base color with stamping but I tried to do to much. Some say simpler is better and I'm learning the hard way that, that is mostly true with nail art. The only thing I really achieved besides exhaustion (from lack of sleep) was that I got to see my glow in the dark polish in action, which it looks awesome by the way.  I hope you find my debacle insightful and know you are not alone with your nail art frustration. Thank you for stopping by, see you next time.


Your Fellow Plebe,


Wednesday, October 15, 2014

Think Pink Cheetah Print Nail Art

Happy Wednesday Everyone! I have had such a busy week (again) that I have had little time for nail art. I managed to make some time to make this #whatruwearingwed nail art design for you. I went with pink today in support of Breast Cancer Awareness month, however, you can do this design in any colors you'd like.


Materials
Base and top coat
Two shades of polish (in this case two shades of pink)
Toothpick (or small dotting tool)

I started off with two clean coats of OPI 'Suzi has a Swede Tooth' from the Nordic collection.


Then using a toothpick I created a cheetah print. A cheetah print is very similar to a leopard print both in appearance and technique. The only real difference is that with a cheetah print the center is not colored, so it requires one less step than a leopard print. To create the cheetah print draw small half circles or misshapen C-shapes in your alternate color. My second color is OPI 'I Love Applause' from the Muppet's Most Wanted collection. Continue creating your C-shapes leaving some space, fill in large
gaps and blank spots with misshapen dots.


I did a full cheetah print on my ring fingers and for all the remaining fingers I just printed on one side of my nail allowing the print to travel a little across my smile line and tip.


This is another great nail art design for newbies because it does require precision to look good. It's also great because you can do it with almost any color combination too.


I would like to dedicate this nail art design to all the wild women out there that have starred breast cancer in the face and fought their battle. The strength and courage of breast cancer survivors I have had the pleasure to meet is astounding.


I hope you enjoyed this #whatruwearingwed manicure, I'd love to see what your wearing (on your fingers) today. Maybe you are wearing something pink, or perhaps a spooky Halloween design, or something festively fall whatever it is I'd love to see it. If you'd like to share your #whatruwearingwed manicure head over to my Facebook page and post your pictures there. If you prefer Instagram post your pictures with the above mentioned hashtag and tag @polish_plebe so that I can find it easily. Don't forget to like/follow me while your there, or you could follow me through Google Friend Connect by clicking the 'Join this Site' Icon on the top right hand side of the screen or through Google+Bloglovin, and/or Pinterest. Thanks for stopping by, see you next time.

Your Fellow Plebe,


Saturday, October 11, 2014

Trick or Treat Nail Art Design

What's Halloween without Trick or Treating! I have so many fond memories of this 'sport', the candy, the costumes, the anticipation of a scare. I created this simple Trick or Treat nail art design using classic orange and black Halloween colors. I also show you an easy way to create a diamond pattern using chevron nail vinyls that is much quicker and consistent than taping the pattern with stripping tape.


Materials
Top and base coat
Orange and black polish
Small brush
Stamping plate and stamper
Black stamping polish
Chevron nail vinyls

I started this design off painting all my nails with OPI 'Can't Afjord Not To' except my mid finger which I painted with Revlon 'Black Star'. I really like this black because it has just a little bit of shimmer.


On my pointer and ring fingers I used two different Jack o'Lantern faced images from my bornprettystore.com image plate QA26, item #5689 (I used this plate last week in my Simple Elegant Spider Charm Manicure) along with my new stamper item #15851 and black stamping polish item #1381 (this stamping polish comes as a pair which includes black and white).


Don't forget to use coupon code: CREATEX31 for your bornprettystore.com purchase for 10% off.


On my mid finger I hand painted 'Trick or Treat' in 'Can't Afjord Not To' with a small brush. I cheated a bit because I only did this on my left hand. I was working on this late at night and didn't have the stamina to do both hands, sorry maybe next time.


On my pinkies I used my chevron nail vinyls from nailvinyls.com. However, instead of lining up the chevrons evenly to create stripes, I staggered them so that the points touched. This creates a diamond pattern. I then used my 'Black Star' polish and painted over the orange, quickly removing my vinyls so that I didn't get any pulls.


On my thumbs I did a similar pattern as to that on my pinkies but did a continuous diamond pattern instead of a single row of diamonds. Using chevron vinyls makes this a much quicker process. The pattern is much more consistent than trying to lay this pattern with stripping tape too.


This nail design was really fun, and I'm really excited that I'm starting to get the hang of stamping. This design just screams Halloween (AAAAAHHH!). I wore it today to a family day hayride outing and it was just perfect. I really love fall, and Halloween! I hope you enjoyed this nail art design and I hope you'll try out that little trick using chevrons to create diamonds. Thanks for stopping by, see you next time.


Your Fellow Plebe,


Social Gadgets

Random Nail Art

Background