Saturday, July 11, 2015

Stamping and Decal Embellishments

Hello Lovelies!  I don't often use decals, because I have never really found ones that I was in love with or they weren't really worth the expense.  However, I recently made a little nail art haul when a local beauty supply store was going out of business.  In addition to buying various polishes that I found attractive, I also purchased some decals, appliques, and charms because they were half priced.  For today's nail art I decided to try out some of the decals...


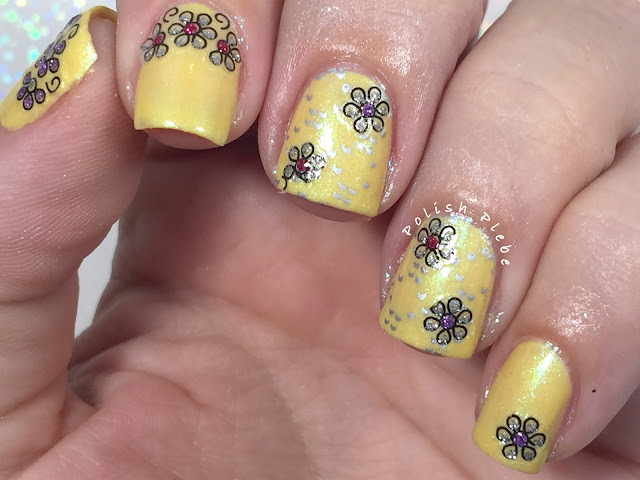
I used Zoya 'Daisy' as my base color.  I also purchased this during my store closing haul.  I don't own many yellows and I love Zoya so I had to purchase it.  This yellow is very pretty and has a bit of a shimmer to it.  This is two coats though it was mostly opaque with one coat.


I decided to add a bit of stamping on my ring and mid fingers just to make this nail art a little more interesting, plus its good practice.  I used Pueen image plate 07 and silver stamping polish from Mundo de Unas to stamp this image...


I then applied flower stickers to all my fingers, the brand I used is Glossyblossom.  As I said previously I purchased these locally, but there are numerous ways to buy similar stickers both in stores and online.  I know that bornprettystore.com offers a significant variety at very good prices, but I'm sure there are many other suppliers out there as well.  However, if you purchase from bornprettystore.com used code: CREATEX31 for 10% off your next purchase.


When using decals be sure to read the package directions, because some are water decals and some are simple peal and stick decals.  These are the later, so all I had to do is peal them from the backing and stick them where I wanted them.  I recommend that whenever you are using any kind of decal, that you let the base polish dry enough so that you can touch it without marking or smearing it.  I waited roughly 20-30 minutes before applying my decals.


If necessary perform a bit of clean up with acetone and a brush.  I also recommend applying a topcoat not only to give it extra shine but to help seal the decals in place.  This way they are less likely to peal up, there is nothing more annoying than a decal that is hanging off the nail, snagging on everything.


Though I don't often use decals, they are a great way to create a quick and interesting manicure.  Having some decals in your arsenal of nail supplies is great, that way if you don't have the time to create a masterpiece you at least have some pretty decals to dress up a basic mani.  Also it doesn't take much skill to use decals, so if you are intimidated about creating fancy artwork, these are a great way, to fake it until you make it.  I see nothing wrong with using the tools at your disposal and decals are just another tool in my book.


Decals are a great way to create an ornate mani or just add a little accent, either way you use them is up to you.  With so many different styles on the market the possibilities are endless.  I hope you enjoyed this easy stamped and decaled nail art design.  Thanks for stopping by, see you next time.

Your Fellow Plebe,


Thursday, July 9, 2015

Nebula Inspired Nail Art

Hello Lovelies!  If you read my last post you have heard about the new Google+ community Nail Art Nation.  One of the great attributes of this community, in addition to its general awesomeness, is that they offer a weekly prompt to help inspire your creative whims.  These prompts might come in the form of an image, a song, a quote or anything inspiring.  This week's prompt was this image of Orion Nebula...


To me this is a very beautiful image, and I wasn't really sure what I was going to do exactly.  I decided that I wanted to try a couple of new to me techniques and see what I could come up with.  What I came up with didn't turn out exactly as I had hoped but I thought it was pretty neat, none the less...


Materials I used
INM Ridge Free
Ellagee 'Lickity Split Liquid Latex Mani Mask'
China Glaze 'Don't Honk Your Thorn' (tan)
China Glaze 'Rainbow' (translucent iridescent)
China Glaze 'Spring in My Step' (light pink)
China Glaze 'Petal to the Metal' (medium pink)
China Glaze 'Beach Cruise-r' (bright pink)
China Glaze 'New Birth' (pale blue grey)
China Glaze 'Towel Boy Toy' (bright teal)
Revlon Top Speed 'Black Star' (black)
Saran wrap
Cup of filter room temperature water
Spray (perfume)
Beauty Plus Salon topcoat

The first technique I used was the saran wrap (plastic baggie) smoosh technique.  I prepped my fingers by apply a latex mani mask on the skin around my nails, and a single coat of a nude base polish.  I applied a second coat of base polish and while it was still wet I dropped various other colors of polish on top.  I then smooshed the polishes with a piece of saran wrap.  I quickly learned that you do not want to over work this because you may end up with bare spots in some places.  I ended up doing this process a couple of times on some nails because I ended up with bare spots.


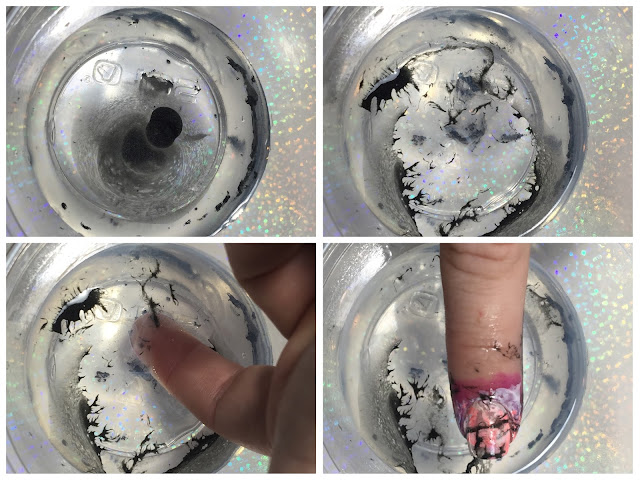
Once I was satisfied with my saran wrap smooshed nails, used what I like to think of as the turquoise watermarble nail technique.  I dropped black polish, roughly five drops in room temperature filtered water and then spritzed it with some perfume to break it up.  I then chose the most interesting areas and dipped my finger(s).


I then removed my latex mani mask, performed some clean up with acetone and a brush, and topped it off with a nice shiny topcoat.


My goal was to start with a light color scheme on my thumb, and brighten/darken colors as I went across my hand to reflect the color change across the nebula picture.  You can see this more clearly in the very first picture of this mani on this post up above.


Even though this didn't turn out exactly the way I envisioned I think they look really neat.  They remind me more of graffiti than they do of the nebula but I like the colors and the way they transition across my hand.  I'm also glad I got to try some techniques I had never used before too.  I hope you found this nail art and tutorial interesting.  Thanks for stopping by, see you next time.

Your Fellow Plebe,

Tuesday, July 7, 2015

Braided Nails

Hello Lovelies!  I hope you all had a long and wonderful weekend.  I know I did, the sun finally came out and we did get to enjoy some last minute fireworks.  As some of you may have seen in a couple of posts back, I was very saddened to here that my favorite G+ community, Nail Polish Queens, was shutting down.  However, I am excited to share with you a new community that I think will easily become just as great, Nail Art Nation!  This new G+ community is cofounded by two of the moderators of the NPQ, and many of my fellow Queens have already joined.  I hope you all will check it out, and join up too!

For my first post to NAN, I wanted to try to accomplish many things.  First, I wanted to do something unusual for me, so I choose a color that I do not wear often, purple.  I also wanted to try a design that I have been meaning to since I became involved with nail art, a braided pattern.  Lastly, I wanted to finish up last months Freehand Challenge from Instagram the prompt, monochromatic.  So, I ended up with this purple, monochromatic, braid design...


Materials I used:
INM Ridge Free base coat
Firecracker Lacquer 'Purple Peep-le Eater' (crelly) - from the Indie Mani Bunny Box
I A.M...Custom Color '30 Minute Work Week' (dark purple jelly) - from the Fraggle Rock Collection
Zoya 'Hudson' (medium sparkly purple) - from the Spring Awakening Collection
I A.M...Custom Color 'Diamond Pro' topcoat

At first, I was just going to create a single braided accent nail but then I decided to do a double accent nail instead.  I started off with dark purple on my pinky and thumb, the crelly on my pointer, and my medium purple on my ring and point, these last two being my accent fingers.


To create the braid, it is a simple process of criss-crossing and overlapping colors.  I recommend when doing this design that you choose an odd number of colors, three seems ideal because it is easy to work a pattern and doesn't seem too busy.  Also, try to choose colors that a thin in consistency and opaque in color to avoid having thick heavy layers.  It can be very challenging to find polishes that work best for this design, in fact, the polishes I chose weren't perfect, but I made due.

After applying your base color, use your secondary color and create a strip at an angle.  Then with the third color, create a stripe at about the same angle but in the opposite direction of your first, crossing over the first stripe, creating and almost x-like shape.  Follow with your primary (base) color and create a stripe parallel to your first, and overlapping the second stripe.  Continue criss-crossing colors till you reach the end of your nail.  I recommend giving a few seconds to dry between stripes so as not to bleed or drag previous layers.


Perform any clean up necessary, and apply your favorite topcoat.


I love this pattern, but I'm uncertain of the purple.  Of course, I am always uncertain about purple, that is probably why I wear it so rarely.  I think I would like to try this pattern again but maybe with some complimentary colors, or something bright instead.  Either way I'm glad I tried it.  Its always nice to try new things even if it is outside your comfort zone.


This is design is also great because it doesn't require any tools, this is perfect if you like to do nail art while your traveling and don't have proper supplies or if you just don't have many tools.  I hope you enjoyed this design, and I hope to see you around the Nail Art Nation.  Thanks for stopping by, see you next time.


Your Fellow Plebe,


Social Gadgets

Random Nail Art

Background