Showing posts with label Zoya. Show all posts

Tuesday, December 8, 2015

Personal Announcement

Hello Lovelies! I want to share some personal news. I thought it would be fun to use a nail art design tutorial to share it with you.


Materials I used:
Basecoat - SuperChic Lacquer "Bring it On!"
White base - Sally Hansen Xtreme Wear "White On"
Polishes - Zoya "Hudson," "Cole," "Tilda," & "Daisey"
Skinny vinyls (striping tape works too)
White nail art striper
Topcoat - SuperChic Lacquer "Marvel"

I started off with a solid white base. 
 

Then I created a color blocking pattern by using two vinyls crossed in a t-shape. I filled in each space with a different color and then removed the vinyls. Using a nail art striper I added hash marks to make the blocks appear stitched together. 
 

I shifted the colors on each nail, performed a bit of clean up, and applied a layer of top coat. 
 

Are you curious about my announcement yet? Well, my hubby and I are expecting baby #2! I am 22 weeks along, and baby 2 should be arriving in early April.  My daughter is very excited about becoming a big sister, and we are really looking forward to the new family addition. 


The big question is, what does this mean for the future of Polish Plebe's blog and nail art endeavors?  I don't intend to give nail art completely, however, as I get bigger it is becoming more difficult to sit hunched over to do nail art. This means my posts are probably going to be less frequent. I plan to utilize my Instagram account more frequently as well as other social media outlets to keep in touch. 
 

Thank you, to everyone who visits this blog on a regular basis as well as follow me on my other media outlets. I hope you enjoyed this nail art design. Thanks for stopping by, see you next time. 


Your Fellow Plebe,


Saturday, July 11, 2015

Stamping and Decal Embellishments

Hello Lovelies!  I don't often use decals, because I have never really found ones that I was in love with or they weren't really worth the expense.  However, I recently made a little nail art haul when a local beauty supply store was going out of business.  In addition to buying various polishes that I found attractive, I also purchased some decals, appliques, and charms because they were half priced.  For today's nail art I decided to try out some of the decals...


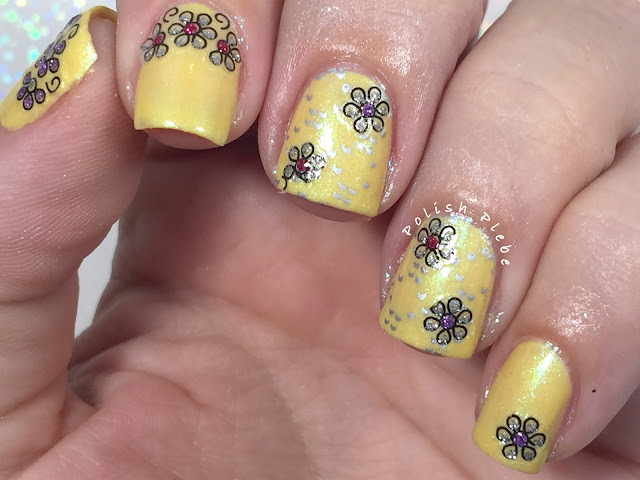
I used Zoya 'Daisy' as my base color.  I also purchased this during my store closing haul.  I don't own many yellows and I love Zoya so I had to purchase it.  This yellow is very pretty and has a bit of a shimmer to it.  This is two coats though it was mostly opaque with one coat.


I decided to add a bit of stamping on my ring and mid fingers just to make this nail art a little more interesting, plus its good practice.  I used Pueen image plate 07 and silver stamping polish from Mundo de Unas to stamp this image...


I then applied flower stickers to all my fingers, the brand I used is Glossyblossom.  As I said previously I purchased these locally, but there are numerous ways to buy similar stickers both in stores and online.  I know that bornprettystore.com offers a significant variety at very good prices, but I'm sure there are many other suppliers out there as well.  However, if you purchase from bornprettystore.com used code: CREATEX31 for 10% off your next purchase.


When using decals be sure to read the package directions, because some are water decals and some are simple peal and stick decals.  These are the later, so all I had to do is peal them from the backing and stick them where I wanted them.  I recommend that whenever you are using any kind of decal, that you let the base polish dry enough so that you can touch it without marking or smearing it.  I waited roughly 20-30 minutes before applying my decals.


If necessary perform a bit of clean up with acetone and a brush.  I also recommend applying a topcoat not only to give it extra shine but to help seal the decals in place.  This way they are less likely to peal up, there is nothing more annoying than a decal that is hanging off the nail, snagging on everything.


Though I don't often use decals, they are a great way to create a quick and interesting manicure.  Having some decals in your arsenal of nail supplies is great, that way if you don't have the time to create a masterpiece you at least have some pretty decals to dress up a basic mani.  Also it doesn't take much skill to use decals, so if you are intimidated about creating fancy artwork, these are a great way, to fake it until you make it.  I see nothing wrong with using the tools at your disposal and decals are just another tool in my book.


Decals are a great way to create an ornate mani or just add a little accent, either way you use them is up to you.  With so many different styles on the market the possibilities are endless.  I hope you enjoyed this easy stamped and decaled nail art design.  Thanks for stopping by, see you next time.

Your Fellow Plebe,


Thursday, May 21, 2015

Watermarble Practice

Hello Lovelies! Yesterday I decided to practice watermarbling.  This is a nail art technique I am far from mastering, but I love it so much that I really want to get good at it.  I decided to use some Zoya nail polishes that I have used in the past.  Most things that I have read about watermarbling says that it is best to use new polishes.  However, these polishes are about a year old and I used them because the colors seemed right for the season and I have had some success with them in the past.


I used Zoya 'Rooney,' 'Wendy,' 'Cole,' 'Tilda,' and 'Ling' (shown from left to right).


I used a white base coat this time around, the first time I used these polishes for watermarble I did not use a base coat (it was my second time watermarbling, ever).  This is two coats of Color Club 'Blank Canvas.'  As you can see I wasn't too concerned with perfection here.


I created a three layer bulls-eye with my Zoya polishes.  I use bottled water when doing watermarble because I have hard water.  My tap water has so many minerals that the polishes just will not spread in it.  Bottled water works wonderfully and I leave it with my nail art supplies so that it is always at room temperature.  Your tap water may work just fine, but if you are having a problem with getting the polishes to spread try bottled water.  This time around I attempted to create a flower-type design by pulling in toward the center.  I then dipped, aiming to capture the petals (I used a liquid latex mask on my skin, the purple stuff, to help with the clean up process).  Clean the surface of the water with a q-tip while your finger is in the water.  Remove your finger slowly once the surface of the water is clear of polish.


Seems really easy, doesn't it?  I spent almost the entire day working on this.  I had so many problems, from the polish drying too quickly to accidentally knocking the cup and destroying patterns.  For me this is such a frustrating nail art technique, but the results are so pretty.


Even though it's not perfect I do like the colors, and it turned out well enough to present to you.  You can see some of my white base showing through in some spots.  This was caused by air bubbles that occurred during the finger dipping process.


I was also getting frustrated because I couldn't get the petals small enough to fit them on my nails exactly the way I wanted them.  I settled for them being a little larger and spaced further apart.


All in all, I like the way this watermarble design turned out.  Zoya crème polishes work really well for me when trying to do watermarble and the white under-coat really makes the colors pop.  This is a great summer time color scheme, I'm feeling ready for the beach and sun.Thanks for stopping by, see you next time.

Your Fellow Plebe,


Friday, February 27, 2015

Longing for Spring - Reverse Stamping

Hello Darlings!  I hope you have all had a wonderful week and have a fun weekend planned.  As most of you know I live in upstate (I consider it more middle state) New York.  The weather has been cold and miserable.  When its not snowing it is so windy, you can barely stand up with out getting blown over.  I am not a winter person, I don't like snow or cold, and I don't care for winter activities.  I am so done with winter and really want spring to get here.

This week's #nailthattechnique challenge on Instagram is: Reverse Stamping.  For those of you that are unfamiliar with this term, it simply means making a decal using a stamped image.  This is a true challenge for me for a couple reasons; 1) I'm not very good at stamping, and 2) I don't own many image plates, which limits the images I have worth doing reverse stamping with.

I decided to give it a try and after a couple of attempts I created something I was satisfied with...


I started out with a base of Zoya 'Rooney' (from the Tickled collection), 'Dot' (the light pink, from the Awaken collection), and the lovely sparkly 'Binx' on my pinky (from the Bubbly collection).  I don't usually bling out my pinky, so I thought it was time, besides isn't so pretty?!


So as I mentioned previously it took me a couple of tries to get this right.  My first attempt was almost a complete failure, but was workable if I wasn't willing to try it again.  However, I was determined to get it right. 

This is what I did on my failed attempt (starting with the picture on the top left):
  • I have a total of four image plates, so not a whole lot to work with.  I decided to use my Konad M61 plate, the floral design to be exact.  You may recognize this from my very first stamping tutorial 'Stamping Into Spring.' Out of the few images I have to choose from I felt this had the most negative space, structured enough to fill in.
  • I used standard black polish, Sinful Colors 'Black on Black,' and stamped the full image.  I didn't want all the vines and dots, so I scraped them away using my smallest dotting tool (you can also use a toothpick for this, but I'm currently all out).
  • I then used my smallest dotting tool and filled in the flowers.  I used a Yellow Art Club Stripper for the centers and then I used Zoya 'Rebel' (also from the Awaken collection), and 'Rooney' for the petals of the flowers.
  • I then used my quick drying Seche Vite top coat to seal the entire design and create the decal.
  • Once, it was dry I used a pair of tweezers to peal it of the stamper.

To apply it, I simply added another thin coat of 'Dot' on my ring finger and applied the stamped decal.  I had a hard time getting the image to slide into place where I wanted it, so when I was semi-satisfied with the placement, I used cuticle scissors and trimmed some of the image away.  However, to get rid of most of the access, I used my clean up brush and acetone to wiped it away.  After clean up I applied a final layer of top coat.


So, I call this a failed attempt for a few reasons that might not be too apparent in the pictures.  First, the Sinful Colors 'Black on Black' didn't pick up quit as well as I had hoped, so the image is a little dim.  Deciding to use a quick drying top coat was also a bad idea, it was very thick and even though it was dry seemed very sticky.  I think this is why I was having such a hard time placing the decal, it wanted to curl up on the edges, but stuck firm in the center without and pressure. Another failure on my part was that I had applied two layers of 'Dot' initially and then added a third for the application of the decal.  This was too many layers for my liking and made the finished product very thick.  In the end the image is too light, too thick, off centered, and bubbly/wavy and doesn't lay smoothly on the nail.

I decided to scrape this attempt all together and started over.  For my second attempt, I did a very similar process with a few minor changes.
  • This time I used my black stamping polish from bornprettystore.com, item #1381.  You can used code: CREATEX31 to get 10% off your next purchase.
  • The other thing that I did differently was that instead of using a top coat, I used 'Dot' to create the decal.  I applied to coats of 'Dot' over the image on the stamper.  For the small flower on my thumb I used Seche Vite Base Coat and gave it ample time to dry before removing it from the stamper.
  • For the application, I applied only one layer of 'Dot' to my nail and immediately placed my decal on the wet polish.
  • I used a metal nail file to press the image down around the edge of my nail plate, pressed the overhanging edge of the image down over the tip of my nail, and then used my clean up brush and acetone to carefully clean the excess.  After cleaning up, I applied my top coat.

Though this is still far from perfection in my eye, it is significantly better than my first attempt.


This is one of the rare cases where my Cinderella hand (my dominant hand that does all the major work, in my case my right hand) turned out better than my non-dominant hand.  Of course, I did most of the work with my dominant hand since I was reverse stamping.


I really think I am getting the hang of this stamping thing, so it might be time for me to invest in more stamping supplies.  If anyone has any advise on who make the best stamping polishes and images plates, I'd love to hear from you.  How about a little #thumblovin, with a macro shot of the beautiful 'Rooney' and the cute little flower decal.  I think this turned out really nice, how about you?


Between, these gorgeous pinks, all colors from last years spring and summer collections mind you, and the cute flower designs I feel a little warmer already.  Where oh where, fore art thou Spring!  No seriously, where is it, I'm tired of being cold and trapped indoors.  Well at least I have this bright mani to enjoy.  I hope this mani brightened your day, and I hope you found the tips and tutorial helpful.  Thanks for stopping by, see you next time.


Your Fellow Plebe,


Monday, October 20, 2014

Witchicure

I have been looking for an excuse to do a green and purple combination nail art design and when I was looking over my new Halloween image plate from bornprettystore.com and noticed the little witch, I thought what better theme than a witch theme manicure. So I created these witch skittles using a variety of techniques…


Materials
Base and top coat
Purple, 2 shades of green, & gray polish
Black nail art stripper
Stripping brush
Sponge
Image plate and stamp
Nail Vinyls
Glow in the dark polish (optional)

Witches Cauldron
On my thumb I painted a bubbling witches cauldron. For my base color I used China Glaze 'All Aboard' (from the All Aboard collection). I then topped that with two coats of Sinful Colors 'Glow in the Dark'.


Using a black nail art stripper I drew a half circle at the tip and filled it in.


Then using a green cream polish, in this case Zoya 'Tilda' (from the Tickled collection), and a stripping brush, I filled in a small portion of the black cauldron. The shape is almost and lens shape.


To make the witches brew bubble I used a dotting tool and dotted Zoya 'Tilda' above the brew and Zoya 'Stassi' (from the Bubbly collection) in the brew to give it texture.


Witches Hat
On my pointer I painted a very simple witches hat. I started out with my purple base color again and again topped it with my glow in the dark polish.


I then used my black nail art stripper and drew a very narrow (close to the tip) curved line and filled it in to the tip to create the brim of the hat.


Using the same nail art stripper I then drew a triangle atop the brim.


Then using my green cream polish and a stripping brush I drew a stripe along the brim and the base of the hat.


Witch Face Silhouette
On my mid finger I hand drew the silhouette of a witches face. I started with a base color of Zoya 'Stassi' and topped with my glow in the dark polish.


Then using a thin stripping brush and black polish I drew three lines somewhat horizontally from the side of my nail. These will be the brim of the witches hat, her nose, and her chin.


I then very carefully filled in that side of the nail, and created the contour of her face complete with a wart on the crook of her nose and her chin.


Witch Flying Across the Moon
On my ring finger I decided to use my stamped image of a witch flying on her broom stick. I started with a gray base color, China Glaze 'Five Rules' (from the Giver collection). I gave the moon a very slight amount of texture by taking a very small piece of sponge and dabbing a very small bit of a dark metallic purple over the surface. For my metallic purple I used China Glaze 'Choo-Choo Choose You' (also from the All Aboard collection). I then topped this with my glow in the dark polish.


I created the outline of the moon by using a thin stripping brush and my purple polish used on my thumb and pointer and traced the edge of my nail. Because my tips are squovals I had to curve the lower corners a bit more than the uppers, to create the round moon shape.


I then applied my witch stamp using bornprettystore.com image plate QA26 item #5689 and their black stamping polish item #1381 . Remember if you purchase from bornprettystore.com use coupon code: CREATEX31 for 10% off your purchase.


Witch Stockings
For my pinkie I did a simple stripe design representing witch stockings. I started with my sparkly Zoya 'Stassi' and topped with my glow in the dark polish and a coat of quick drying top coat.


After waiting for my base polish(es) to dry I applied to straight nail vinyls from nailvinyls.com horizontally across my nail. I cannot stress enough how important it is to wait for the polish to dry before applying vinyls or tape. Also keep in mind that the more layers of polish you have the longer it takes for it to dry even with a quick drying top coat.


With my vinyls in place I painted my purple polish over top and then quickly removed my vinyls.


I topped all my nails with a quick drying top coat once I was complete with the designs. I really love this spooky design and the purple and green combination. I'm particularly fond of the witch on her broom flying across the moon, especially in the dark when it glows.


I hope you enjoyed these witchy skittles, thanks for stopping by, see you next time.

Your Fellow Plebe,


Social Gadgets

Random Nail Art

Background