Showing posts with label watermarble. Show all posts

Friday, July 24, 2015

Inside Out Movie Inspired

Hello Lovelies!  Last week's Nail Art Nation weekly prompt was the movie Inside Out.  I had the opportunity to see this movie with my daughter when it first came out and I really enjoyed it.  Even though I missed the Nail Art Nation deadline, I still wanted to create nails inspired by my favorite character from the movie.  Here is a clue to who he is...

Who's your friend who likes to play?
Bing Bong, Bing Bong
His rocket makes you yell "Hooray!"
Bing Bong, Bing Bong
Who's the best in every way, and wants to sing this song to say
Bing Bong, Bing BONG!


Bing Bong, is by far my favorite character.  For those of you who haven't seen this movie, he is Riley's imaginary friend.  He is this quirky creature made up of various animals such as an elephant, raccoon, rabbit and probably a few others.  His lifetime aspiration is to take Riley to the moon in his song powered wagon rocket ship.  This fury lovable guy, helps Joy and Sadness on their adventure through long-term memory.  I won't say anything more because I don't want to spoil the movie for anyone who hasn't seen it yet.  However, he is an unforgettable character.

I started with a white base color, this time I used Color Club 'Blank Canvas'


I created rainbow stripes, representing the rainbow jets of Bing Bong's rocket wagon using watermarble stripes.  I simply created a rainbow bulls-eye using various shades of Ciate London.  I then stretched it to create curved oblong lines.


I tried dipping three fingers at once and end up with a bit of a problem on my pinky because I accidentally overlapped my fingers.


I ended up redoing my pinky, I performed a bit of clean up, added a bit of China Glaze 'Fairy Dust' to make it more magical, and topped it all off with a glossy topcoat.  I added an acrylic painted image of Bing Bong peaky over the tip of my nail.


I did a similar design on my right hand, except I painted his lapel flower instead.


I had some issues with the watermarbling on my right hand but I really like how the rainbow stripes turned out on the rest of my fingers.  The color is a little off on Bing Bong too but it was the closest I could mix up.


If you haven't seen Inside Out yet, I highly recommend it, even if you don't have kids.  It is a really cute movie, and easy to relate to too.  I hope you enjoyed my Bing Bong inspired nails.  Thanks for stopping by, see you next time. 


Your Fellow Plebe,

Thursday, May 21, 2015

Watermarble Practice

Hello Lovelies! Yesterday I decided to practice watermarbling.  This is a nail art technique I am far from mastering, but I love it so much that I really want to get good at it.  I decided to use some Zoya nail polishes that I have used in the past.  Most things that I have read about watermarbling says that it is best to use new polishes.  However, these polishes are about a year old and I used them because the colors seemed right for the season and I have had some success with them in the past.


I used Zoya 'Rooney,' 'Wendy,' 'Cole,' 'Tilda,' and 'Ling' (shown from left to right).


I used a white base coat this time around, the first time I used these polishes for watermarble I did not use a base coat (it was my second time watermarbling, ever).  This is two coats of Color Club 'Blank Canvas.'  As you can see I wasn't too concerned with perfection here.


I created a three layer bulls-eye with my Zoya polishes.  I use bottled water when doing watermarble because I have hard water.  My tap water has so many minerals that the polishes just will not spread in it.  Bottled water works wonderfully and I leave it with my nail art supplies so that it is always at room temperature.  Your tap water may work just fine, but if you are having a problem with getting the polishes to spread try bottled water.  This time around I attempted to create a flower-type design by pulling in toward the center.  I then dipped, aiming to capture the petals (I used a liquid latex mask on my skin, the purple stuff, to help with the clean up process).  Clean the surface of the water with a q-tip while your finger is in the water.  Remove your finger slowly once the surface of the water is clear of polish.


Seems really easy, doesn't it?  I spent almost the entire day working on this.  I had so many problems, from the polish drying too quickly to accidentally knocking the cup and destroying patterns.  For me this is such a frustrating nail art technique, but the results are so pretty.


Even though it's not perfect I do like the colors, and it turned out well enough to present to you.  You can see some of my white base showing through in some spots.  This was caused by air bubbles that occurred during the finger dipping process.


I was also getting frustrated because I couldn't get the petals small enough to fit them on my nails exactly the way I wanted them.  I settled for them being a little larger and spaced further apart.


All in all, I like the way this watermarble design turned out.  Zoya crème polishes work really well for me when trying to do watermarble and the white under-coat really makes the colors pop.  This is a great summer time color scheme, I'm feeling ready for the beach and sun.Thanks for stopping by, see you next time.

Your Fellow Plebe,


Wednesday, April 22, 2015

Holo Creme Metallic Watermarble

Hello Lovelies!  I have seen so many beautiful watermarble manis lately, that I decided it was high time I sat down and tried this out for myself, again.  The last few times, I've tried to create a beautiful watermarble design I have ended up frustrated and with less that desirable nail art designs. I sat down and decided to practice and try some different polish types out and I ended up creating this...


Materials I used:
Base coat - Seche Vite
Three shades of polish - I A.M...Custom Color '30 Minute Work Week,' 'Secret Society of Poobahs,' and 'Space Frog Follies' (these are all part of the Fraggle Rock collect, checkout swatches here).
Top coat - I A.M...Custom Color 'Diamond Pro' top coat
Bottled Water
Clear short solo cup
Dotting tool
Mani Mask - Ellagee 'Lickity Split Liquid Latex Mani Mask'


Now as I previously mentioned, I have not had much luck creating watermarble nails.  I do not now the perfect formula, what polishes are perfect, or the best procedure.  The only thing that I have determined from what I have read and discussed with other nail art addicts, is that creating a successful watermarble involves a lot of trial and error.  Here is how I created this design...

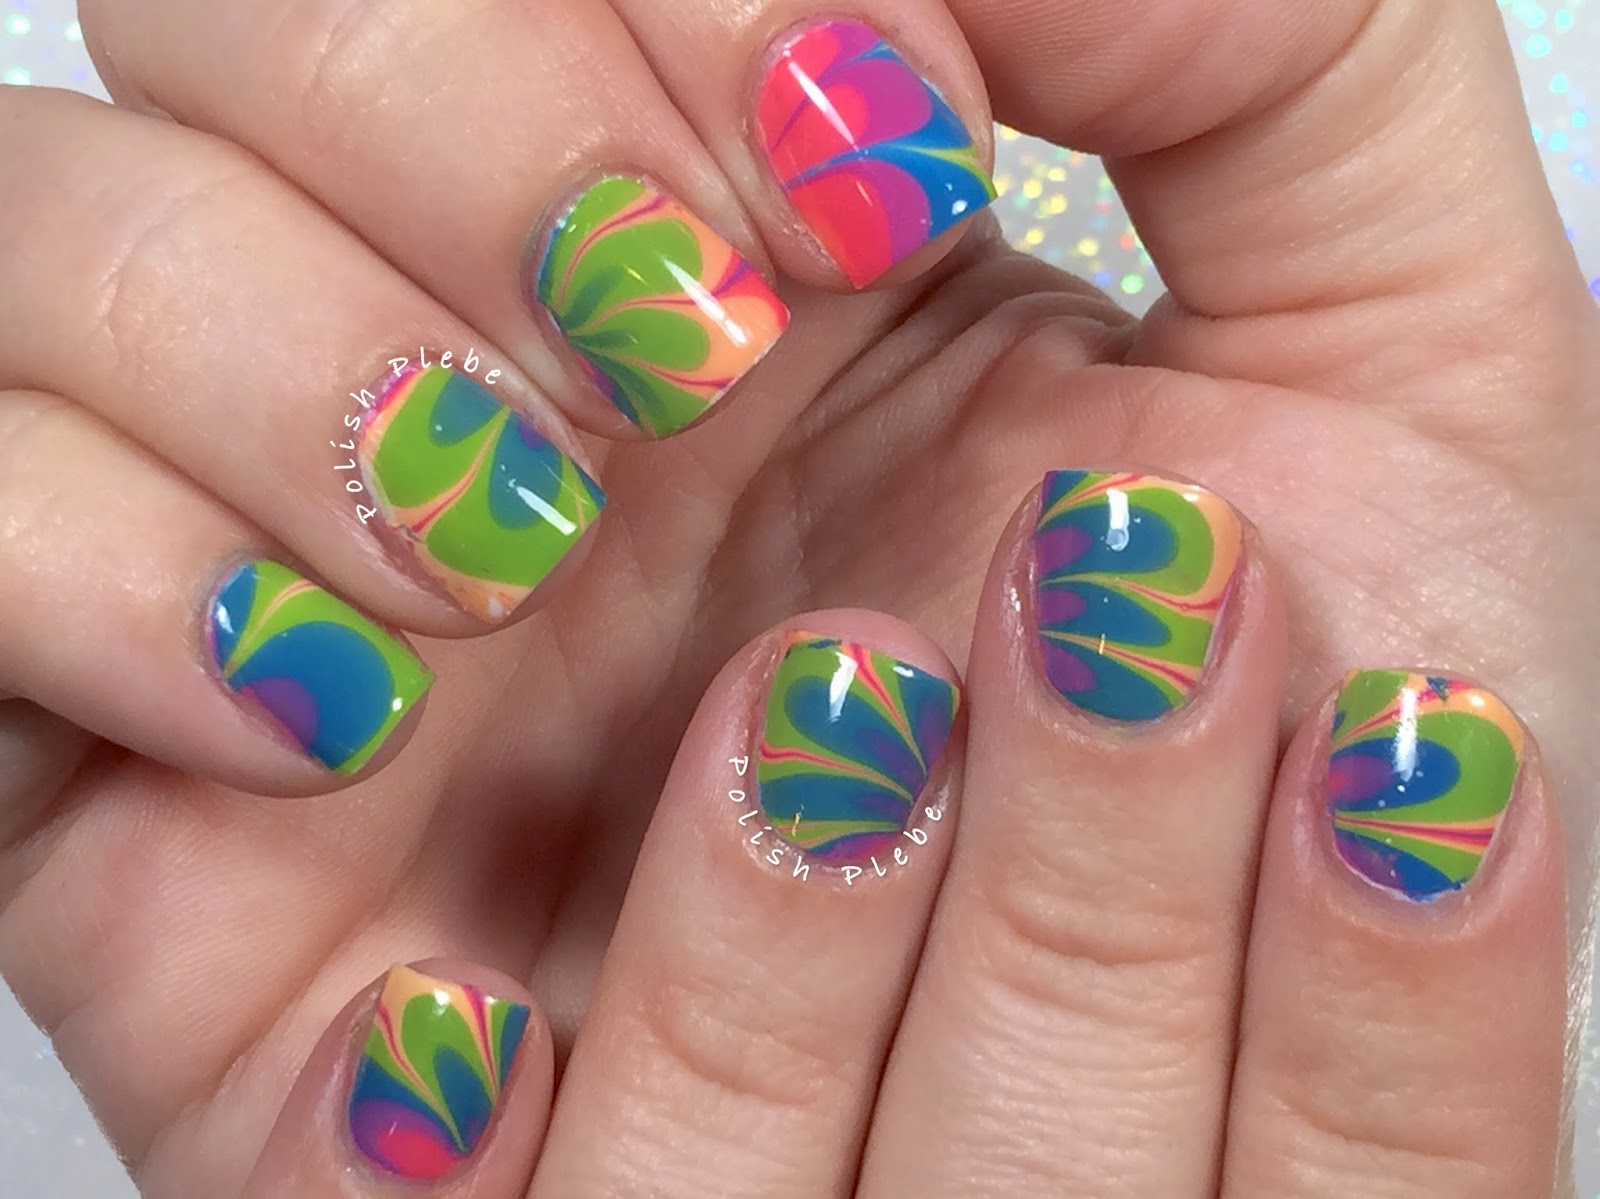
I started with a base of '30 Minute Work Week' on my thumb, pointer, and mid-finger.  I used 'Secret Society of Poobahs' on my ring finger and 'Space Frog Follies' on my pinky.  Most people use white undies (white base polish) under their watermarble, and that does help to brighten the colors.  You can also use the lightest shade of polish you are marbling with, however, this may change the appearance of some of the colors in the watermarble design.  Either way I highly recommend you use some kind of base color, the first watermarble I did, I did them on naked nails and the colors were so muted you couldn't even tell it was a watermarble design.  Since, I was doing this design as more of an experiment and wasn't having any great expectations for creating an awesome nail art design, I decided to watermarble over a holographic and metallic polish to see how it affected the design.


I prepped my fingers with a liquid latex mani mask from Ellagee.  I received this as part of my Indie Mani Bunny Box and I'm not really sure how I ever lived without it.  However, if you don't have liquid tape I highly recommend protecting your skin with scotch tape or Elmer's glue.  Watermarble is very messy and if you don't protect your skin you'll spend more time cleaning than creating.


For my watermarble I use bottled water because I know I have hard water and the few times I have used tap water I have had nothing but problems.  I keep a bottle of water in with my nail art supplies so that it is always at the perfect room temperature.  Many people have used tape water and have not had issues.  I recommend that you try your tape water, however, if you have problems with your polishes spreading or sinking it may because of your water.

For my first attempt at creating a design I tried for a flower-like pattern but after a few tries I couldn't get it right.  I was having a hard time with the holographic polish breaking and bleeding into the other colors, making the marble messy and not at all pretty.

I decided to try for a zigzag pattern and had much greater success.  In the pictures below I inserted arrows to show you the directions I dragged to create this pattern (I figured this might be easier than trying to describe it).  Once I was satisfied, I targeted an area of the design, plunged my finger, cleaned the remaining polish off the surface, and slowly removed my finger from the water.  I only did one finger at a time, since I am a total plebe when it comes to watermarbling.


After repeating this process for my pinky finger, I removed the mani mask.  As you can see, it saves on a lot of clean up.  However, I didn't apply my mask high enough on my mid finger but still far better than no mask at all.


Originally, I was going to watermarble over the purple crème too, but I felt like I was pushing my luck.  Instead, I decided to apply two side dots of 'Space Frog Follies' with a medium dotting tool over the crème nails.  I then performed a clean up with brush and acetone and topped it all off with IAMCC 'Diamond Pro' top coat.


It is really interesting to see how using a different base polish changes the appearance of the colors in the watermarble design.  The metallic green on my pinkies really muted the colors, giving them a slightly yellowish appearance.


If you take a close look at the watermarble over the holographic purple polish on my ring fingers you can almost see a bit of the holographic shimmer through the design.  It also made the purple crème much brighter.


I am so ecstatic about how this turned out.  When I started this project I completely expected to end with a mess on my nails and less hair on my head.  For those of you who have tried watermarbling and have given up because its such a pain and seems impossible, just keep at it.  Just like any other kind of nail art design this requires practice.  But once, you find something that works it is so worth it.  I hope you all enjoyed this nail art design, thank you for stopping by, see you next time.


Your Fellow Plebe,
  

Tuesday, March 3, 2015

Watermarble Decals Revisited

This week's Nail Polish Queens' challenge is watermarble decals.  Of course, I had to do this challenge.  In September of last year I created a tutorial for this easy process based on a You Tube video I had watched, http://polishplebe.blogspot.com/2014/09/water-marble-decals.html.  I honestly, haven't tried it again since then.

I decided to make it a Saint Patty's day color scheme.  I was hoping to make it two shades of green and a gold, but unfortunately my gold polishes weren't playing well.  After a few tries, I decided to just go with a two shade green marble...


I decided to use some of my Lucky Lacquer, because the Irish are infamously known for being lucky.  The two greens I used are 'Mint Daisy' (dark green), and 'Bells of Ireland' which in mind is just perfectly named for the coming holiday.  I typically have a very hard time with watermarble designs because my polish don't always spread well.  These polishes however, spread like butter on warm toast (minus the crumbs).


I was really hoping that this time around I would have some great revelation and be able to share with you the great secret to creating awesome watermarble designs.  Alas, I have nothing new to add to the previous tutorial.  After I made my bulls-eye, I played with various patterns but this flower like design ended up being my favorite.


Once, I was happy with my design I left it to dry.  As I stated in the previous tutorial, and I have heard this from others that have tried it to, picking it up is the hardest part of the process.  I found that if I let the marble dry longer it became a little more ridged which made it easier to pick up without it folding or wrinkling.  This time around I allowed each marble to dry for about 20-30 minutes.  I placed them on paper towels to let the water dry off naturally.  I previously used wax paper because I was afraid the paper towel would stick to the decals.  However, if the polish is dry enough the paper towels work just fine.

The only thing I changed during this application is that I trimmed the decal prior to placing it on my nail.  I did this to make the decal more manageable.  I applied one coat of my lightest color, in this case 'Bells of Ireland.'  I placed the decal while the polish was still wet and attempted to smooth out the design.  I had two problems this time around 1) the decal began wrinkling as soon as it touched the wet polish, and 2) anytime I touched the surface of the decal it instantly ripped.


I found this very discouraging.  I believe that the decal wrinkled so easily during application because they were very thin.  I think the next time I try this if the polishes seem thin I'll create the rings using a couple of drops per ring instead of just one.  As for the rips, I'm not exactly sure how I might have prevented it, but I found it was easily fixed with some polish and a dotting tool.  Notice the bare spot near my free end in picture 5 and then in picture 6 it's covered up.  However, this looks really terrible right?  Well after a little clean up with acetone and a brush as well as a thick application of top coat, this is the end result...


It's not perfect but its better than almost any finger dipped watermarble I've ever done.  The one on my mid finger of this hand turned out pretty well.  This decal happened to be a little thicker than most of the others.  Sadly, the bubbles on my ring finger occurred during the top coat application.  I applied a top coat I had received free as part of a promotion, and I doubt I'll use it again. 


I'm feeling more confident with my watermarbling technique.   I think I may try a finger dipped water marble soon and I'll definetly be using my Lucky Lacquer polishes to create them.  I hope you enjoyed this nail art design, thanks for stopping by, see you next time.


Your Fellow Plebe,


Friday, September 5, 2014

Watermarble Striping

This weeks Blogger Bragger challenge is watercolor.  I have always been in love with watercolor/marble nail art designs.  It was the first nail art design technique and one of the many I have tried that I can't even come close to getting right.

I discovered an artist on Instagram, (this is one of my favorite stomping grounds as of late,) she goes by @banicured.  She does the most lovely designs and water marbles.  This design was inspired by her.  The technique is relatively simple if you've done any water marbling at all.  It's also a great water marble design to start with  if you are a beginner too.


Materials
Cup
Water
Base and top coat
Various shades of polish

Just like with any water marble technique you start with a cup/bowl  of water.  I like to use a disposable plastic cup cut down for my bowl.  I also use bottled water because I have had poor results using my tap and filtered water.  Everyone's water is different and the only way to find out what works for you is trial and error.


I prepped my fingers by applying my lightest shade of polish.  For this design I am using three shades from Essie's Dress to Kilt Collection.  My base color is 'Take it Outside'.  I also taped the cuticles of my fingers to speed up the clean up process.  I have tried glue but it doesn't work well for me.


I then created my water marble rings using 'Take it Outside', 'Dress to Kilt', and 'Partner in Crime'.
Usually at this point you break out your toothpick or orange stick and start creating swirls and various shapes in your water marble, but not for this design.


At this point you just dip your fingers, clean the surface, pull your fingers out.


Remove the tape, clean up your cuticles, and apply your favorite top coat.


I like this simplified version of water marbling because it allows you to work on your dropping technique, and your placement.  I have a really difficult time with placement.  I love water marbling but find it so frustrating.  This was a good nail art design because it allowed me to enjoy the water
marbling process and obtain a descent result.  I hope you enjoyed this nail art design, thanks for stopping by, see you next time.

Your Fellow Plebe,


Social Gadgets

Random Nail Art

Background