Showing posts with label NPQ. Show all posts

Friday, July 3, 2015

Mani Swap with Ab_nailedit

Hello Lovelies!  I know I promised you another Fourth of July mani, but I wanted to share this with you first.  This is my first ever mani swap with Anusha (IG:ab_nailedit)...


For my fellow plebes out there, a mani swap is the process of recreating another artist design, with the agreement that they are going to do the same with one of your designs.  This is a great way to make new nail pals, test your skills, and try on that mani you've been admiring on Instagram.

I decided to recreate one of Anusha's bright pastel nail art design because I really like the colors and I thought the design would be fun.  Anusha's original design I recreated was done freehand, however, I cheated and used tapes to recreate the pattern.

For the recreation I started with a very bright pink, Color Club 'Sweet Getaway.'  This happens to be scented to smell like roses and it smells absolutely divine.


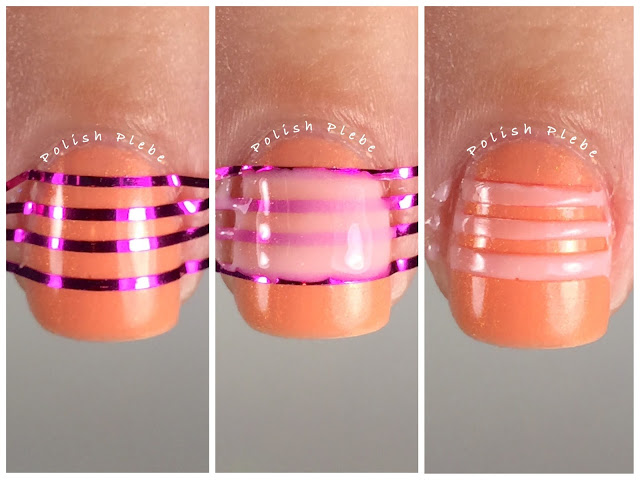
I used striping tape to create the pattern.  I started with the diagonal stripes first because I felt that was easier for both the application and removal.  I then applied tapes vertically, lining them up with the top diagonal stripe being careful to not over lap it into the diagonal area.  I applied my secondary color, Color Club 'Holy Chic!' and then removed my tapes as quickly as possible.

  
As (almost) always, I performed a bit of clean up with acetone and a brush, and applied a quick drying top coat.


This was a really fun project, and I highly recommend you contact your nail pals or someone you admire and arrange a mani swap.  Anusha and I, meet (virtually) and was encouraged to do a mani swap because of an absolutely one of a kind, fantastic nail art community on Google+, Nail Polish Queens.  However, I am sad to announce that this wonderful community will be shutting down tomorrow, July 4th.  I am broken hearted over the end of such a great group but I am happy to have been a part of it.  Through the NPQ I have meet so many, wonderful, caring, considerate, encouraging, and enabling nail pals (many of whom I will do my best to keep in touch with through other medias).  I have improved my skills, and have been able to produce better nail art in part because of the NPQ community.  So, it is with a heavy heart that I say goodbye to NPQ.  If you are a fellow NPQ member, and I am not following you on IG, or any other media, please let me know so that I can track you down. 


On a happier note, how pretty did these nails turn out?!  I love the colors and the stripy pattern.  Big thank you to Anusha for being my first mani swap partner, be sure to check Anusha out on IG: ab_nailedit to see all of her great design.  Also, if you are interested in doing a mani swap with me, please don't hesitate to ask, I love a challenge and it is a great way to make new friends.  Thanks for stopping by, see you next time.

Your Fellow Plebe,


Wednesday, June 3, 2015

80's Style Palm Trees

Hello Lovelies!  It has been so rainy and dreary here, it has been a bit depressing.  Today, is the first day the sun has tried to make an appearance, and according to the forecast its not going to stay long.  I have been planning this palm tree nail art design for a while, so I thought now would be the time to post it, it might encourage the sun to stay a bit longer.  Not to mention, it happens to be this week's NPQ challenge...


Materials I used:
Base coat - INM Ridge Free
Base color - Color Club 'Tiny Umbrella' (on the right)
Stripe color - Color Club 'Bermuda Beaches'
Striping tape
White nail art striper
Top coat - Rica 'Glam Gloss'


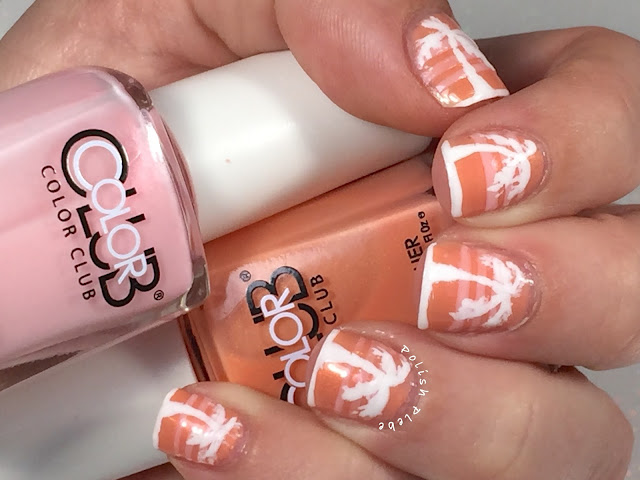
I used a pale orange polish for my base color with a top coat.  I actually wore Color Club 'Tiny Umbrella' for a day or so before I actually got around to creating the design.  You can see a little bit of tip wear but I'll be covering up that part before the design is complete.


For most of the palm tree nail art designs I've seen and for the one I created last summer (Happy International Nail Art Day) the background is usually a gradient.  I decided to go with just a very simple horizontal stripe for the background this time.  I used striping tape and outline three stripes (four tapes) a little higher than the center of my nail.  I carefully applied my pink polish within the stripes, so that when the tape is removed there are only three pink stripes.


In a second, attempt to be slightly different I used a white nail art striper, instead of the typically used black and created my palm tree design.  I lined the tip, almost as if capping my free-end with the striper, because this is the horizon I wasn't concerned with it being absolutely perfect.  I then drew in the trunk of the tree, making the base slightly wider than the top and giving the top a bit of a curve.  I then drew in four palm leaf or branches.  Lastly, I filled out the leaves with a little hashing motion extending from the branches.


I repeated this design on all my nails, and then as usual I performed a bit of clean up with acetone and a brush, and applied my favorite top coat.


I'm really glad I did this palm tree design with an 80's twist.  Not that gradient background palm tree designs aren't fantastic, because you know I love gradients.  I'm just really pleased with how these turned out.  Palm trees are great for the summer, or for vacations, or if you wished you were on vacation.


This design and color combo is both subtle yet eye-catching.  Also, it's difficult to see in these pictures but the orange and pink polishes have a slight shimmer to them which really adds to the overall design.


For my fellow plebe's out there this design is a great alternative if you haven't mastered or aren't ready to tackle gradients.  You can use striping tape like I did or you can practice your freehand and do it without any tapes.


Hopefully, this nail art design will encourage the sun to stay a little longer.  I hope you enjoyed this nail art design as much as I am.  Thanks for stopping by, see you next time.

Your Fellow Plebe,


Wednesday, April 29, 2015

Dream Catcher Nail Art Design

Hello Lovelies!  I wasn't going to share these because this is one of those cases that the design looked better in my head.  We've all been there.  I decided to share them though, because I like to share everything with you plus I have a tip on how to speed up the gradient process.  I created these nails for this week's Nail Polish Queen Dream Catcher challenge...


Materials I used:
Base coat - Seche Vite
Polishes - China Glaze 'Don't Honk Your Thorn' (tan), 'Towel Boy Toy' (blue), 'Community' (brown), 'Release' (grey), 'Beach Cruise-r' (pink), and 'Boundary of Memory' (glitter)
Mani mask - Ellagee 'Lickity Split Latex Mani Mask'
Top coat - Rica 'Glossy Glam'
Makeup sponge
Small brush
Small dotting tool

I created a gradient for my background on all fingers except my pinky but I used a slightly modified method to speed up the process.  Typically, when creating a gradient you either want to use a white or light colored polish to sponge over.  This allows the gradient colors to be more vibrant and takes fewer sponged coats.  However, using a white or one shade of color may not be ideal in all situations.  For instance, the blue that I used was a bit jelly like and if I applied the tan on my entire nail it would have changed the color slightly, also the blue was to dark to put under the tan, and quite frankly I didn't want to bother with white undies.  So here is what I actually did...

I applied my mani mask around my nails to protect my skin and speed up the clean up process.  I then painted the upper half of my nail with the tan polish and the lower (free-end) portion of my nail with the blue.  I allowed the colors to overlap slightly and wasn't to concerned with perfection at this point.  It is important that no matter what color undie you use that you let it dry before sponging the gradient.  If you sponge on wet polish, you will remove the base polish and end up with bare spots.  After giving my two-tone base a few minutes to set, I then used a makeup sponge and applied my sponge gradient, blending the line between the colors.  I have not tried this method with three colors, just with two.  This method is great for colors that are a bit sheer or if you don't want to sponge many layers to get a heavy opacity.  It took me two sponge applications to achieve the blend and opacity that I was looking for.  On an average when I create a gradient, I typically do 3-5 sponge applications over white or light base. 


I then removed my mani mask, did a quick clean up and applied a layer of top coat.  I also applied a glitter to my pinky this time just to change it up a bit.  I'm really beginning to like pinky bling.


I then hand painted a dream catcher on my ring finger.  Using a small brush, I started off by dotting three dots in a half circle at my cuticle to use as a guide.  I drew the half circle, spokes, and three strands hang from the catcher with my brown polish.  On the center strand I drew the outline of a feather with the same brown polish.  I roughly filled in the feather with tan polish and then highlighted it with some of my glitter polish.  I finished up the design by dotting some brightly colored beads with a small dotting tool.


On my three remaining fingers I painted a single feather in the same manner that I did with the feather on the dream catcher.  The only difference is that I curved the feathers slightly.


I've always liked hand painted feathers in the nail art designs I've seen and other artists make them look so easy, but sadly these didn't come out exactly the way I had hoped.  Perhaps, if I try them with acrylic paints versus the polish I will get better results.  I really like the gradient though, the gradient colors I used are two of my favorite CG polishes of all times.  I hope you found the gradient tip useful, thanks for stopping by, see you next time.

Your Fellow Plebe,


Friday, April 3, 2015

Carroticure

Hello Lovelies!  I have a very cute Easter design for you today, that is bright and colorful, a carroticure. 


Materials I used:
Base coat - Seche Vite
Base polish - Paint Box Polish 'Marshmallow Peeps'
White polish - Sinful Colors 'Snow Me White'
Acrylic paints - orange, white, green, brown
Detail brush
Large dotting tool
Top coat - Seche Vite


I started out with three thin coats of Paint Box Polish 'Marshmallow Peeps,' this is one of the polishes I received in the Indie Bunny Mani Box.  I love this pastel yellow shade, full of silver shimmery flakies.


I then used orange acrylic paint and a small detail brush to create small carrot shape triangles.  I then toned down the orange with some white to create a little orange shade.  Using the detail brush I drew light orange lines across the triangles.  Lastly, I used green paint and the same small brush to paint leafy tops.


On my accent nail (ring finger) I painted the backside of a chocolate Easter bunny, with a white tail.  I performed a quick clean up and applied a shiny top coat.


This is a really fun and cute Easter design, perfect for a full manicure or just use it to accent another Easter manicure design.  It also works well on short or long nails too, just adjust the size of the carrots to fit accordingly.  I hope you enjoyed this Easter nail art design, thanks for stopping by, see you next time.

Your Fellow Plebe,


Wednesday, April 1, 2015

Garden Easter Egg Hunt

Hello Lovelies! Today is the first day of April, and the first decent day we've had here in NY in a long time. My nails of the day, are for two challenges; the weekly NPQ Spring challenge, and my first submission for a new Instagram challenge, the Freehand challenge, Flowers.  Of course, I had to make it an Easter themed manicure, well because Easter is coming up and it's my third favorite holiday.


This post is more of a show n' tell than a tutorial because it is primarily freehand and because my tripod broke which made it difficult to take pictures for each step.  However, I do have a few pictures to show you.  Special thanks to my hubby for helping me with taking the double hand shots.

I started off this design with two coats of Color Club 'Blank Canvas' and Nicole by OPI matte top coat.  I applied Ellagee's Liquid Latex Mask around my cuticles to help with the clean up process.


I then did a sponge gradient using Essie 'Truth or Flare,' 'Sew Psyched' and Color Club 'Blank Canvas'.  I removed the latex, performed a brief clean up and applied another layer of matte top coat.


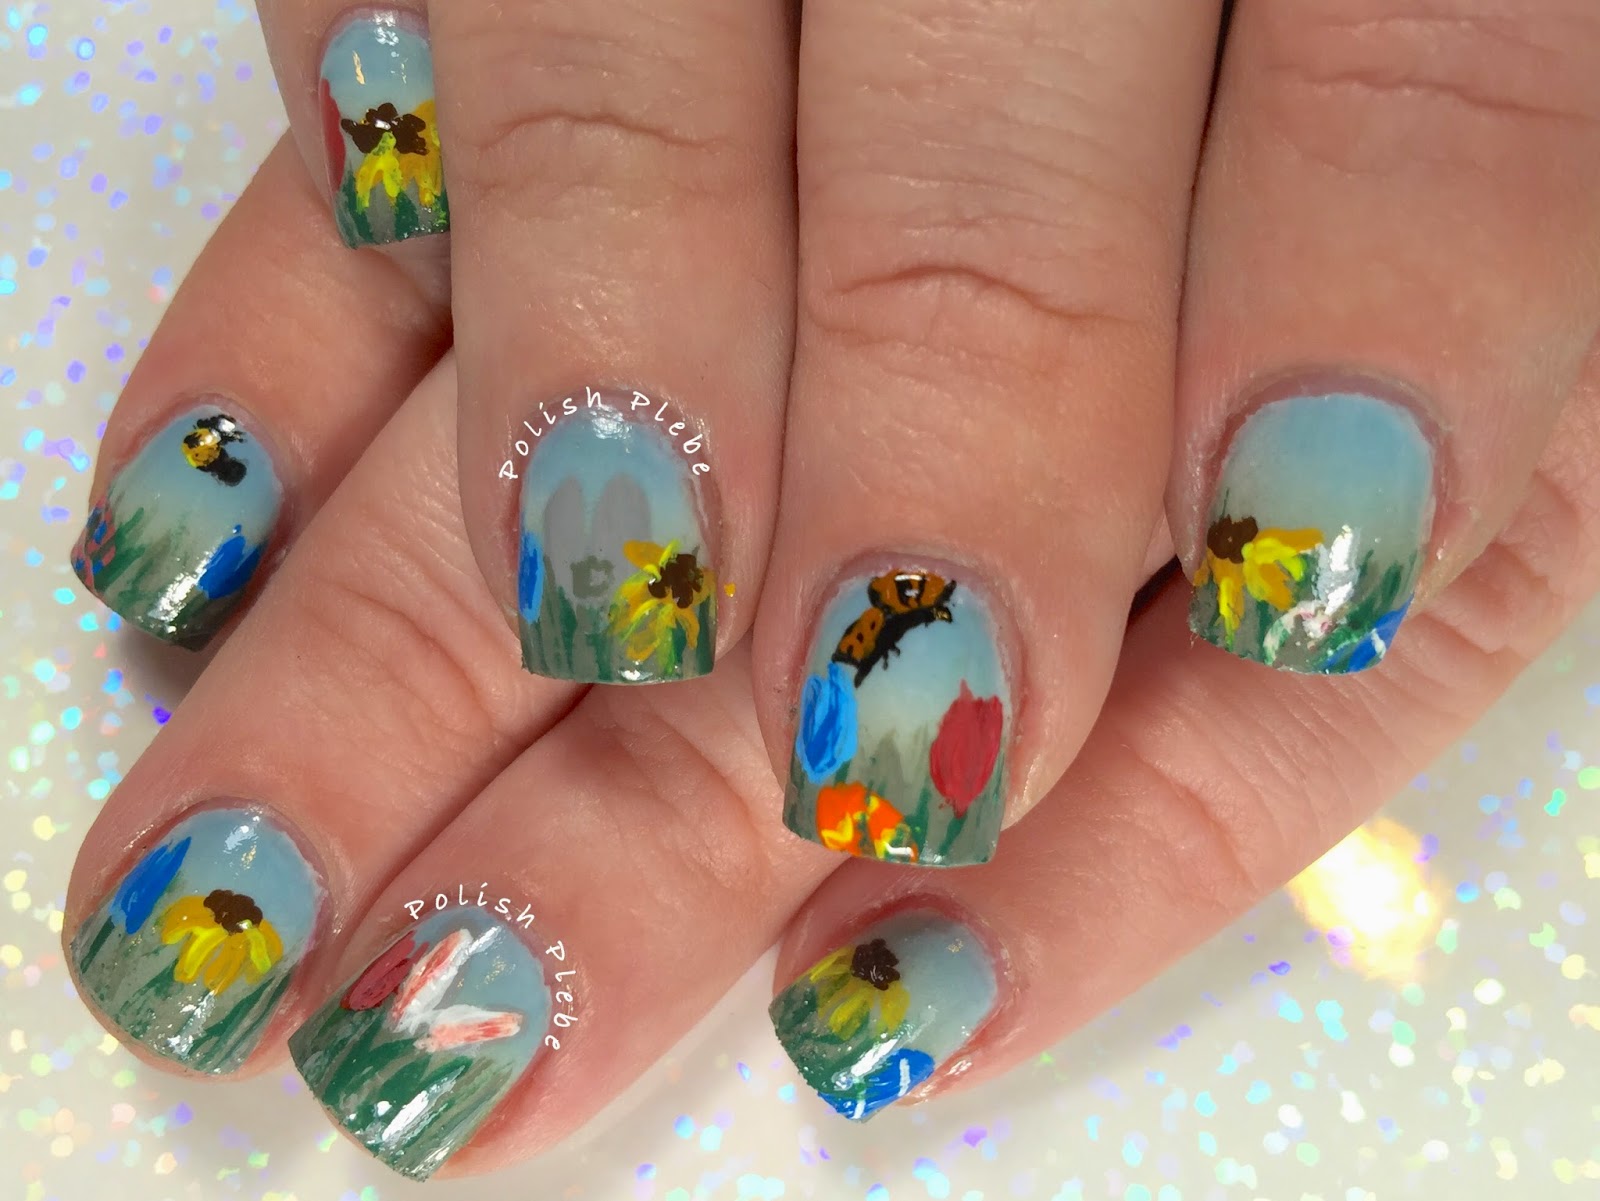
Then using a large variety of brushes, dotting tools and acrylic paints, I freehand a scene including flowers, Easter eggs, and various other little things.  I topped this all off with a shiny top coat.


This turned out a bit more abstract than I intended it to, but I really like the way it looks.  It has everything that I wanted.  The above picture was painted with my non-dominant hand and I'm really proud of the control I have achieved with my left hand.  What more could I ask for, well maybe more fingers to paint on, because I'm so proud of this I don't want to take it off.  I hope you enjoyed this nail art design just as much as me.  Thanks for stopping by, see you next time.

Your Fellow Plebe,


Tuesday, March 17, 2015

Gilded Gold Shamrock

Happy Saint Patrick's Day!  I had so many ideas for St. Paddy's Day nail art designs, but like always I didn't have enough time to create them all.  However, I wanted to create one more design for this week's Nail Polish Queens' Challenge.  I saved this one for the NPQ challenge because I felt the design was fit for a queen.


I happen to find some gold calligraphy ink the last time I was at my local craft store, so I thought it was time to try another calligraphy pen design.  I used a calligraphy pen in a previous Valentine's Day design and I really liked using it.  This is what I came up with this time around...


I created the gilded gold shamrocks over Revlon Colorstay 'Rain Forest' which I topped with a matte topcoat.  I find that the matte topcoat helps applying the calligraphy ink. 


I decided when the design was complete to add a glossy top coat, and paired it with one of the polishes from the 7 Tales of Luck & Whiskey indie collaboration set I mentioned in my last post.


This seriously glittery green and gold polish is Simply Beautiful 1973 'Blarney Stone.'  I'm not a big glitter fan, I never really have been but I just can't get enough of this.  It's so sparkly and incredibly opaque, I applied two coats both in the swatches and for today's nail art.


As for today's nail art, you can see from the pictures that I drew the design on both hands.  This is the first time I have ever wielded a calligraphy pen with my non-dominant hand.  Though I need a great deal of practice with using the calligraphy pen (with both hands), I am pretty pleased with the results.


I hope you enjoyed this nail art design, and I hope you are all having a wonderful St. Patrick's Day.  Thank you for stopping by, see you next time.

Your Fellow Plebe,


Wednesday, March 11, 2015

Smoosh Attack!

Hello Lovelies! Welcome to the middle of the week, I hope you are all having a wonderful week so far.  Reading the title of this post, some of you might be thinking I've lost my mind.  Though I may not be completely sane, the title is intentional.  A smoosh attack is a technique...What?!  It also happens to be this week's Nail Polish Queens Challenge.

I'll be honest, I wasn't too sure about this technique but after looking it over I decided I should give it a try.  This technique and its name originate with @With2L on Instagram.  The technique is relatively easy, and is kind of hard to do wrong.  This is what I came up with...


I initially tried this technique without a base color and decided that it was better to use a base color.  So, I started out this design with 2 coats of Butter London 'Petrol.'


With my base color dry, I started my Smoosh Attack!  In order to do this technique you need two stampers.  I happen to have two that came as a set from bornprettystore.com, item #15851.


For this technique simply apply your polishes to the stamper.  I tried both swiping and blobbing polishes on the stamper and it didn't really make much of a difference.  With the polishes applied to one of your stampers, use the other stamper to smoosh them together.  Then stamp it onto your finger.  With one smoosh (two stampers) I was able to cover one nail completely.


I used Butter London 'Petrol,' 'Slapper,' and 'Queen Vic' and Smoosh Attacked all my nails!


However, as I was cleaning up my cuticles I decided this looked kind of like paper mache.  This reminded me of an elementary school project I did as a kind to create an underwater shadow box.  So, I ended up hand painting scales in Marc Jacobs 'Stone Jungle' with a small brush on my ring finger.  Like any elementary school project, this nail art wasn't completely without some glitter.  I used Butter London 'Lovely Jubbly' and applied two coats right over the Smoosh Attack.


I think the hardest part of this technique is finding polishes that don't overpower one another but work well together.  I'm really glad I went ahead and tried it, I think this will make a great base technique to put under stamping and other patterns.  Plus, I finally know what to do with the stampers that I don't often use because I'm not very good at stamping.


I hope you found this technique fun and interesting.  Thanks for stopping by, see you next time.

Your Fellow Plebe,


Social Gadgets

Random Nail Art

Background