Showing posts with label China Glaze. Show all posts

Wednesday, April 29, 2015

Dream Catcher Nail Art Design

Hello Lovelies!  I wasn't going to share these because this is one of those cases that the design looked better in my head.  We've all been there.  I decided to share them though, because I like to share everything with you plus I have a tip on how to speed up the gradient process.  I created these nails for this week's Nail Polish Queen Dream Catcher challenge...


Materials I used:
Base coat - Seche Vite
Polishes - China Glaze 'Don't Honk Your Thorn' (tan), 'Towel Boy Toy' (blue), 'Community' (brown), 'Release' (grey), 'Beach Cruise-r' (pink), and 'Boundary of Memory' (glitter)
Mani mask - Ellagee 'Lickity Split Latex Mani Mask'
Top coat - Rica 'Glossy Glam'
Makeup sponge
Small brush
Small dotting tool

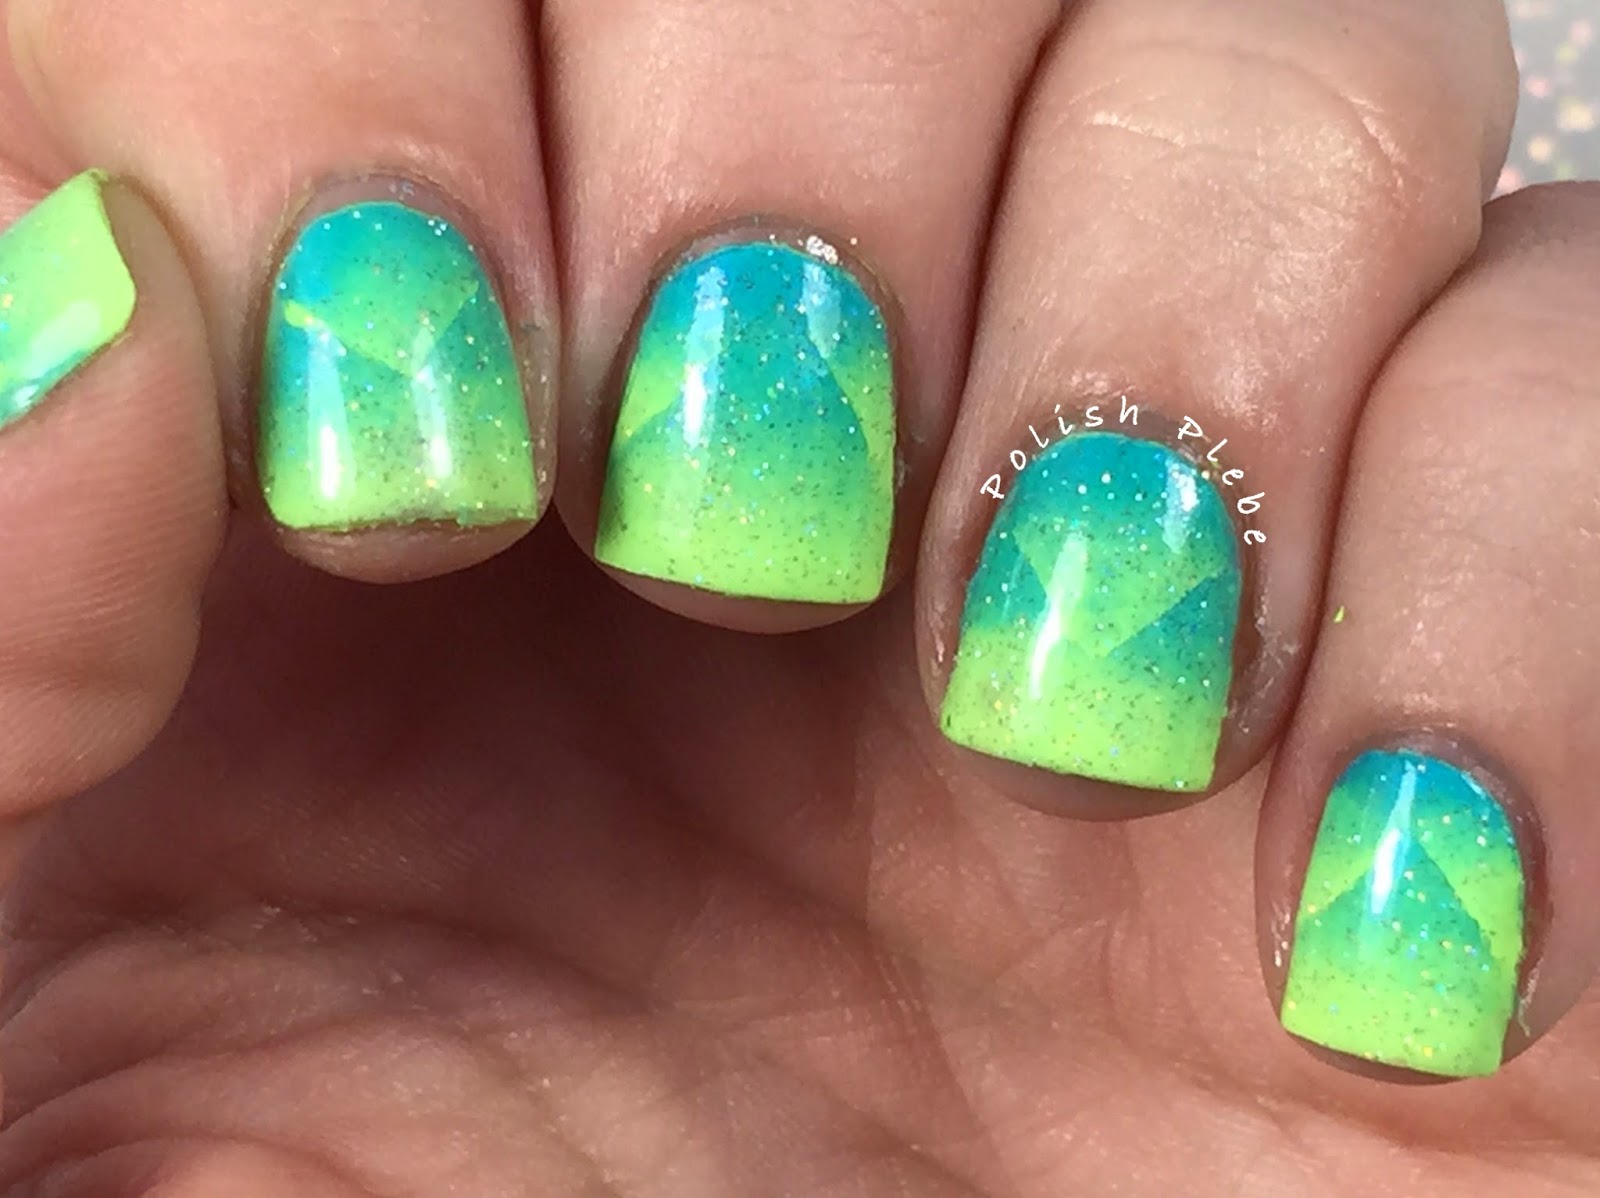
I created a gradient for my background on all fingers except my pinky but I used a slightly modified method to speed up the process.  Typically, when creating a gradient you either want to use a white or light colored polish to sponge over.  This allows the gradient colors to be more vibrant and takes fewer sponged coats.  However, using a white or one shade of color may not be ideal in all situations.  For instance, the blue that I used was a bit jelly like and if I applied the tan on my entire nail it would have changed the color slightly, also the blue was to dark to put under the tan, and quite frankly I didn't want to bother with white undies.  So here is what I actually did...

I applied my mani mask around my nails to protect my skin and speed up the clean up process.  I then painted the upper half of my nail with the tan polish and the lower (free-end) portion of my nail with the blue.  I allowed the colors to overlap slightly and wasn't to concerned with perfection at this point.  It is important that no matter what color undie you use that you let it dry before sponging the gradient.  If you sponge on wet polish, you will remove the base polish and end up with bare spots.  After giving my two-tone base a few minutes to set, I then used a makeup sponge and applied my sponge gradient, blending the line between the colors.  I have not tried this method with three colors, just with two.  This method is great for colors that are a bit sheer or if you don't want to sponge many layers to get a heavy opacity.  It took me two sponge applications to achieve the blend and opacity that I was looking for.  On an average when I create a gradient, I typically do 3-5 sponge applications over white or light base. 


I then removed my mani mask, did a quick clean up and applied a layer of top coat.  I also applied a glitter to my pinky this time just to change it up a bit.  I'm really beginning to like pinky bling.


I then hand painted a dream catcher on my ring finger.  Using a small brush, I started off by dotting three dots in a half circle at my cuticle to use as a guide.  I drew the half circle, spokes, and three strands hang from the catcher with my brown polish.  On the center strand I drew the outline of a feather with the same brown polish.  I roughly filled in the feather with tan polish and then highlighted it with some of my glitter polish.  I finished up the design by dotting some brightly colored beads with a small dotting tool.


On my three remaining fingers I painted a single feather in the same manner that I did with the feather on the dream catcher.  The only difference is that I curved the feathers slightly.


I've always liked hand painted feathers in the nail art designs I've seen and other artists make them look so easy, but sadly these didn't come out exactly the way I had hoped.  Perhaps, if I try them with acrylic paints versus the polish I will get better results.  I really like the gradient though, the gradient colors I used are two of my favorite CG polishes of all times.  I hope you found the gradient tip useful, thanks for stopping by, see you next time.

Your Fellow Plebe,


Thursday, March 19, 2015

Scaled Gradient

Hello Loves!  Once again I have fallen behind on some of the nail art challenges, I committed myself to completing.  This is for last week's Nail That Technique Challenge on Instagram: Scaled Gradient.  If you are confident with your gradient abilities this will be an easy but time consuming nail art for you.  If you are not great at gradients this nail art design gives you ample opportunity to practice.  I'm okay with gradients but like almost anything I could use some practice. This is what I came up with...


I was concerned that this design wouldn't work well with my nails, because as you can see I recently brought them back down to nubtown.  Too many of my nails were breaking and chipping and I could no longer stand the unevenness, so I'm back to shorties.  However, the design still worked well.  If you think your nails are too short for this design you could also do it vertically versus horizontally (which is how I did it).

Back to the technique and what I did.  This is a layered sponge technique that requires some time to create.  If you are in a hurry, don't bother with this technique.  I started off with one coat of China Glaze 'Grass is Lime Greener' from the City Flourish collection.  The purple stuff on my cuticles is Ellagee's 'Lickity Split Latex Mani Mask'.  This was one of the goodies in my Indie Bunny Mani Box that I was lucky enough to get my hands on (reveal, swatches, and review coming this weekend...hopefully).  If you don't have a latex mask please save yourself some time and either use Elmer's glue or tape.  This will save a lot of clean up time.


I then used a make up sponge and did a gradient of China Glaze 'Towel Boy Toy' (an oldie but a goodie) and 'Grass is Lime Greener.'


I concentrated the gradient toward the tip (free end) of my nail.  I layered the gradient until it reached an opacity that I was happy with.  I then applied a quick drying top coat.


When the first layer of gradient was dry, I added single chevron vinyls from nailvinyls.com and covered the exposed area on the tips of my nails with scotch tape.  You'll notice that I alternated the direction of the V-shape to keep things interesting.


Once, again I repeated the sponge gradient process on the exposed area of the nails.  Keeping the gradient colors in the same order as previously sponge.  For example, I used green near the tip and the blue near the cuticle with the first layer, and repeated that pattern with the next layer.  If you reverse the colors between layer your creating a reciprocal gradient instead of a scaled gradient.  I sponged until, I once again, reached my desired opacity and then I removed my vinyls, tape, and latex mask.  You can see that I still have some clean up to do, but definitely not as much if I hadn't protected the skin around my nails.


At this point I performed my usual clean up with a brush and acetone.  To make things a little more interesting I added a sprinkling of China Glaze 'Fairy Dust'.  Lastly, I topped of with a super shiney top coat, Rica (aka Justricarda) 'Glossy Glam' another of my goodies from the Indie Bunny Mani Box.


The final result, in my opinion is awesome!  There are so many different combinations of colors and shapes you can do to create this kind of gradient.  I've seen it done with chevrons, straights, lightning bolts; I've seen it done horizontally and vertically.  Really the possibilities are endless.  If you need more inspiration, I highly recommend you checkout the YouTube Channel of the original creator of the scaled gradient Simply Nailogical (or at least I'm pretty sure she started this all).  She has several different videos on this technique (I bet you wish I told you that at the beginning of this post, so you could have skipped reading this altogether, but I was diabolically clever, hehehe!).


Even though this was a very time consuming technique, I am glad I tried it out.  I hope you enjoyed this nail art design, thanks for stopping by, see you next time.

Your Fellow Plebe,


Monday, March 9, 2015

Dotted Stripe Nail Art

Happy Monday! I hope you've all had a wonderful weekend and I hope your Monday is treating you well so far.  The weather is finally starting to warm up here in NY, the sun is shining, and I even heard birds singing this morning.  I don't want to get my hopes up too much, but I think this just might be the beginning of Spring!

I originally planned this design using darker and more neutral colors, but I decided to change the color scheme to reflect the bright and cheery weather we have had the last couple of days.


I used four shades of China Glaze, to create this look.  I apologize but I forgot to take a picture of this with just the base shades but the colors are: the green is 'Grass is Lime Greener,' the pink is 'Peonies & Park Ave' both of these shades are from last springs City Flourish collection.  The blue is 'Capacity to See Beyond,' and the purple is 'The Giver's Theme,' both of these are from The Giver collection.

With my base colors applied, I used my second smallest dotting tool and began a pattern by placing a small dot near the smile line of my nail.  I then placed the next dot below, I continued the pattern vertically down the length of my nail.  I tried to place the dots as close together without overlapping them.  Make sure that you wipe the dotting tool after each color, so that the colors don't bleed or blend.


This is such a simple design but the final look is so fun and cute.  This is another great design for beginners because it doesn't require a great deal of skills or unique tools.  Remember, if you don't have dotting tools, you can use almost anything as a dotting tools; toothpicks, bobby pins, a needle, even an old pen that doesn't work could all be used as a dotting tool.


I am really glad I decided to do this with a bright colorful palette.  However, this design could be done with so many different color palettes to give it a different look.  For a soft spring look use pastels, for a subtle sultry look use darks and reds, or maybe you want to do a nautical them using blue, white, silver, and gold.  The possibilities with this one simple design are endless.


I hope you enjoyed this nail art design as much as I am, and I hope you'll give it a try.  Thanks for stopping by, see you next time.

Your Fellow Plebe,


Wednesday, November 26, 2014

Tweed Nail Art

Winter is on its way here in the Northeastern United States for some of us its already here. With temperatures dropping and snowy weather moving in, many of us are looking for ways to stay warm. Heavy coats and sweaters are being brought out of storage and put to good use. I wanted to create a warm and interesting nail art design and what I came up with was this tweed like print.


Materials
Base and top coat (matte optional)
4-5 shades of polish
Stripping brush

I started with a nude base color, China Glaze 'Don't Honk Your Thorn' from their City Flourish collection. I know I just used this with Monday's design but it'll mostly be covered up by the end of this tutorial anyways.


I then started adding layers using the dry drag method. I do not have pictures of this method but it seems pretty simple to explain. The dry drag method is when you remove as much of the polish from the applicator brush by wiping on the side of the bottle. I also swiped my brush on a paper towel before application.

The first layer of dry drag was China Glaze 'What are You A-Freight of?' from their All Aboard collection. I did not cover the nail completely but did a staggered brick pattern horizontally across the nail. This left some blank space but no worries there are more layers coming.


For the next layer of dry drag I used China Glaze 'Don't Get Derailed' also from the All Aboard collection. I concentrated on filling in the slightly bare areas and brushed vertically this time allowing the layer to overlap the previous one a bit.


Next I added in some tweed stitches, I used China Glaze 'Well Trained' another from the All Aboard collection and a stripping brush to create thin vertical lines and t-shapes.


I repeated the previous step using China Glaze 'Swing Baby', I'm not sure what collection this is from but it's a favorite of mine that I purchased at the beginning of my nail polish addiction.  You'll notice I used all cream colors except this last one. I felt it need a little sparkle but not too much because there are not too many sparkly tweeds out there.


I did my clean up and add a matte top coat. You could of course use a regular top coat of youd like but I feel the matte top coat gives it a slightly more realistic affect.


I'm actually really enjoying this nail art design; it's one of those ones that look better in person than it does in pictures. This is a great fall/winter nail art design, it incredibly easy, perfect for beginners, and I hope you'll try it out. 


Don't forget that it's #whatruwearingwed. Head over to my Facebook page and post your nail art designs there or use the hashtag on your Instagram pictures and tag me in the comments so that I find it easily. Please like and follow me while youre there or follow me by clicking the 'Join this Site' icon on the top right hand side of the screen. You can also follow me through Google+Bloglovin, and/or Pinterest. I hope you are all staying warm and cozy, thanks for stopping by, see you next time. 

Your Fellow Plebe,


Monday, October 20, 2014

Witchicure

I have been looking for an excuse to do a green and purple combination nail art design and when I was looking over my new Halloween image plate from bornprettystore.com and noticed the little witch, I thought what better theme than a witch theme manicure. So I created these witch skittles using a variety of techniques…


Materials
Base and top coat
Purple, 2 shades of green, & gray polish
Black nail art stripper
Stripping brush
Sponge
Image plate and stamp
Nail Vinyls
Glow in the dark polish (optional)

Witches Cauldron
On my thumb I painted a bubbling witches cauldron. For my base color I used China Glaze 'All Aboard' (from the All Aboard collection). I then topped that with two coats of Sinful Colors 'Glow in the Dark'.


Using a black nail art stripper I drew a half circle at the tip and filled it in.


Then using a green cream polish, in this case Zoya 'Tilda' (from the Tickled collection), and a stripping brush, I filled in a small portion of the black cauldron. The shape is almost and lens shape.


To make the witches brew bubble I used a dotting tool and dotted Zoya 'Tilda' above the brew and Zoya 'Stassi' (from the Bubbly collection) in the brew to give it texture.


Witches Hat
On my pointer I painted a very simple witches hat. I started out with my purple base color again and again topped it with my glow in the dark polish.


I then used my black nail art stripper and drew a very narrow (close to the tip) curved line and filled it in to the tip to create the brim of the hat.


Using the same nail art stripper I then drew a triangle atop the brim.


Then using my green cream polish and a stripping brush I drew a stripe along the brim and the base of the hat.


Witch Face Silhouette
On my mid finger I hand drew the silhouette of a witches face. I started with a base color of Zoya 'Stassi' and topped with my glow in the dark polish.


Then using a thin stripping brush and black polish I drew three lines somewhat horizontally from the side of my nail. These will be the brim of the witches hat, her nose, and her chin.


I then very carefully filled in that side of the nail, and created the contour of her face complete with a wart on the crook of her nose and her chin.


Witch Flying Across the Moon
On my ring finger I decided to use my stamped image of a witch flying on her broom stick. I started with a gray base color, China Glaze 'Five Rules' (from the Giver collection). I gave the moon a very slight amount of texture by taking a very small piece of sponge and dabbing a very small bit of a dark metallic purple over the surface. For my metallic purple I used China Glaze 'Choo-Choo Choose You' (also from the All Aboard collection). I then topped this with my glow in the dark polish.


I created the outline of the moon by using a thin stripping brush and my purple polish used on my thumb and pointer and traced the edge of my nail. Because my tips are squovals I had to curve the lower corners a bit more than the uppers, to create the round moon shape.


I then applied my witch stamp using bornprettystore.com image plate QA26 item #5689 and their black stamping polish item #1381 . Remember if you purchase from bornprettystore.com use coupon code: CREATEX31 for 10% off your purchase.


Witch Stockings
For my pinkie I did a simple stripe design representing witch stockings. I started with my sparkly Zoya 'Stassi' and topped with my glow in the dark polish and a coat of quick drying top coat.


After waiting for my base polish(es) to dry I applied to straight nail vinyls from nailvinyls.com horizontally across my nail. I cannot stress enough how important it is to wait for the polish to dry before applying vinyls or tape. Also keep in mind that the more layers of polish you have the longer it takes for it to dry even with a quick drying top coat.


With my vinyls in place I painted my purple polish over top and then quickly removed my vinyls.


I topped all my nails with a quick drying top coat once I was complete with the designs. I really love this spooky design and the purple and green combination. I'm particularly fond of the witch on her broom flying across the moon, especially in the dark when it glows.


I hope you enjoyed these witchy skittles, thanks for stopping by, see you next time.

Your Fellow Plebe,


Social Gadgets

Random Nail Art

Background