Showing posts with label simple nail art. Show all posts

Friday, July 15, 2016

Coloring Book Nails - Nicole Diary Water Decal Review

Hello Lovelies! Today, I have another set of Nicole Diary water decals to share with you. This time I've added a fun little twist that will help you customize your water decals so you can create a look all your own. I created my look with these water decals that are a black outline floral design over a clear background.


The nice thing about these decals is that because they are relatively simple (black and clear) you can do so many different things to make them look unique. You can place them over a gradient, a smoosh, any shade of polish you like, really the possibilities are endless. I started with a simple white base. 


I then applied the water decals to all my nails. If you would like a pictorial on how to apply these water check out my previous review Black, White, & a Pop of Color


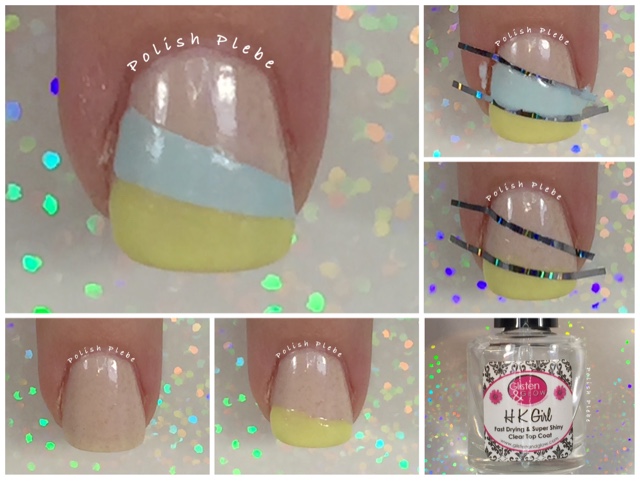
As usual perform any necessary cleanup and apply your favorite topcoat. 


And there you have a beautiful black and white design with little effort. Now you could leave it at that, there is always a time and a place for a black and white manicure. But maybe you're looking for something different...

Apply a matte topcoat, and allow to dry completely. I only let my topcoat dry for about 30 minutes and I should have waited longer. Of course, different matte topcoats will have different drying times. Just be sure that the topcoat isn't soft, if you can touch it and not leave a fingerprint you should be safe to proceed. 


Then bust out your favorite markers and start coloring. I personally prefer my fine tip Sharpies, which are perfect for this small print. I recommend a stippling motion for coloring in the design. 


When your done you can apply a glossy topcoat. I left mine matte because I wanted this to look like the pages of a coloring book. 


This is a great way to personalize a water decal design and it is very easy to do. 


You could also wear the black and white design for a little while and then add the color later. 


You can find these and othe Nicole Diary water decals through their Amazon or Aliexpress stores. They offer a wide range of unique water decals and other nail art supplies. You can use my code TAL2016 to get a free gift with you purchase. I hope you enjoyed this personalized water decal design and found the tutorial useful. Thanks for stopping by, see you next time.


Your Fellow Plebe,


Friday, July 8, 2016

Shell Nails - LadyQueen.com Product Review

Hello Lovelies! Today, I have a review of some very pretty self adhesive Shell Vinyl appliques from ladyqueen.com.


I was very intrigued by these when I first saw them online.  They come in many different colors, this is pattern #11. I wasn't sure what to expect, they appeared very rigid and I thought they would be difficult to work with.  I was very surprised as to how flexible they are.


They are semi-transparent, that is why I started with a black base, so that the shell would appear a bit darker.  I also applied a quick drying top coat on the base polish before applying the applique.


After fitting the shell applique to my nail I trimmed a piece from the sheet and cut it to fit the curve of my nail.  This material does not dissolve with acetone, so you need to cut the shape you wish to achieve.  After trimming the applique, simply peal off the backing and apply it to the nail.  Press down firmly, and trim any excess from the free end of your nail.


I also applied a quick drying topcoat over this applique to help secure it to the nail as well.


This Shell Applique is very unique and pretty.  It requires some skill to use, because you have to be precise in how you cut it.  Otherwise, it is a very easy product to work with.  I feel this would make a great design applique, cut in stripes or other patterns instead of a full nail applique as I've done here.


You should checkout these shell appliques Item #0849, it comes in 12 different colors that are absolutely stunning. While your there at ladyqueen.com, check out their Hot Sales, Special Prices, New Arrivals, and Top Trends for the latest and greatest in nail art supplies and accessories.


In addition to their already great prices, they offer free shipping worldwide, and you can use my code: QJXS15 for 15% off of your purchase.


I hope you found this review useful and enjoyed this design.  Thanks for stopping by, see you next time.


Your Fellow Plebe,


Monday, June 20, 2016

Simple Asymmetrical Stripes

Hello Lovelies! I have been drooling over Anchor & Heart Lacquer since they first started out and I finally order a few of Taryn's gorgeous polishes. I order these three beauties: "The Free Spirit," "The Selfless," and "Sweet Love."


I couldn't figure out which one I wanted to wear first so I decided to use all 3 and came up with this simple asymmetrical striped design…

Materials I used (in addition to the polishes named above):
Dream Polish "Smooth Gem" Basecoat
Striping tape
HK Girl topcoat
Small rhinestones

I started with "The Selfless" on my thumb, pointer, and pinkie. I applied "Sweet Love" on my mid and ring finger. Both of these polishes applied beautifully, I ended up applying 3 coats only because I was having problems with my nail ridges. I think if I had applied 2 coats of my basecoat I would have only needed 2 coats of color. So these polishes are easily a 2-3 coater. 


On my 2 mid fingers, the ones with "Sweet Love," I created the asymmetrical stripe design. I painted the tip of the nail with "The Free Spirit." I then applied a layer of quick drying topcoat and allowed it to dry. I then applied striping tape horizontally across the nail, making one side narrower than the other. I filled in the middle section with "The Selfless" and immediately removed the tapes. 


I repeated the process on the adjacent finger but reversed the side where the stripe was narrowed. 


I then performed a little cleanup, applied a layer of topcoat as well as 3 rhinestones at the narrowest side of the stripes. 


I can't tell you how much I love these polishes. My photos don't do them true justice. "The Free Spirit" is a beautiful yellow with a gold irridescent shimmer. "The Selfless" is a lovely soft blue with a pink irridescent shimmer (that my camera just wouldn't photograph). "Sweet Love" is a wonderful nude polish with bits of bronzy golds. 


I like to think of this design as a symbolic representation of an ocean view. "Sweet Love" represents the sandy beach, "The Selfless" is the tranquil waters of the ocean, and "The Free Spirit" is the warm summer sun. 


I am so smitten with these polishes, I am more than certain I'll be purchasing more Anchor & Heart Lacquer in the future. Taryn's polishes are so much more beautiful than my pictures show, you really should see them in person. 


I hope you enjoyed this nail art design and found my mini review of these polishes useful. Thanks for stopping by, see you next time. 


You Fellow Plebe,


Tuesday, December 1, 2015

Black and White Interlock

Hello Lovelies!  This week's Nail Art Nation prompt is black and white.  Since you can't have one without the other, I thought an interlocking design would be perfect for this prompt.  I have done this pattern once before Interlocking Dot Nail Art, and it is relatively easy to create...


Materials I used:
Basecoat - SuperChic Lacquer 'Bring it On!'
White polish - Sally Hansen Xtreme Wear 'White On'
Black polish - Sally Hansen Xtreme Wear 'Black Out'
Quick drying topcoat - SuperChic Lacquer 'Marvel'
Scotch tape
Dotting tools
Holo topper - Dream Polish 'Dream Dust'

I began with a white canvas.  When doing an overlapping design it is best to start with the lightest color or the thinnest polish for your base.  Of course, I don't recommend using a thin polish for an overlapping design, but sometimes you have a polish that you just have to use.  I topped this with a quick drying topcoat.


When the base color was dry, I taped off half of my nail at an angle, painted it black, and immediately removed the tape.  Using a medium/large dotting tool I interlocked the black and white by placing black dots on the edge of the black overlapping into the white, and likewise with the white.  Switching to a smaller size dotting tool I placed a dot of each color in line with the previous dot.  Lastly, I did that with an even smaller dotting tool, filling in any voided area but still keeping it in line with the other dots.  I repeated this pattern on all my nails, but alternated the black and the white on each nail.

After a bit of clean up with acetone and a brush, I topped it  with a holo topcoat.  Dream Polish Gem Glam topcoat also happens to be a quick drying topcoat, so no need to apply another topcoat.


And here is a macro shot so that you can see that holo bling, I only added one coat because I wanted a very subtle holo affect.  More coats would have increased the holo factor but I like it just like this...


I really enjoy creating the interlocking design because it seems so complex, yet is very easy.  This design is perfect for a beginner, and requires only basic tools.  I hope you enjoyed this nail art design, see you next time.


Your Fellow Plebe,


Friday, November 13, 2015

Watercolour Fall Foliage

Hello Lovelies!  Today, I have a very easy, yet very pretty DIY watercolour mani for you.  I created these for this week's WNAC, this month's theme is elegant and this week's prompt is watercolour.  I think some of the most elegant nail art designs are simple and subdued, that is why I went with this design...


Materials I used:
Basecoat - SuperChic Lacquer "Bring it On!"
Base polish - China Glaze "Don't Honk Your Thorn!"
Sharpies in red, brown, orange, and yellow
91% Isopropyl rubbing alcohol
Small plastic or glass container, such as a shot glass or paint pallet
Small brushes
Brown polish - Color Club "Fondue for Two"
Topcoat - New York Color matte topcoat


I started with my favorite nude polish for a base color, China Glaze "Don't Honk Your Thorn!"  I opted for a nude base because I wanted my colors to be subdued, not too bright.  If you want your watercolour to turn out brighter, I would recommend a white base color.


I had to make my own watercolour because I don't own any.  I've seen many nail artist use Sharpies to make their own waercolours and I've used Sharpies to create watercolour nail art before but with a different technique (Sharpie Gradientish Stripes). For this nail art, I used the more conventional method.  Using a glass or plastic container, color the bottom with a Sharpie (I started using a shot glass, but switched to a plastic paint palette by the second color).  Then pour a small amount of rubbing alcohol into the container.  Use a brush to mix the Sharpie ink and the alcohol together.  For more opaque colors use as little rubbing alcohol as possible for less opaque colors add more rubbing alcohol.


I blobbed on my watercolours in random areas of my nail.  Continuing the process with various fall colors until I was satisfied with the layers and coverage.

Then using a thin brush and dark brown polish I painted thin trees and tree limbs to give the appearance of Autumn trees.


I cleaned my cuticles with rubbing alcohol and a brush, and applied a matte topcoat.


It has been a while since I have fallen madly in love with one of my nail art design, but this is a keeper.  I love the fall colors, I love matte texture, and I love the subtle, yet eye catching colors.  I feel this nail art design has a simplistic elegant feel to it.  How about you?  Do you think this is elegant?  If not what qualities do you feel a nail art design needs to be deemed elegant?


Whether or not you think this is elegant, I hope you enjoyed this nail art design.  I highly recommend you try creating your own watercolours using Sharpies.  It's easy to do and a great way to add some interesting color and texture to your nail art.  Thanks for stopping by, see you next time.

Your Fellow Plebe,

Tuesday, November 10, 2015

Glitter Rhinestone - Lady Queen Beauty Review

Hello Lovelies!  I was recently contacted by Lady Queen Beauty and asked if I would like to review their product.  They have so many wonderful nail art products and accessories that I couldn't resist.  One of the items I choose to review were these gorgeous Multi Colored Rhinestones.


These Multi Colored Rhinestones Item # NA0285 come in a wheel and include two sizes of gems in just about every color of the rainbow.


The Rhinestones have a 3D shape and a nice iridescent appearance that make them shine like jewels.  These stones also have a somewhat metallic finish which makes them very opaque (in other words you cannot see through them).

I decided to use these Multi Colored Rhinestones  to create a French tip nail art design.  Using a binder hole reinforcement dot I created a deep French tip, by placing the reinforcement dot approximately 1/3 from the tip of my nail.  I then filled in the tip with black polish and immediately removed the reinforcement dot to prevent the polish from pulling.  I used Sinful Colors "Black on Black" because this is my go to black polish.

I then used the Multi Colored Rhinestones along the smile line of the French tip I just painted.  I used three larger stones in the middle and a smaller stone on either side.  I applied these stones by applying a topcoat and pressing the stones into the topcoat while it was still wet.  I then applied another layer of topcoat over the stones to seal them in place.


I prefer the topcoat method for applying stones and studs because I change my nail art often and I find it easier to remove the studs without damaging my nails.  If you intend to wear a manicure with studs for an extended period of time, I would recommend using nail glue to apply the studs instead of the topcoat method.  I would also recommend using nail glue if you are using a significantly large gem or charm, because the topcoat will not hold them for long.


I highly recommend you checkout the gorgeous and very economically priced nail art items that Lady Queen Beauty has to offer.  They offer the latest in Nail Art Trends, not to mention Daily Deals and Hot Sales, in addition to their already great priced items.  They also offer free shipping on top of their great prices.  You can earn points for purchases, product reviews and photo/video uploads to their site, that you can redeem on future purchases.  If that's not enough and you want more, you can also use my coupon code: QJXS15 for 15% off!  It really doesn't get any better than that.


I hope you enjoyed this nail art design and found the review useful.  Be sure to use my coupon code when you make a purchase with Lady Queen Beauty.  Thank you for stopping by, see you next time.

Your Fellow Plebe,


Social Gadgets

Random Nail Art

Background