Showing posts with label elegant. Show all posts

Friday, July 8, 2016

Shell Nails - LadyQueen.com Product Review

Hello Lovelies! Today, I have a review of some very pretty self adhesive Shell Vinyl appliques from ladyqueen.com.


I was very intrigued by these when I first saw them online.  They come in many different colors, this is pattern #11. I wasn't sure what to expect, they appeared very rigid and I thought they would be difficult to work with.  I was very surprised as to how flexible they are.


They are semi-transparent, that is why I started with a black base, so that the shell would appear a bit darker.  I also applied a quick drying top coat on the base polish before applying the applique.


After fitting the shell applique to my nail I trimmed a piece from the sheet and cut it to fit the curve of my nail.  This material does not dissolve with acetone, so you need to cut the shape you wish to achieve.  After trimming the applique, simply peal off the backing and apply it to the nail.  Press down firmly, and trim any excess from the free end of your nail.


I also applied a quick drying topcoat over this applique to help secure it to the nail as well.


This Shell Applique is very unique and pretty.  It requires some skill to use, because you have to be precise in how you cut it.  Otherwise, it is a very easy product to work with.  I feel this would make a great design applique, cut in stripes or other patterns instead of a full nail applique as I've done here.


You should checkout these shell appliques Item #0849, it comes in 12 different colors that are absolutely stunning. While your there at ladyqueen.com, check out their Hot Sales, Special Prices, New Arrivals, and Top Trends for the latest and greatest in nail art supplies and accessories.


In addition to their already great prices, they offer free shipping worldwide, and you can use my code: QJXS15 for 15% off of your purchase.


I hope you found this review useful and enjoyed this design.  Thanks for stopping by, see you next time.


Your Fellow Plebe,


Sunday, March 1, 2015

Matte & Metallic Nail Art

Happy Sunday All!  I hope you are all having a pleasant weekend so far.  We are enjoying another snowy day here in New York (said in my most sarcastic tone ever while rolling my eyes).  Even though I hate the snow, it does give me an excuse to stay indoors and get some nail art done.

Since I purchase the Essie Cashmere Matte collection I have had many ideas of different nail art designs I would love to create using them.  I decided to do something super simple, we'll call this a super simple Sunday nail art design, using matte and metallic polish.  I created this very easy dotticure with a stripped finger accent...


I started this out with Essie's 'All Eyes on Nudes' on all my fingers, except for my ring finger which is Color Club 'Antiquated.'  I also applied a quick drying top coat over 'Antiquated.'  Of course, you don't put a top coat over the matte polish because it will no longer be matte if you do.


On my accent (ring) fingers I applied straight nail vinyls from nailvinyls.com once my polish was dry.  Of course, you can use stripping tape, or scotch tape to create your stripes.  If you're really talented you can free hand your stripes.  I'll like vinyls because they are quick, easy, and create nice clean lines.  With my vinyls in place, I applied Essie's 'All Eyes on Nudes' and then removed my tapes.


For all my other fingers, I used the smallest dotting tool that I own and created this super cute tiny polka dot dotticure.  The size of the dotting tool I used is equivalent to the size of a toothpick.  Make sure that when you use any kind of dotting tool (toothpick too) that you occasionally wipe the tip.  If you don't the polish builds up on the end and you end up with different size dots.  When I was all done dotting I did a little clean up with acetone and a brush, and that's it.  Remember no top coat, unless of course, you don't want the matte affect.


What I like about this nail art design is that the similar color tones make the design subtle, yet the different finishes (matte and metallic) make it eye-catching.  I really like this design and I hope you do too!  Thanks for stopping by, see you next time.


Your Fellow Plebe,


P.S. What do you think of the new background?  I purchased a few different ones from my local craft store.  I'll be trying them out on different posts and I need an honest opinion.  If you don't like them I don't want to keep using them and if you love them I definitely do.  Thanks in advance for your input ; )

Wednesday, February 25, 2015

Reverse French Tip Using SmArt Nails Stencil

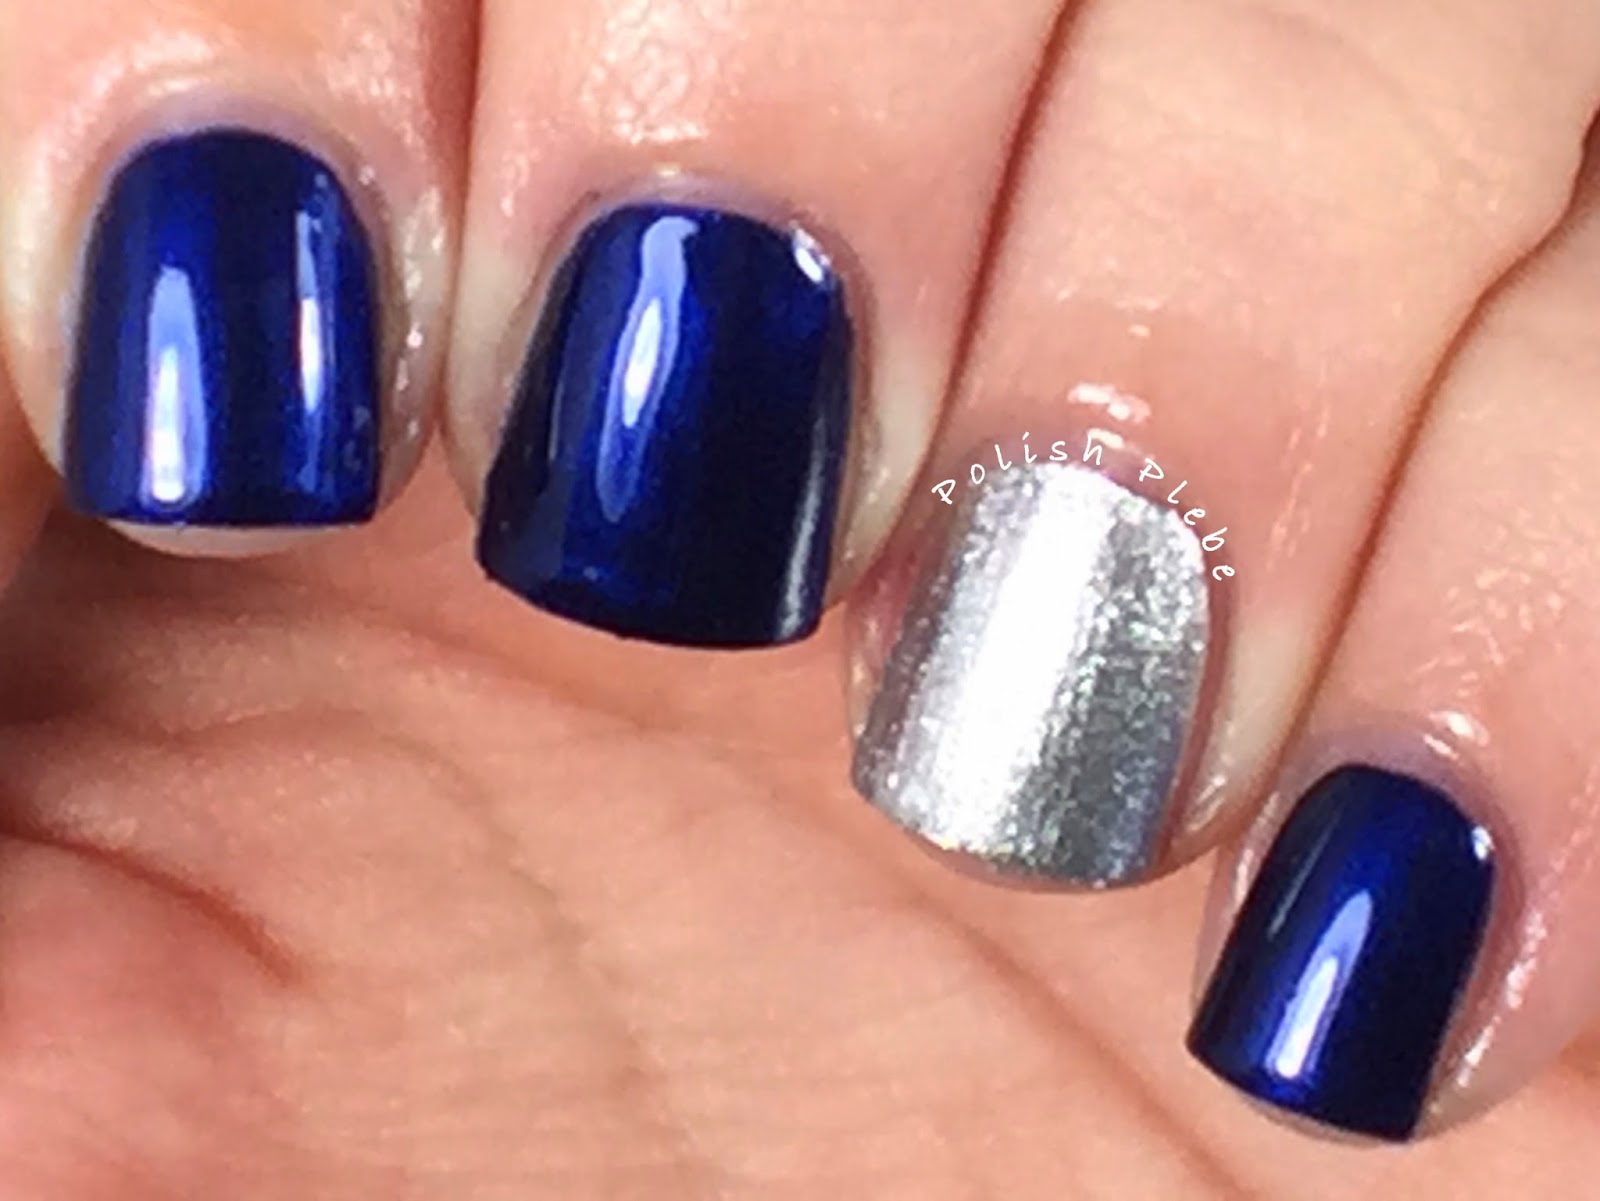
Hello Loves!  I have been craving a silver and blue manicure lately, and I need a reason to use the SmArt Nails Stencils I have had since before Christmas.  This is what I created...


I apologize for the picture being slightly out of focus but the silver that I used made it difficult to get clear pictures.  As you can see I did what I'm calling a reverse French tip on all but my ring fingers, on which I did a normal French tip.  I feel that doing a decorative French tip on my nails makes them look even shorter than they are so I normally avoid doing them.  That is why I decide to reverse the design and created the decorative area near my cuticle.

I started out with one coat each of Ciate 'Knee High,' and Revlon 'Metallic.'  I used these two colors in particular because they are very opaque with one coat, since I will be doing a couple layers this keeps it from getting too thick.  It also gives better coverage when applying one shade over the other.  This silver is also my go to silver because I love it so much.  After applying my base colors I did apply a quick drying top coat, because I am too impatient to let my base colors dry on their own.


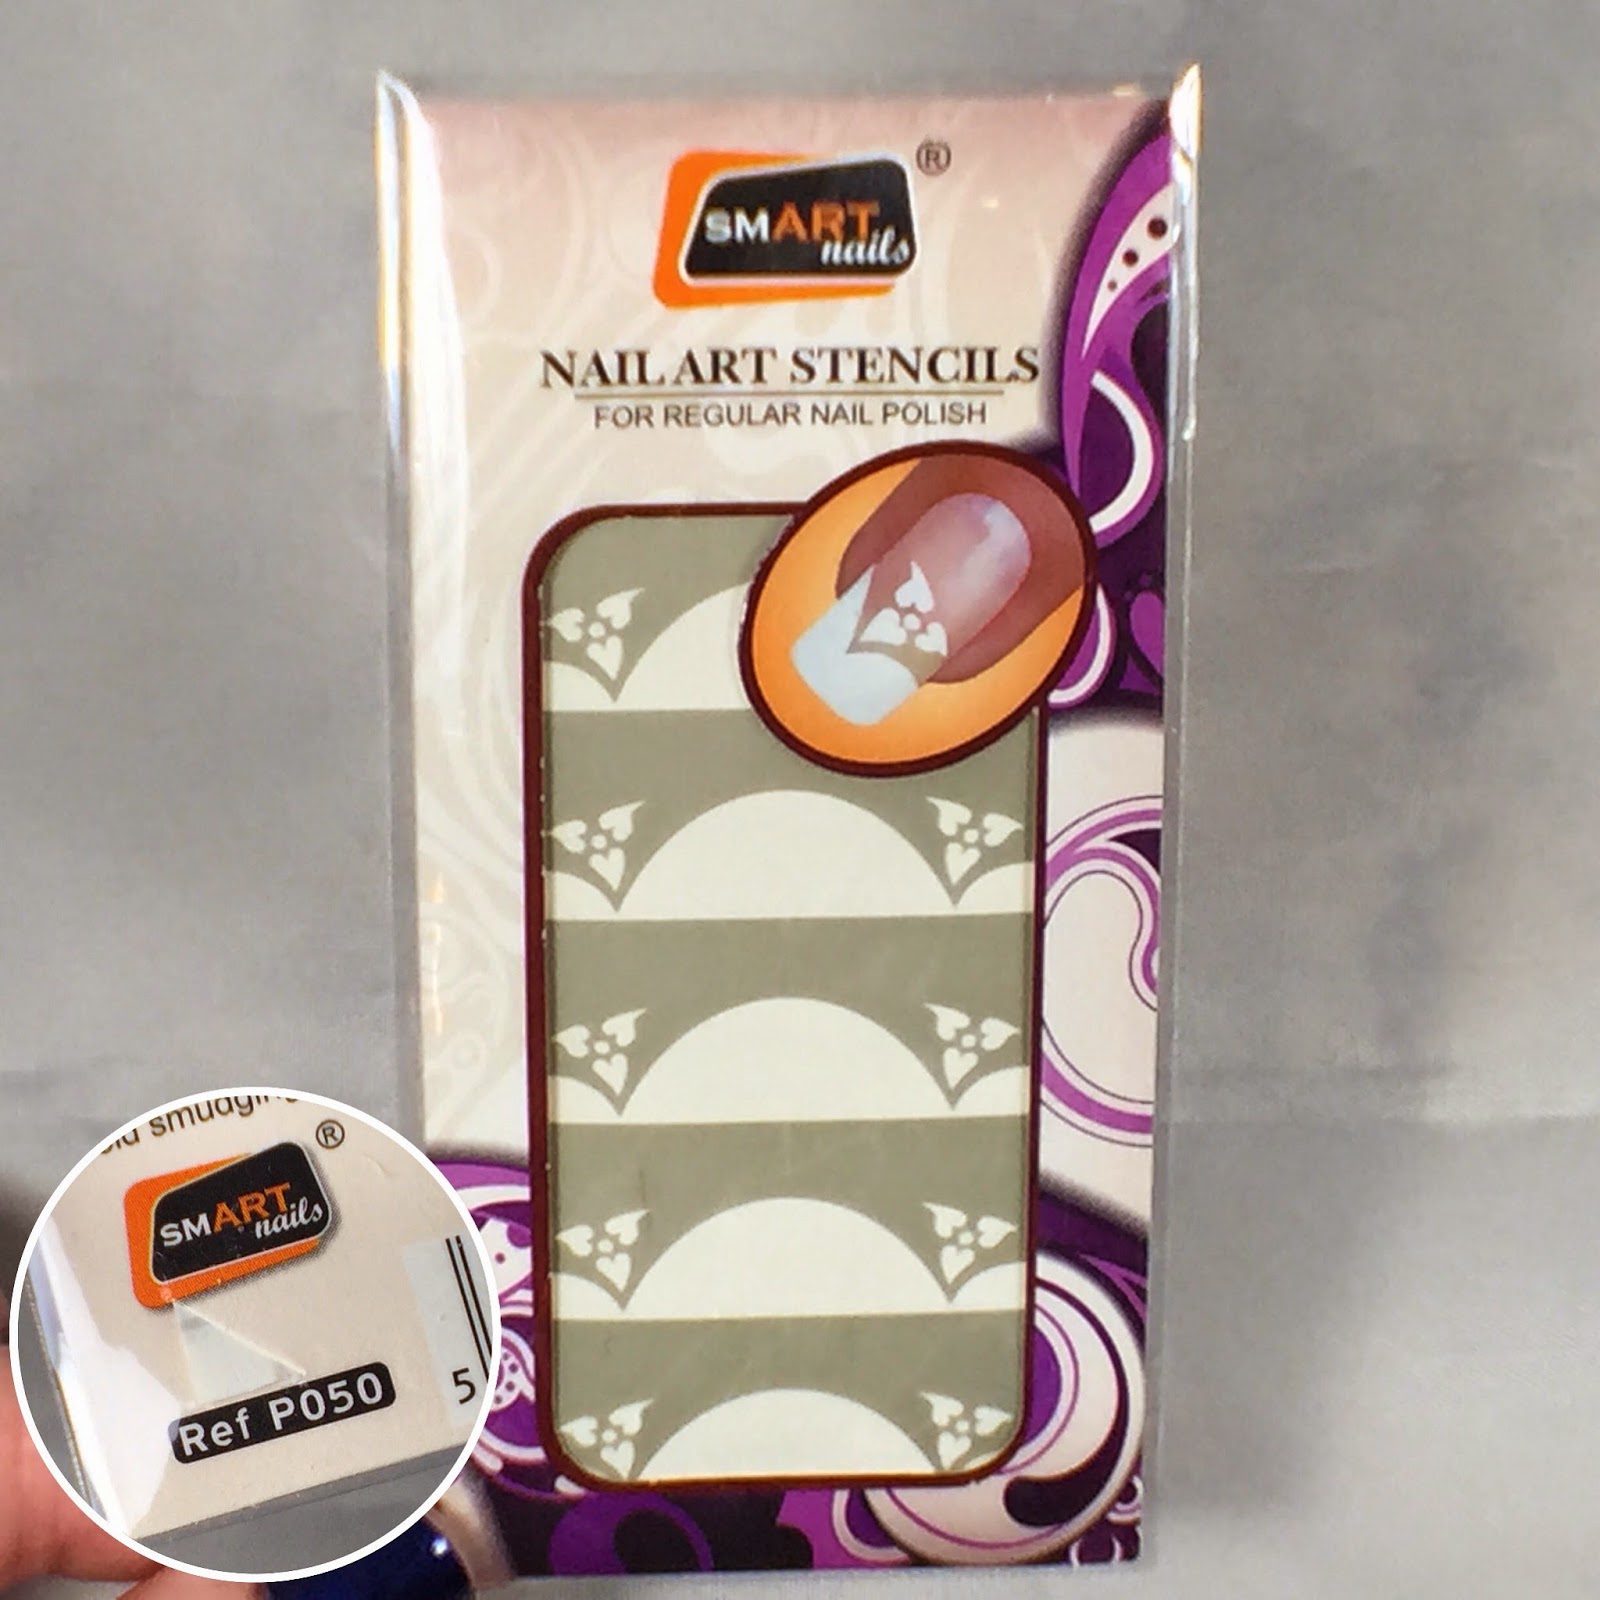
With my base polishes dry I used my SmArt Nails Nail Art Stencils.  I won these back in December, on Facebook.  They often do Facebook giveaways, but if you don't want to wait for lady luck to shine favor on you, you can purchase them on their site http://www.smart-nails.com/.  They are running a 25% off sale right now until February 28th and their prices are already phenomenal so check them out.  The stencil that I used for this design is P050, but they have many other designs to choose from.


Using these stencils are no different than using any other nail stencil, tape, or vinyl.  After your base polish is dry, apply the stencil.  Be sure to smooth out the stencil and press it firmly to ensure air pockets don't occur near the edge of the design.  Use your finger or a cuticle pusher to push it firmly down along the edge of the nail bed and cuticle area.  Apply your secondary color, and then immediately remove the vinyl.  It's just that simple!


Some of you might be asking, if these are just like other stencils and vinyls why would I purchase these SmArt Nails Stencils.  Even though they are just as easy to use, SmArt Nails Stencils are very high quality and you can get a couple of uses out of them unlike other products that are one time use.  I used four out of the ten stencils provided in the pack to do both of my hands.  Additionally, there are so many different designs to choose from, whether you like classic, funky, pretty, or romantic designs they have something for everyone.  And did I mention their prices are phenomenal!  If you would like to see another mani I created using SmArt Stencils check it out here.


Back to my design...for my completed look, I applied the design just as seen in the pictorial above on my thumb, pointer, and mid finger.  On my ring finger (silver finger), I flipped the stencil around so that the tip of the nail was exposed and applied my secondary color.  This is the way the packaging shows the stencil being used.  On my pinky I only used the flower part of the design because I felt my pinky was too small for the entire design.  I did a little clean up, applied a top coat and added rhinestones to the center of my flowers.  I'm not sure why, but rhinestones are my thing right now.  I did a macro shoot of this design on my ring finger, to give you a better look at it...


This silver and blue combo satiated my craving for a silver and blue mani, and the SmArt Stencils made it quick and easy to create.  I hope you enjoyed this nail art design, thank you for stopping by, see you next time.


Your Fellow Plebe,


Wednesday, February 11, 2015

Lattice Glitter Gradient

For Christmas, my best friend got me Sally Hansen Triple Shine 'Dream Sequins.'  I love copper tones so this was just perfect for me.  It has been sitting in my untried stash for far too long, but I was having a hard time deciding what to do with it.  This is what I finally came up with...


I started off with OPI 'Thank Glogg It's Friday' and a quick drying top coat.  I was originally going to use a black base color but I decided that this rich burgundy color would give this nail art design a more sultry look.


Once my polish dried I applied stripping in tape in a criss-cross pattern near my cuticle. With the tapes in place I sponged my 'Dream Sequins' over the lattice.  I did this in 3-4 coat applications, concentrating nearer to the cuticle with each layer.  Of course, I then removed the tapes, performed some clean up and applied a final layer of top coat.


 I am really glad that I went with this burgundy base color instead of the black.  Though the black and copper would have been nice, I think this combo is slightly more unique.  I'm also glad I finally got to use this beautiful glitter polish (though I know I'll be complaining later when I have to take it off).


I hope you enjoyed this simple yet glitzy nail art design.  Thank you for stopping by, see you next time.


Your Fellow Plebe,


Saturday, January 24, 2015

Calligraphy "Love" Nail Art

About a week (maybe two) ago, I was scrolling through Instagram when I saw a post from one of my favorite Instagram gals, @sloteazzy.  She was using a calligraphy pen to create a nail art design.  My first reaction was, face palm!  Why didn't I think of that?!

I have been interested in calligraphy for a long time.  I think I got my first calligraphy set when I was thirteen or so.  Though I don't write in calligraphy all the time, I do scribe an occasional letter now and then.  I think it is kind of fun to write letters and send them snail mail every once and a while.  I like it even more when I get a response the same way.

Anyways, I broke out my calligraphy pen and some ink and tried it out.  Since, this was a trial run I didn't want to create anything to elaborate, so this is what I did...


I started off with Color Club 'On Cloud Nine' from the Love Tahiry collection (swatches of this collection coming soon), and topped this off with Nicole by OPI Matte top coat.  I thought the matte finish would help catch the ink better.


Since, it has been a bit and because I wasn't sure exactly which tip I wanted to use, I practiced scrolling some letters on paper before I started out on my nails.  I ended up using the smallest tip I own, though the medium tip would have worked well too.


I then carefully scribed the letter L. O. V. E. on each nail.  It worked much better then I had anticipated.


I didn't want to leave my thumb bare so I went a head and drew a heart with the calligraphy pen and used a red nail art striper to fill it in.


A couple pointers if you are going to try this out:

  • If you have never used a calligraphy pen before, I strongly recommend you practice on paper first.  Unlike a ball point pen you have to practice to determine the best hold and pressure as well as determining which style text you prefer.
  • If you have curved nails like mine (baseball shaped, curved both horizontally and vertically), you may have to adjust your grip slightly.
  • Some ink may be a bit runny, if that is the case try to use a little ink at a time and don't apply too much pressure.  You may also have to go over the same area twice, I did in a couple of spots.
  • Use a matte top coat or a slightly textured polish to help capture the ink.  Stay away from high gloss or very  smooth finish because the ink will roll or run off.
  • One of the most forgiving things about the ink that I used was that it washed off easily.  In, fact I was having trouble with my E, and had to start over three times before I finally got it right.
  • Also this ink does take a bit of time to dry, so if you intend to use a top coat give it a few minutes before application.
 I liked the way this looked with the matte finish and wasn't going to use a top coat, but then I thought what the heck.  I need to see how the ink was going to react with the top coat anyways.  So, here it is with Seche Vite quick drying top coat...


I am super excited that this little experiment worked out, I think it has a real romantic feel to it.  Now I need to practice writing smaller, try different colored inks, and practice using my none dominant hand.  So, I'm pretty sure you will be seeing more nail art designs from me in the future using a calligraphy pen.  I hope you enjoyed this nail art design, and found the tips useful.  Thanks for stopping by, see you next time.


Your Fellow Plebe,


Sunday, January 18, 2015

Vintage Style Nail Art

Hello Darlings!  Anyone who knows me well, knows that I love vintage and retro styles for just about everything from clothing, to décor, and even nail art.  I had a dinner party to attend last night and decided to wear one of my favorite 50 style dresses.  What better way to accessorize my ensemble than with some vintage style nails: polka dot and stripes accented with some roses.


I started off with Color Club 'Look, Don't Tusk' and 'Apple of My Eye.'  Originally, I was going to do three accent nails and then changed my mind, but I forgot to take another starter picture after I changed my pointer to 'Apple of My Eye.'  You'll see the change in all the other pictures though.


I used striping tape over the 'Look Don't Tusk' on my ring finger and used 'Apple of My Eye' as my secondary color.  I also used 'Apple of My Eye' and a small/medium dotting tool to dot my mid finger.


Over top I drew simple roses using three pink shades of Zoya; 'Wendy,' 'Rooney,' and 'Dot.'  I also used Zoya 'Tilda' and Revlon 'Emerald' for the leaves.


I felt my other nails seemed a bit boring so I added a medium and a small dot of Color Club 'Look, Don't Tusk' over 'Apple of My Eye.'  I also dotted a smaller dot of Color Club 'Bright Knights, Big City' in the center of each white dot, unfortunately this is barely visible.


I really like the stripes and polka dots with roses, it is such a classic look.  The burgundy color was a great accent color against my dress too.  If I had been smart, I would have taken a picture of them together, alas I did not.  However, my dress was a similar shade of green to Zoya 'Tilda', maybe a shade darker.  This is a nail art that will be difficult for me to part with, I've worn it all weekend (I applied it Friday evening).  I think the off white shade of 'Look, Don't Tusk' really leant to the vintage style, don't you?


I hope you enjoyed this nail art design, thanks for stopping by, see you next time.

Your Fellow Plebe,


Thursday, January 15, 2015

Liquid Eyeliner Nail Art

Hello Lovelies!  A few weeks ago I was scrolling through Facebook when I spotted a post from Nail It Magazine.  It was a tutorial in which the artist used liquid eyeliner as a medium for creating a nail art design.  Sadly, I never made note of who the artist was and can no longer find it, so if you know who it is that I am referring to I would love some insight.  Anyways, I decided to try it out for myself.


I started off this nail art design with Butter London 'Nail Foundation' on my ring and mid finger, and Butter London 'Baroness' on all other fingers.  I decided to use the nail foundation because I wasn't sure if my nails would be stained by the liquid eyeliner.  I also decided against using a typical base coat because the finish on the nail foundation is more of a satin finish that would be less "slick."


I started off my liquid eyeliner design by framing the nail.


I decided that I didn't want to make the design too complicated so I just drew some simple curly-q's and squiggles to fill in the nail.


I also decided that I wanted to give 'Baroness' a little gradient, so I sponged Salley Hansen's Big 'Smokey' Top Coat over the tip of my nails (excluding the accent fingers).


In all honesty, I didn't care for how my liquid eyeliner applied.  It was a bit streaky and I had to go over some spots multiple times to get consistent lines.  I did however, like that it dried really quickly.  I think if I was in a bind and really wanted to create a design I might try this again.  But I think that using acrylic paints or polish is a better medium than the liquid eyeliner.


I do like the design though, I like the negative space on the accent nails, and 'Baroness' is a nice subtle color.  I hope you found this post insightful, and enjoyed this nail art design.  Thanks for stopping by, see you next time.

Your Fellow Plebe,


Social Gadgets

Random Nail Art

Background