Showing posts with label Matte. Show all posts

Monday, February 8, 2016

Holo Matte Hearts

Hello Lovelies!  Happy Monday to you all!  Today, I have a super quick nail art design for you.  I recently won a lovely giveaway from I.AM...Custom Color Cosmetics and I couldn't wait to use some of my goodies, so I threw together this quick mani using some of my prizes (not all items used are from the giveaway)...


Materials I used:
Basecoat - Dream Polish 'Smooth Gem'
Pink Holo - Glisten & Glow 'Raspberry Margarita'
Quick drying topcoat - Glisten & Glow 'HK Girl'
Heart shaped nail vinyls from Nails Redesigned
Matte polish - Bad Bitch Polish 'Masker'

After applying my protective ridge filler base coat, I applied two coats of bright pink holo polish.  I topped this with a layer of quick drying topcoat, because I am using vinyls to create my design.


Once, my topcoat was dry, I applied a couple of heart outline vinyls to my ring finger.  I applied a layer of matte polish over top, and than immediately removed the vinyls.  When working with vinyls or tapes and a matte polish, it is important to work quickly to prevent pulling.  I recommend if you are doing multiple fingers to work one finger at a time.


I repeated this process on my pinky finger, as well.  Then I performed a bit of cleanup with gentle acetone and a brush.  I did not apply any topcoat to my pinky or ring finger because I didn't want to negate the matte affect.


I love this color combination, the dark teal green and the bright pink really pop.  I also like the contrasting finishes too.  This makes a great Valentine's Day mani or just a cute mani to wear any ol' time.  I hope you enjoyed this nail art design.  Thanks for stopping by, see you next time.


Your Fellow Plebe,


Friday, December 11, 2015

Textured Cable Knit

Hello Lovelies! This week's WNAC2015 prompt is Christmas Sweater. I've always liked fuzzy cable knit sweaters in neutral colors. However, I don't use gel and I've never worked with acrylic. So, I decided to try to make my own 3D texture.


Materials I used:
Basecoat: Yellowstopper
Essie 'Wrap Me Up' Cashmere Matte
Baking Soda
Dotting tool
I began with a solid base of matte polish. I used matte polish because I don't own any shiny sweaters.

I mixed a small amount of matte polish with baking soda. Using a dotting tool, I created a cable knit pattern. I had to layer this in some places to give it the dimension I wanted.


Once, I was satisfied with the pattern, I applied another layer of the matte polish to help smooth out the texture slightly.


Though the pattern is imperfect and a bit rough, I like the realistic feel of the overall design.  I hope you too enjoyed this design, and if you want to do 3D nail art without gel or acrylic I recommend you try the baking soda method. I've also heard of some people using flour to achieve the same thing. I'm curious if anyone has tried thismethod for 3D nail art? Thanks for stopping by, see you next time.


Your Fellow Plebe,


Thursday, November 5, 2015

Mustache-icure

Hello Lovelies!  I have been having a difficult time staying motivated with nail art, so I decided to pick up a challenge for November.  For this month I thought I would give the Instagram #WNAC2015 a shot.  The over all theme is elegant, followed by weekly prompts.  This week's prompt is Movember.

No that's not a typo, Movember aka No Shave November is a movement to help support male wellness, encouraging men to exercise, eat healthy, and get regular checkups.  The primary goal of Movember is to bring about awareness of prostate and testicular cancer.  Many men show their support by vowing not to shave for the month of November, many growing elaborate moustaches in the process.  For (most) women growing a moustache is not really achievable so instead we create moustache nail art.  This was what I created...


Materials I used:
Basecoat - SuperChic Lacquer "Bring It On!"
Polishes - OPI "You're so Vain-illa", "Icebergers and Fries", "My Voice is a Little Norse", and Sinful Colors "Black on Black"
Medium/small dotting tool
Small detail brush
Topcoat - New York Color matte topcoat

I started with an off white on my pointer and mid finger, black on my ring finger and thumb, and added a glitter polish to my pinky.


For my moustaches I decided to try to go for a handlebar style stache.  Surprisingly, this is the first time I have ever done a moustache of any kind on my nails, however, it is relatively easy.  Start by placing two dots side by side with a dotting tool.  Then using a small brush, create a tail to either side of the dots.  I created a pattern of four to five moustaches on each finger and added sparkly dots between them to add a touch of elegance.


I did the same pattern over the black base as I did over the off white.  I simply changed the colors of the moustaches.


I performed my usual clean up with gentle acetone and a brush, and this time I added a matte topcoat.  I have never applied a matte topcoat over a glitter polish but I thought the affect was pretty interesting, almost stone like.


My goal with this manicure was to make it both masculine, since it is for Movemeber, yet incorporate a little bit of elegance so that it fit the theme of the WNAC.  I'm not quite sure I met the criteria of my goals, but I think I came pretty close.  What do you think?  Either way I hope you enjoyed this nail art design, thanks for stopping by, see you next time.


Your Fellow Plebe,
   

Friday, October 2, 2015

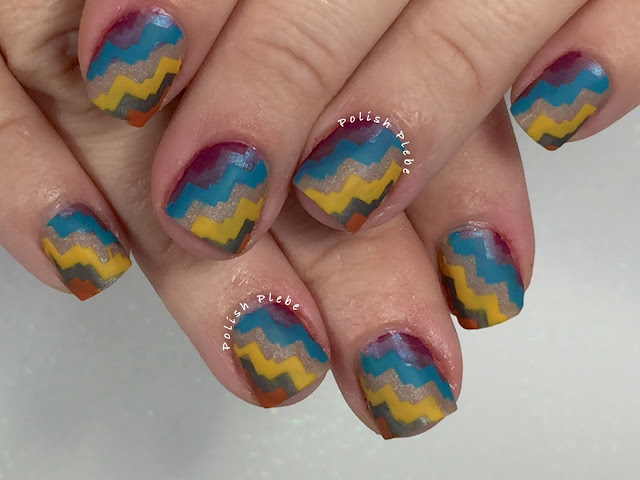
ZigZag Nails Inspired by @lifeisnails

Hello Lovelies!  Today, I have a mani I created because I was inspired by the wonderfully talented Ramie of : +Lifeisnails.  I have been following her on Instagram, @lifeisnails, for a while and when she posted her Colorful Zigzag Nails a couple months back, I knew I had to try them.  I finally got around to creating my own version of her nail art, and this is what I came up with...


Materials I used:
Basecoat/polishes/matte topcoat - all from the Butter London "Gears & Gadgets" Steampunk Trunk, I purchased last year.  It is no longer available on their site.
Vinyls - TwinkledT "Frisky Chevron" (I purchased these a while ago, and I'm finally getting around to using them.)

I'll share with you how I created these nails but I would recommend you checkout Life is Nails on G+ or Instagram for a video tutorial (links to both accounts above), it will help tremendously though this is not a difficult nail art design.

Start out by painting three diagonal stripes in three different colors across the nail.  I wasn't concerned about them being perfect, but it is important that they are wide enough for a single vinyl to cover.  Apply a quick drying topcoat, and allowed to dry.  With the base colors dry, apply a vinyl over each stripe.  Proceed by painting a different color between each vinyl, be sure to remove the vinyls as quickly as possible to avoid pulls.


After a bit of cuticle clean up with gentle acetone and a brush, I applied a matte topcoat just to change it up a bit.


I love the design created by Ramie, and it was fun to recreate it though a little time consuming.  The only major differences, between hers and mine, is that I tried for a more Autumnal color scheme, used different vinyls (frisky chevrons vs. standard chevrons), and I applied a matte topcoat. 


All in all, I like Ramie's better but that is because she created them first.  Ramie, Life is Nails, is a major inspiration of mine, and I hope to be half as good as she is some day.


I hope you enjoyed my version of Life is Nail's Zigzag nails.  I'm curious about who inspires your nail art the most, is it fellow nail artist, a celebrity, a family member or friend?  Who's art do you look to when you find yourself in the need of a little encouragement? Please comment down below, I love to discover other nail artists and techniques.  Thanks for stopping by, see you next time.

Your Fellow Plebe,
    

Sunday, March 1, 2015

Matte & Metallic Nail Art

Happy Sunday All!  I hope you are all having a pleasant weekend so far.  We are enjoying another snowy day here in New York (said in my most sarcastic tone ever while rolling my eyes).  Even though I hate the snow, it does give me an excuse to stay indoors and get some nail art done.

Since I purchase the Essie Cashmere Matte collection I have had many ideas of different nail art designs I would love to create using them.  I decided to do something super simple, we'll call this a super simple Sunday nail art design, using matte and metallic polish.  I created this very easy dotticure with a stripped finger accent...


I started this out with Essie's 'All Eyes on Nudes' on all my fingers, except for my ring finger which is Color Club 'Antiquated.'  I also applied a quick drying top coat over 'Antiquated.'  Of course, you don't put a top coat over the matte polish because it will no longer be matte if you do.


On my accent (ring) fingers I applied straight nail vinyls from nailvinyls.com once my polish was dry.  Of course, you can use stripping tape, or scotch tape to create your stripes.  If you're really talented you can free hand your stripes.  I'll like vinyls because they are quick, easy, and create nice clean lines.  With my vinyls in place, I applied Essie's 'All Eyes on Nudes' and then removed my tapes.


For all my other fingers, I used the smallest dotting tool that I own and created this super cute tiny polka dot dotticure.  The size of the dotting tool I used is equivalent to the size of a toothpick.  Make sure that when you use any kind of dotting tool (toothpick too) that you occasionally wipe the tip.  If you don't the polish builds up on the end and you end up with different size dots.  When I was all done dotting I did a little clean up with acetone and a brush, and that's it.  Remember no top coat, unless of course, you don't want the matte affect.


What I like about this nail art design is that the similar color tones make the design subtle, yet the different finishes (matte and metallic) make it eye-catching.  I really like this design and I hope you do too!  Thanks for stopping by, see you next time.


Your Fellow Plebe,


P.S. What do you think of the new background?  I purchased a few different ones from my local craft store.  I'll be trying them out on different posts and I need an honest opinion.  If you don't like them I don't want to keep using them and if you love them I definitely do.  Thanks in advance for your input ; )

Social Gadgets

Random Nail Art

Background