Showing posts with label retro. Show all posts

Monday, June 20, 2016

Simple Asymmetrical Stripes

Hello Lovelies! I have been drooling over Anchor & Heart Lacquer since they first started out and I finally order a few of Taryn's gorgeous polishes. I order these three beauties: "The Free Spirit," "The Selfless," and "Sweet Love."


I couldn't figure out which one I wanted to wear first so I decided to use all 3 and came up with this simple asymmetrical striped design…

Materials I used (in addition to the polishes named above):
Dream Polish "Smooth Gem" Basecoat
Striping tape
HK Girl topcoat
Small rhinestones

I started with "The Selfless" on my thumb, pointer, and pinkie. I applied "Sweet Love" on my mid and ring finger. Both of these polishes applied beautifully, I ended up applying 3 coats only because I was having problems with my nail ridges. I think if I had applied 2 coats of my basecoat I would have only needed 2 coats of color. So these polishes are easily a 2-3 coater. 


On my 2 mid fingers, the ones with "Sweet Love," I created the asymmetrical stripe design. I painted the tip of the nail with "The Free Spirit." I then applied a layer of quick drying topcoat and allowed it to dry. I then applied striping tape horizontally across the nail, making one side narrower than the other. I filled in the middle section with "The Selfless" and immediately removed the tapes. 


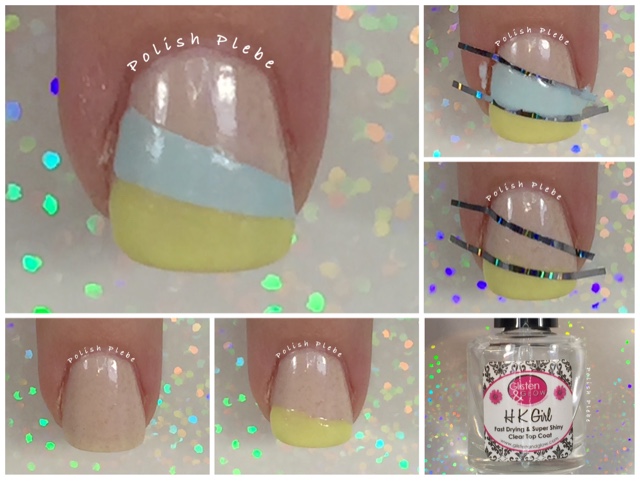
I repeated the process on the adjacent finger but reversed the side where the stripe was narrowed. 


I then performed a little cleanup, applied a layer of topcoat as well as 3 rhinestones at the narrowest side of the stripes. 


I can't tell you how much I love these polishes. My photos don't do them true justice. "The Free Spirit" is a beautiful yellow with a gold irridescent shimmer. "The Selfless" is a lovely soft blue with a pink irridescent shimmer (that my camera just wouldn't photograph). "Sweet Love" is a wonderful nude polish with bits of bronzy golds. 


I like to think of this design as a symbolic representation of an ocean view. "Sweet Love" represents the sandy beach, "The Selfless" is the tranquil waters of the ocean, and "The Free Spirit" is the warm summer sun. 


I am so smitten with these polishes, I am more than certain I'll be purchasing more Anchor & Heart Lacquer in the future. Taryn's polishes are so much more beautiful than my pictures show, you really should see them in person. 


I hope you enjoyed this nail art design and found my mini review of these polishes useful. Thanks for stopping by, see you next time. 


You Fellow Plebe,


Friday, September 25, 2015

Poppin Bow

Hello Lovelies!  It has been a long while since I have done any kind of freehand nail art, so I decided to do a little.  I decided to make it a bit retro, because it's been a while since I've done anything retro too.


Materials I used:
Basecoat - SuperChic Lacquer "Bring It On!"
Polishes - Color Club "On Cloud Nine," "Sweet Getaway," "Je T'Aime," "Jitters," & Sinful Colors "Black on Black"
Small brush
Small dotting tool
Topcoat - SuperChic Lacquer "Marvel"

I began with a white base color on my pointer, mid, and ring fingers.  This is two coats of Color Club "On Cloud Nine," which smells like white chocolate.


Using a small brush I filled in the shape of a large bow on my mid finger and a stripe on both my pointer and ring fingers.  I used Color Club "Sweet Getaway," for the bow, it smells like roses.


I used a lighter pink to outline and add details to the bow and the stripes.  I did have to go back over some areas with white because I made some lines too thick.


Using a small dotting tool and black polish, I filled in the areas around the bows and stripes with polka dots.


For my thumb I did a simple black, and add a glitter to my pinky for a little bit of sparkle.  As usual I performed a bit of cuticle clean up with gentle acetone and a brush, and applied a glossy topcoat.


I repeated this on my right hand as well.  Unfortunately, my non-dominant hand is so out of practice, however I feel it turned out reasonably well.


There is something I really like about a black, white, and pink color scheme, and of course, I just love retro designs too.  So, all in all I am pretty pleased with this look.


However, I do feel my freehand needs a bit of work.  I was hoping freehand painting was going to be more like riding a bike.  You know one of those things you can pick up and do with ease, even if you haven't done it for a while.  Unfortunately that doesn't seem to be the case for me.


Either way, I hope you enjoyed this retro-ish nail art design.  Thanks for stopping by, see you next time.

Your Fellow Plebe,


Saturday, May 9, 2015

Retro Cherries and Stripes

Hello Lovelies!  As many of you know I love all things retro, vintage, and/or pinup style, and since its been a while  I thought it was time for me to create a retro nail art design.  I decided to go with a classic cherry pattern because I have never done one (can you believe that)!  I wanted to do a little something more than just cherries so this is what I did...


Materials I used:
Base coat: Seche Vite
White polish: Color Club 'On Cloud Nine' (white chocolate scented)
Red polish: Color Club 'Red-Handed' (cinnamon scented)
Black polish: Sinful Colors 'Black on Black'
Green Art Club stripper (not shown in picture below)
Striping tape
Dotting tools
Silver studs from bornprettystore.com
Top coat: Rica 'Glossy Glam'


I started off with two coats of white on my pointer, mid, and ring fingers, and two coats of red on my pink and thumb.  I applied top coat to my pointer and mid because I will be using tape on these fingers for my stripes.


On my ring finger, I created a cherry pattern on the entire nail.  This is relatively easy because it really is just a series of dots.  Using a medium/small dotting tool I placed two dots together randomly over the nail.  I then used a green nail art striper and drew a v-shaped stem connecting the two dots.  Then with a very small dotting tool I applied a very small white dot on the same side of each cherry.


I finished off this manicure by dotting medium/large dots over the red on my pink and thumb.  On my pointer I used striping tape and applied black over the white.  Lastly for the mid finger I did a half stripe, half cherry pattern using medium sized silver studs over the center.


I really like this nail art design, because I love the retro look.  The classic red, white, and black combo are just the perfect pin up combo, and the little splash of green really livens up the look.  I also like that even though this design looks complicated that it was actually very easy to create.


I hope you are all having a wonderful weekend so far, and I hope you enjoyed this nail art design as much as I.  Thanks for stopping by, see you next time.


Your Fellow Plebe,


Social Gadgets

Random Nail Art

Background