Showing posts with label summer. Show all posts

Monday, June 20, 2016

Simple Asymmetrical Stripes

Hello Lovelies! I have been drooling over Anchor & Heart Lacquer since they first started out and I finally order a few of Taryn's gorgeous polishes. I order these three beauties: "The Free Spirit," "The Selfless," and "Sweet Love."


I couldn't figure out which one I wanted to wear first so I decided to use all 3 and came up with this simple asymmetrical striped design…

Materials I used (in addition to the polishes named above):
Dream Polish "Smooth Gem" Basecoat
Striping tape
HK Girl topcoat
Small rhinestones

I started with "The Selfless" on my thumb, pointer, and pinkie. I applied "Sweet Love" on my mid and ring finger. Both of these polishes applied beautifully, I ended up applying 3 coats only because I was having problems with my nail ridges. I think if I had applied 2 coats of my basecoat I would have only needed 2 coats of color. So these polishes are easily a 2-3 coater. 


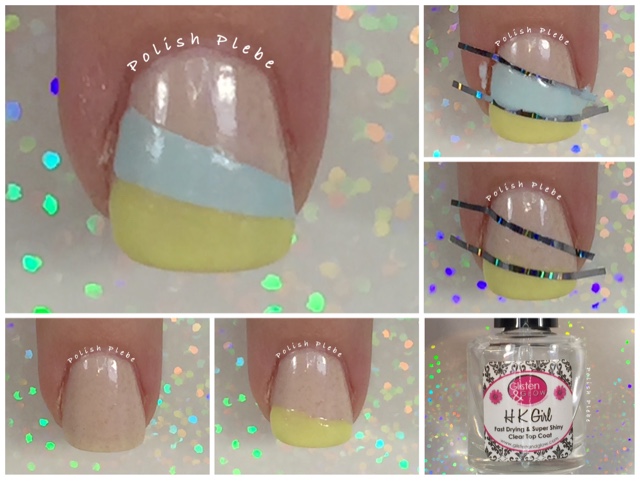
On my 2 mid fingers, the ones with "Sweet Love," I created the asymmetrical stripe design. I painted the tip of the nail with "The Free Spirit." I then applied a layer of quick drying topcoat and allowed it to dry. I then applied striping tape horizontally across the nail, making one side narrower than the other. I filled in the middle section with "The Selfless" and immediately removed the tapes. 


I repeated the process on the adjacent finger but reversed the side where the stripe was narrowed. 


I then performed a little cleanup, applied a layer of topcoat as well as 3 rhinestones at the narrowest side of the stripes. 


I can't tell you how much I love these polishes. My photos don't do them true justice. "The Free Spirit" is a beautiful yellow with a gold irridescent shimmer. "The Selfless" is a lovely soft blue with a pink irridescent shimmer (that my camera just wouldn't photograph). "Sweet Love" is a wonderful nude polish with bits of bronzy golds. 


I like to think of this design as a symbolic representation of an ocean view. "Sweet Love" represents the sandy beach, "The Selfless" is the tranquil waters of the ocean, and "The Free Spirit" is the warm summer sun. 


I am so smitten with these polishes, I am more than certain I'll be purchasing more Anchor & Heart Lacquer in the future. Taryn's polishes are so much more beautiful than my pictures show, you really should see them in person. 


I hope you enjoyed this nail art design and found my mini review of these polishes useful. Thanks for stopping by, see you next time. 


You Fellow Plebe,


Saturday, March 26, 2016

Chaotic Glitz Spring 2015 Collection

Hello Lovelies!  Earlier this week I swatched some pretty pale pastel polishes for you, so I thought I would liven things up and show you some bright pastel swatches perfect for spring or summer.  I recently won some codes to purchase from some very lovely indie brands in an Instagram giveaway, and one of them was for Chaotic Glitz who is easily one of my top five favorite indie makers.  I'm a sucker for crème polishes, and with spring here and summer not to far behind I just knew I had to make this collection my own, and the code I won gave me just the excuse I needed to make the purchase.  I also purchased a lemon scented cuticle pen, which smells divine and she threw in a mani soak for me too.


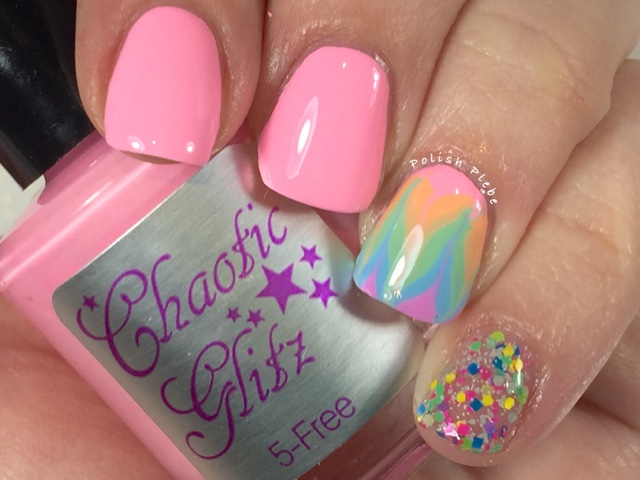
I decided to do these swatches slightly different than I normally do, as you will see in the pictures below.  I swatched each polish on only two finger (mid and pointer) and created a dry drag accent (this was done as a decal) on my ring finger and a glitter accent on my pinky.  All swatches are done with 2 coats, though all of them were mostly opaque with 1 coat.  All photographs are taken indoors under daylight lamps.  Also all swatches are topped with a glossy topcoat too.

What Do You Pink


This is a super bright bubble gum pink, though a friend of mine mentioned it reminded her of Pepto-Bismol.  Either way I think it is a fun color.  The application of this polish was very smooth and easy, though slightly on the thick side.

Peaches Be Like


This is a very unique orange crème, that is a great addition to my collection which currently lacks in orange shades.  The application of this was delightfully smooth and creamy.

Mint for Me


I often say this but I feel green shades are so underappreciated in the nail polish world.  This is a really pretty bright mint green.  The application of this was very easy, just like the others.

Here's Lookin at Blue


My favorite shade, blue!  This is a gorgeous bright sky blue that I find irresistible!  The formula of this one was a bit thicker than the rest, so the application wasn't as smooth as I prefer.  However, I would rather have a thicker formula than a thinner one, because you can always use polish thinner to obtain the consistency you prefer.

Purple On


Much like pink, I don't give purple polishes much thought.  However, this bright pastel purple is incredibly pretty and surprisingly easy to wear.  The application of this polish was absolutely perfect.

Peeps Gettin' Better


This complimenting glitter is a super loaded bright matte pastel glitter bomb.  Its full of bright colored large square and hexes pieces, medium grey hexes, and teeny tiny white hexes.  I applied this in three brushed on layers (unfortunately I am currently out of makeup sponges).  This glitter would go perfectly over any shade in the collection.
I am so glad I purchased this collection, it is so bright and colorful, and the application was very easy on all the polishes.  This is the first time I've attempted to create a dry drag decal and because the polishes are thick and creamy it didn't take me very many tries before I had created one I was satisfied with.  I did attempt to do some stamping with these polishes but was unsuccessful in getting my stamper to pick them up. 
Either way, I am absolutely in love with this collection and have many plans for them in the future.  Currently, the full sized full set of this collection is sold out, but it is available as a mini set and as individuals (link to store above).  I hope you found this review useful and enjoyed these swatches.  Thanks for stopping by, see you next time.
Your Fellow Plebe,
    

Wednesday, June 3, 2015

80's Style Palm Trees

Hello Lovelies!  It has been so rainy and dreary here, it has been a bit depressing.  Today, is the first day the sun has tried to make an appearance, and according to the forecast its not going to stay long.  I have been planning this palm tree nail art design for a while, so I thought now would be the time to post it, it might encourage the sun to stay a bit longer.  Not to mention, it happens to be this week's NPQ challenge...


Materials I used:
Base coat - INM Ridge Free
Base color - Color Club 'Tiny Umbrella' (on the right)
Stripe color - Color Club 'Bermuda Beaches'
Striping tape
White nail art striper
Top coat - Rica 'Glam Gloss'


I used a pale orange polish for my base color with a top coat.  I actually wore Color Club 'Tiny Umbrella' for a day or so before I actually got around to creating the design.  You can see a little bit of tip wear but I'll be covering up that part before the design is complete.


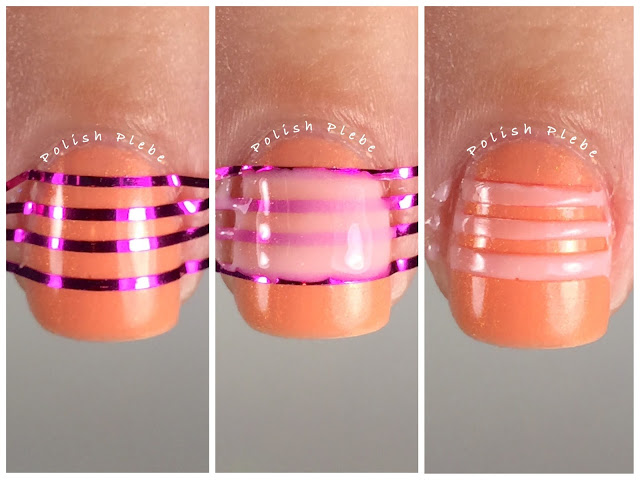
For most of the palm tree nail art designs I've seen and for the one I created last summer (Happy International Nail Art Day) the background is usually a gradient.  I decided to go with just a very simple horizontal stripe for the background this time.  I used striping tape and outline three stripes (four tapes) a little higher than the center of my nail.  I carefully applied my pink polish within the stripes, so that when the tape is removed there are only three pink stripes.


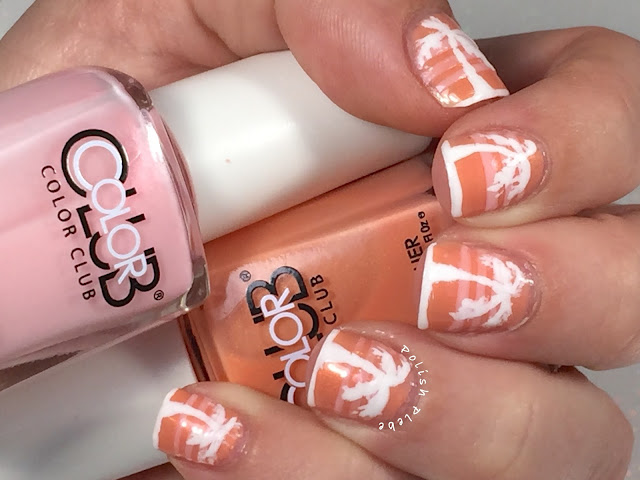
In a second, attempt to be slightly different I used a white nail art striper, instead of the typically used black and created my palm tree design.  I lined the tip, almost as if capping my free-end with the striper, because this is the horizon I wasn't concerned with it being absolutely perfect.  I then drew in the trunk of the tree, making the base slightly wider than the top and giving the top a bit of a curve.  I then drew in four palm leaf or branches.  Lastly, I filled out the leaves with a little hashing motion extending from the branches.


I repeated this design on all my nails, and then as usual I performed a bit of clean up with acetone and a brush, and applied my favorite top coat.


I'm really glad I did this palm tree design with an 80's twist.  Not that gradient background palm tree designs aren't fantastic, because you know I love gradients.  I'm just really pleased with how these turned out.  Palm trees are great for the summer, or for vacations, or if you wished you were on vacation.


This design and color combo is both subtle yet eye-catching.  Also, it's difficult to see in these pictures but the orange and pink polishes have a slight shimmer to them which really adds to the overall design.


For my fellow plebe's out there this design is a great alternative if you haven't mastered or aren't ready to tackle gradients.  You can use striping tape like I did or you can practice your freehand and do it without any tapes.


Hopefully, this nail art design will encourage the sun to stay a little longer.  I hope you enjoyed this nail art design as much as I am.  Thanks for stopping by, see you next time.

Your Fellow Plebe,


Social Gadgets

Random Nail Art

Background