Showing posts with label French tip. Show all posts

Monday, February 1, 2016

French Tips Made Easy with UberChic Mat

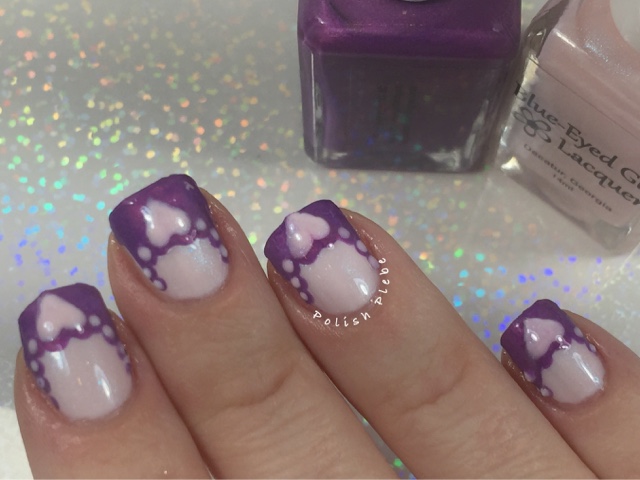
Hello Lovelies!  Since, I've owned my UberChic Mat I have been trying to find different ways to use it.  I absolutely love it to make decals, which really help create consistent designs on both hands.  I personally have a hard time creating French Tip designs that even on all my nails.  So, I had this great idea to use my Uber Chic Mat to create French Tip decals.


Materials I used:
Basecoat - Dream Polish 'Smooth Gem'
Uber Chic Mat
Polishes - Blue-Eyed Girl Lacquer 'Cherry Blossom,' & 'Wanna Fall in Love Tonight'
Dotting tools
Topcoat - Glisten & Glow 'HK Girl'

I began with two perfectly beautiful coats of 'Cherry Blossom,' one of my favorite BEGL, on all my nails.


Using the curved nail outlines on my Uber Chic Mat, I traced the outline of the tip with my secondary color 'Wanna Fall in Love Tonight'.  Using a medium dotting tool I placed two dots center of the curve using the same color, I then switched to a smaller dotting tool and placed dots on either side of the larger dots.  Using 'Cherry Blossom' I created a heart over the top of the center dots and placed smaller dots over each dot along the edge, creating a lace like edge.


Once dry, I removed the French Tip decals from the mat and applied them to my nails using a topcoat as an adhesive.  I performed a bit of clean up and applied a final layer of topcoat.


If you don't have an Uber Chic Mat or something similar (there are so many different variations in the market now), you can do the same thing by printing a nail outline (click link for google search) and use a plastic baggy or cellophane over top to create your decals.


I hope you enjoyed this nail art design and found the tutorial useful.  Thanks for stopping by, see you next time.

Your Fellow Plebe,


Friday, January 29, 2016

Lattice Lace with Heart French Tip

Hello Lovelies! Today, I have my lace nails for this week's WNAC.  I had a really epic break on my left hand, so it has gone into hiding for awhile.  However, I thought it was time I really challenge myself, and do some freehand on my cindy hand.  This is after all a weekly challenge, so why not push myself just a little bit.


Materials I used:
Basecoat - Dream Polish 'Smooth Gem'
White acrylic paint
Small detail brush (I recently won in a giveaway from IAMCCC, you can find it in her store)
Glitter or Die 'Romantic Tutu'
Dotting tool
Topcoat - Glisten & Glow 'HK Girl'

I started off with a base coat of Dream Polish's 'Smooth Gem' base coat.  This has become one of my favorite base coats because I have pretty significant ridges and this really helps hide them.  Unlike other ridge filler base coats I've tried, this is not thick and goopy and applies like a dream.  Also, it dries relatively clear which makes it perfect for doing french tip or negative space designs.


Using white acrylic paints and a small detail brush, I painted a criss-cross lattice pattern over the entire nail.  With the same paint and brush I filled in the tip with a somewhat heart shape french tip.  Switching to polish I filled in the very tip of the white french tip, leaving a boarder.  I then used a dotting tool and dotted the crosses of the lattice as well as small dots along the white board of the french tip.


I performed a small bit of clean up with gentle acetone and a brush, and topped off with a shiny quick drying topcoat.


So, my execution on this design isn't the greatest, but considering this is all done with my non-dominant hand, which hasn't really been put to task in a while it's really not all that bad.  With this design I have completed another month worth of WNACs.  I will be attempting to complete these challenges for the next couple months before I have to take a hiatus for our new little man's arrival.  I hope you all enjoyed this nail art design and the brief tutorial.  Thanks for stopping by, see you next time.

Your Fellow Plebe,


Tuesday, November 10, 2015

Glitter Rhinestone - Lady Queen Beauty Review

Hello Lovelies!  I was recently contacted by Lady Queen Beauty and asked if I would like to review their product.  They have so many wonderful nail art products and accessories that I couldn't resist.  One of the items I choose to review were these gorgeous Multi Colored Rhinestones.


These Multi Colored Rhinestones Item # NA0285 come in a wheel and include two sizes of gems in just about every color of the rainbow.


The Rhinestones have a 3D shape and a nice iridescent appearance that make them shine like jewels.  These stones also have a somewhat metallic finish which makes them very opaque (in other words you cannot see through them).

I decided to use these Multi Colored Rhinestones  to create a French tip nail art design.  Using a binder hole reinforcement dot I created a deep French tip, by placing the reinforcement dot approximately 1/3 from the tip of my nail.  I then filled in the tip with black polish and immediately removed the reinforcement dot to prevent the polish from pulling.  I used Sinful Colors "Black on Black" because this is my go to black polish.

I then used the Multi Colored Rhinestones along the smile line of the French tip I just painted.  I used three larger stones in the middle and a smaller stone on either side.  I applied these stones by applying a topcoat and pressing the stones into the topcoat while it was still wet.  I then applied another layer of topcoat over the stones to seal them in place.


I prefer the topcoat method for applying stones and studs because I change my nail art often and I find it easier to remove the studs without damaging my nails.  If you intend to wear a manicure with studs for an extended period of time, I would recommend using nail glue to apply the studs instead of the topcoat method.  I would also recommend using nail glue if you are using a significantly large gem or charm, because the topcoat will not hold them for long.


I highly recommend you checkout the gorgeous and very economically priced nail art items that Lady Queen Beauty has to offer.  They offer the latest in Nail Art Trends, not to mention Daily Deals and Hot Sales, in addition to their already great priced items.  They also offer free shipping on top of their great prices.  You can earn points for purchases, product reviews and photo/video uploads to their site, that you can redeem on future purchases.  If that's not enough and you want more, you can also use my coupon code: QJXS15 for 15% off!  It really doesn't get any better than that.


I hope you enjoyed this nail art design and found the review useful.  Be sure to use my coupon code when you make a purchase with Lady Queen Beauty.  Thank you for stopping by, see you next time.

Your Fellow Plebe,


Social Gadgets

Random Nail Art

Background