Saturday, March 26, 2016

Chaotic Glitz Spring 2015 Collection

Hello Lovelies!  Earlier this week I swatched some pretty pale pastel polishes for you, so I thought I would liven things up and show you some bright pastel swatches perfect for spring or summer.  I recently won some codes to purchase from some very lovely indie brands in an Instagram giveaway, and one of them was for Chaotic Glitz who is easily one of my top five favorite indie makers.  I'm a sucker for crème polishes, and with spring here and summer not to far behind I just knew I had to make this collection my own, and the code I won gave me just the excuse I needed to make the purchase.  I also purchased a lemon scented cuticle pen, which smells divine and she threw in a mani soak for me too.


I decided to do these swatches slightly different than I normally do, as you will see in the pictures below.  I swatched each polish on only two finger (mid and pointer) and created a dry drag accent (this was done as a decal) on my ring finger and a glitter accent on my pinky.  All swatches are done with 2 coats, though all of them were mostly opaque with 1 coat.  All photographs are taken indoors under daylight lamps.  Also all swatches are topped with a glossy topcoat too.

What Do You Pink


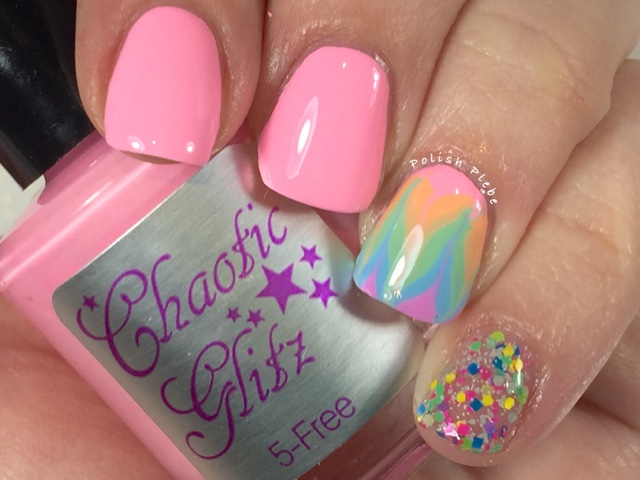
This is a super bright bubble gum pink, though a friend of mine mentioned it reminded her of Pepto-Bismol.  Either way I think it is a fun color.  The application of this polish was very smooth and easy, though slightly on the thick side.

Peaches Be Like


This is a very unique orange crème, that is a great addition to my collection which currently lacks in orange shades.  The application of this was delightfully smooth and creamy.

Mint for Me


I often say this but I feel green shades are so underappreciated in the nail polish world.  This is a really pretty bright mint green.  The application of this was very easy, just like the others.

Here's Lookin at Blue


My favorite shade, blue!  This is a gorgeous bright sky blue that I find irresistible!  The formula of this one was a bit thicker than the rest, so the application wasn't as smooth as I prefer.  However, I would rather have a thicker formula than a thinner one, because you can always use polish thinner to obtain the consistency you prefer.

Purple On


Much like pink, I don't give purple polishes much thought.  However, this bright pastel purple is incredibly pretty and surprisingly easy to wear.  The application of this polish was absolutely perfect.

Peeps Gettin' Better


This complimenting glitter is a super loaded bright matte pastel glitter bomb.  Its full of bright colored large square and hexes pieces, medium grey hexes, and teeny tiny white hexes.  I applied this in three brushed on layers (unfortunately I am currently out of makeup sponges).  This glitter would go perfectly over any shade in the collection.
I am so glad I purchased this collection, it is so bright and colorful, and the application was very easy on all the polishes.  This is the first time I've attempted to create a dry drag decal and because the polishes are thick and creamy it didn't take me very many tries before I had created one I was satisfied with.  I did attempt to do some stamping with these polishes but was unsuccessful in getting my stamper to pick them up. 
Either way, I am absolutely in love with this collection and have many plans for them in the future.  Currently, the full sized full set of this collection is sold out, but it is available as a mini set and as individuals (link to store above).  I hope you found this review useful and enjoyed these swatches.  Thanks for stopping by, see you next time.
Your Fellow Plebe,
    

Tuesday, March 22, 2016

Sweet & Sour Lacquer Frozen Yogurt Collection

Hello Lovelies!  I apologize for the lack of posts last week, but I had some unexpected family situations arise.  Not to mention I am only a few weeks away from D-Day (expected delivery date) and I'm just having a hard time keeping up with life.  However,  while I was away last week I received a couple packages of nail mail and I'm in the process of swatching and reviewing them to share with you.


First up, I have the Frozen Yogurt Collection that I purchased from Sweet & Sour Lacquer.  When she announced the release of this collection, I thought it was time to add some pastels to my stash, being that I didn't own any.  This collection consists of 7 crellies and a glitter bomb.

All the swatches you are about to see are swatched over a DIY peel off base coat, swatched in 2-3 coats, and topped with Sweet & Sour Lacquer's 'Gloss Sauce.'  They are also all photographed indoors, under daylight lamps, even the macros.

Dubble Bubble Trubble


As the name suggests this is a bubble gum-esque pink, and is very sweet.  This is one of the more opaque colors in the collection and definitely one of the brighter colors.

Mango Tango 


This is a very pale orange sherbet like color.  I don't have many orange shades so this is a great addition to my collection.

Hawaiian Pineapple


This is the yellow shade in the collection.  However, either my eyes or the lighting made me keep seeing a bit of green in this color.  It is definitely yellow but just a touch on the yellow green side in my opinion.  Still a very pretty color!

Shamrock Mint


This is clearly the green shade of the collection, not merely by the name of it but obviously by its appearance.  This is a really delicious color.

Blueberry Dream


As you can probably guess, this is my favorite of the entire collection.  This is perfectly named, blueberry shade, that leans just a little to the burple realm.  This is slightly more opaque than some of the other shades too.

"Poison" Berry Tart


This shade surprised me the most, because I didn't give it much thought in the bottle.  However, once I applied it I discovered it is one of my favorites in the collection.  This is a very pretty purple-pink shade, that is totally drool worthy.  This too is slightly more opaque than some of the other colors.

Don't Forget Your Spoon


Of course, if you are going to enjoy some delicious frozen yogurt, you don't want to forget your spoon.  This is a really pretty pale silvery grey shade that compliments the collection, but really is unique from the rest.  I wore this shade over the weekend and its very easy to wear.

Froyo Drop


This glitter bomb is absolutely perfect for this collection and goes with each and every shade.  It's packed full of small and large pastel hexes and holo glitter.

This collection is absolutely perfect for spring!  They truly are delicious!  I have many nail art design ideas that I hope I'll be able to create for you all soon (or as soon as I can).

I purchased this as a full sized complete collection.  Sadly, when I checked on this today, the complete set is sold out as well as many of the individuals.  There are a few shades left, and you can always follow Sweet & Sour Lacquer on Facebook and Instagram for restocking updates.  I hope you enjoyed these pretty swatches, stay tuned for more swatches.  Thank you for stopping by, see you next time.


Your Fellow Plebe,


Friday, March 11, 2016

Luck o' the Irish

Hello Lovelies! Today, I have some fun St. Patrick's Day nails to share with you. I created these nails for this week's WNAC, luck of the Irish prompt. Of course, I had to go with iconic clovers because what could be luckier. 


Materials I used:
Base coat - Dream Polish 'Smooth Gem'
Polish - Lacquered Polish 'Irish Creme'
Matte topcoat Nicole by OPI
Gel pens 

I started off with one of my favorite nude color, Lacquered Polish 'Irish Creme' it's a beautiful neutral with just a touch of gold in it. 


For this design, I decided to finally try out gel pens. I've seen some really great nail art designs created with gel pens and when I found this rainbow pack of gel pens I couldn't resist. 

I first tried using the gel pens over a gloss topcoat. This didn't work out to well, the pens didn't draw smoothly, and wiped off easily. I ended up using a matte topcoat to help with the application.  I simply drew clovers in various colors, randomly over all my nails. 


Usually, I perform a bit of a cleanup and apply a topcoat, but in this case I didn't do either because I didn't need to cleanup and I liked the matte finish. 


These were really easy and fun to create. The gel pens were easy to work with once I applied the matte topcoat. I would recommend you give them a try.  I hope you enjoyed this nail art design. Thanks for stopping by, see you next time. 


Your Fellow Plebe,


Wednesday, March 9, 2016

HeHe Stamping Plate 006 - Lady Queen Beauty Review

Hello Lovelies!  Since, I have been getting better at nail art stamping I have been trying to increase my stamping plate collection.  I was sent a this gorgeous stamping plate from Ladyqueen.com to review.


This plate, is item #NA0538.  As you can see has four primary or larger images, and four smaller circular floral type images.  This plate has unlimited potential for creating beautiful and unique nail art designs. (Do not forget to remove the blue film from the plate before use.)


For this review, I created a simple spring color scheme design.  I started with a base of minty green polish, Native War Paints 'Bird's Nest in the Mailbox'.


I stamped the image in Mundo de Unas 'Pastel Pink.'  I did use a clear stamper to help with image placement (I'll review that in a later post).  The image picked up with ease, and transferred very easily to my nail.


I love this nail art design!  Stamping is one of the quickest ways to really dress up your nails.  With a little practice, and the proper supplies its actually quit easy to do.


Ladyqueen.com has all you need to create an awesome stamped manicure, all at very reasonable prices.  This image plate #NA0538 is currently on sale for $1.99!  They have an incredible selection of image plates, stampers, scrapers, stamping polishes, and plate holders, you really should check them out (http://www.ladyqueen.com/nail-art-templates1.html).


In addition, to their already excellent prices they offer free shipping world wide, and you can use my code: QJXS15 for an addition 15% off.  Tell me that's not an amazing deal!  While you are visiting their site be sure to checkout their Daily DealsHot SellersNew Arrivals, and Top Trends for the latest and greatest in nail art design supplies and accessories.


I hope you enjoyed this nail art design and found the review useful.  You can be sure that you will be seeing more images from this plate.  I have future plans to do some reverse stamping with some of these images, so be on the lookout for them in future posts.  Thanks for stopping by, see you next time.


Your Fellow Plebe,


Friday, March 4, 2016

Dotted Rainbow Stripes

Hello Lovelies! I am super excited about this months WNAC because the theme is rainbows! Who doesn't love rainbows?! For this week's stripe prompt, I decided to create a dotted stripes.


For this nail art design, I decided to use my go to Ciate London rainbow creme scheme which includes: 'Mistress,' 'Cha, Cha, Cha,' 'Loop the Loop,' 'Apples & Custard,' 'Boom Box,' & 'Talent Scout.'


To create this design I painted three vertical stripes, skipping every other color of the rainbow. Then using a medium dotting tool I dotted a stripe over each seam with the colors I skipped. 


After a quick clean up with gentle acetone and a brush, this is what I came up with…


I decided my rainbow stripes need some more rainbows. So, I added a layer of I.A.M…Custom Color Cosmetics 'Quest for the Holo Pail.'


These nails were so easy to create, and they're bright and fun too. The holo topcoat gave it that little bit extra, that makes me really love this designs. I hope you like this design too, thanks for stopping by, see you next time. 


Your Fellow Plebe,


Tuesday, March 1, 2016

Rainbow Spiral Water Decal - Lady Queen Beauty Review

Hello Lovelies! Today, I have a quick review of these fun funky rainbow spiral water decals, item #NA0187 from ladyqueen.com.


These water decals are available in 8 patterns, each unique, bright, and interesting. This is pattern QJ-191. 


As you can see from the picture this is a full sheet decal. This is both a pro and a con. This allows you to select the area of the design you would like, however, if you  are new to nail art or have a difficult time sizing things to your nail these could be challenging to use. I would consider these decals for moderate and advanced skilled nail fanatics. 

Because most water decals are semi transparent I prefer to use a colored base polish underneath, in this case I used a white base to make the decal appear brighter.

Apply the decal by trimming out the portion that you prefer, remove the protective covering, and submerge it in water for 10-20 seconds. Carefully remove it from the water, moisten your finger slightly, and than apply the decal to the nail. 


Being the plebe that I am, I thought I would be able to apply the decal to my nail with backing still on and then slide the backing off. I do not recommend using this technique. It is difficult to see where you are placing the decal, and it may wrinkle or crease like mine did. I recommend you slide the decal from the backing and then place it on the nail. 

After a bit of cleanup with gentle acetone and a brush. Apply a finishing layer of topcoat to seal the decal and give it extra shine. 


Lady Queen has a wide variety of water decals available on their site all at very reasonable prices. While you are on their site checkout their Special Price, Hot Sellers, Top Trends, and don't forget their New Arrivals.  Be sure to use code: QJXS15 for 15% off your next purchase, between their reasonable prices, this generous code, and free shipping it's really a steal.  I hope you found this review useful and the tips helpful.  Thanks for stopping by, see you next time.


Your Fellow Plebe,


Social Gadgets

Random Nail Art

Background