Monday, June 27, 2016

Black, White & a Pop of Color - Nicole Diary Water Decal Review

Hello Lovelies!  Okay some of you may be getting sick of seeing me use water decals in my nail art designs because I have been using them a lot lately.  But I just can't get enough of these decals from Nicole Diary.  Even though they sent me these and the last several others you've seen from me for review, I recently order a whole bunch more (so be ready to see a great deal more). However, I'm trying to change up how I use them each time.


This time I am using Nicole Diary 27 , these are very pretty lotus like mandala designs.  They are black outline with clear background.


For this overall look, I used Envy Lacquer 'Illuminacion,' 'Razzmatazz,' and Sweet & Sour Lacquer 'Scotty Doesn't Know.'


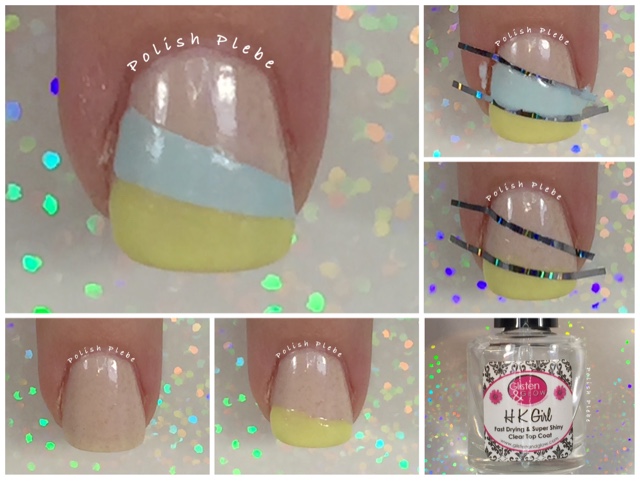
For the mid finger, I painted half with 'Illuminacion,' and the other half with 'Razzmatazz.'  To cover the horizontal seam between the two colors I used black studs (I believe I purchased on Amazon).


For you added pleasure I placed one of the mandala-ish water decals on my ring finger.  I used the same steps I have in previous water decal applications, however, one additional thing that I found useful is to apply a quick drying topcoat (and allow it to dry) before applying the decal.  This helps smooth the base polish especially if it has some texture to it.  So the steps I recommend are as follow (not all steps are photographed):
  1. Apply quick drying topcoat (allow time to dry)
  2. Trim decal
  3. Remove plastic film
  4. Submerge in water for approx. 20-30 seconds
  5. Remove decal from water
  6. Carefully slide decal from backing
  7. Dip finger in water (that you are applying the decal to) to moisten
  8. Place decal, carefully slide it into place, and press flat to smooth out wrinkles
  9. Use acetone and a brush to dab away excess decal
  10. Apply a final layer of quick drying topcoat 

I love this look, it is simple yet interesting.  I think these lotus mandala water decals are my favorite from Nicole Diary, so far.  They make a perfect accent, and I love that there different designs and not just a sheet of the same ten patterns.  This means you get five fresh new looks to use, or you can use them all at once for a very intricate nail art design.


If you haven't checked out Nicole Diary's water decals you should.  You can find them on Amazon or Aliexpress.  They offer their own water decal designs as well as stamping plates, and many other nail art tools and supplies.  If you make a purchase use code TAL2016 (type it in the comments to seller) for a free gift.


I hope you enjoyed this nail art design as much as me!  Keep your eyes open for more Nicole Diary water decal designs because I'm sure I'll be doing more with them.  Thanks for stopping by, see you next time.

Your Fellow Plebe,


Monday, June 20, 2016

Simple Asymmetrical Stripes

Hello Lovelies! I have been drooling over Anchor & Heart Lacquer since they first started out and I finally order a few of Taryn's gorgeous polishes. I order these three beauties: "The Free Spirit," "The Selfless," and "Sweet Love."


I couldn't figure out which one I wanted to wear first so I decided to use all 3 and came up with this simple asymmetrical striped design…

Materials I used (in addition to the polishes named above):
Dream Polish "Smooth Gem" Basecoat
Striping tape
HK Girl topcoat
Small rhinestones

I started with "The Selfless" on my thumb, pointer, and pinkie. I applied "Sweet Love" on my mid and ring finger. Both of these polishes applied beautifully, I ended up applying 3 coats only because I was having problems with my nail ridges. I think if I had applied 2 coats of my basecoat I would have only needed 2 coats of color. So these polishes are easily a 2-3 coater. 


On my 2 mid fingers, the ones with "Sweet Love," I created the asymmetrical stripe design. I painted the tip of the nail with "The Free Spirit." I then applied a layer of quick drying topcoat and allowed it to dry. I then applied striping tape horizontally across the nail, making one side narrower than the other. I filled in the middle section with "The Selfless" and immediately removed the tapes. 


I repeated the process on the adjacent finger but reversed the side where the stripe was narrowed. 


I then performed a little cleanup, applied a layer of topcoat as well as 3 rhinestones at the narrowest side of the stripes. 


I can't tell you how much I love these polishes. My photos don't do them true justice. "The Free Spirit" is a beautiful yellow with a gold irridescent shimmer. "The Selfless" is a lovely soft blue with a pink irridescent shimmer (that my camera just wouldn't photograph). "Sweet Love" is a wonderful nude polish with bits of bronzy golds. 


I like to think of this design as a symbolic representation of an ocean view. "Sweet Love" represents the sandy beach, "The Selfless" is the tranquil waters of the ocean, and "The Free Spirit" is the warm summer sun. 


I am so smitten with these polishes, I am more than certain I'll be purchasing more Anchor & Heart Lacquer in the future. Taryn's polishes are so much more beautiful than my pictures show, you really should see them in person. 


I hope you enjoyed this nail art design and found my mini review of these polishes useful. Thanks for stopping by, see you next time. 


You Fellow Plebe,


Monday, June 6, 2016

Stamping Plate JQ-L17 - Ladyqueen.com Product Review

Hello Lovelies!  Over the weekend I got to play around with stamping plate JQ-L17 sent to me for review from Ladyqueen.com.  I decided to combine this with my #smooshynailsunday manicure that I was also fortunate enough to have time to create.


This plate, Item #NA0869, has many geometric patterns and a couple more whimsical designs too.  There are fourteen full size images and 7 french tip or smaller images.


The images are very crisp and clean.  I tested them using Mundo de Unas 'Silver,' and my Fab Ur Nails stamper and stamped all the images onto black construction paper.  I was pleasantly surprised at how cleanly the images picked up.


For this nail art design I started with a white base coat and protected my cuticles with liquid latex for quicker clean up.  I used a white base coat because I smooshed with neon colors, and neons are always brighter over a white base.


I then used my stamper to smoosh this week's Neon Galactic #smooshynailsunday color combo.  I used Chaotic Glitz 'Little Black Book,' Salon Perfect 'Wrapped Around My Pink-y,' & 'Honeydew, Honey Don't.'


There are a few ways you can smoosh, I typically dot the polishes on a stamper and then smoosh the polishes onto my nails.  Check out my Instagram account @polish_plebe for a quick smoosh video, if you'd like to see more of this process (if the video is not up yet, it will be soon).


I then removed the latex, performed a bit of clean up with gentle acetone and a brush, and then finished the smoosh off with a glossy topcoat.  I prefer to stamp over a topcoat when I am using a smoosh or gradient for my background, however this isn't absolutely necessary for transferring a crisp image.


After my base polish was dry I stamped the star image, in Mundo de Unas 'Silver' on all my nails with my Fab Ur Nails stamper.  I felt the star image was most appropriate since this week's smoosh combo was Neon Galactic.


Remember to remove the protective film from any new stamping plate, otherwise it just doesn't work.


As you can see the image transferred quite nicely with minimal voided spaces, leaving a crisp clean pattern.


I really like all the geometric images on this plate.  This plate has many classic prints such as the hounds tooth and the stars, but also has some very unique images as well.  Many of these images would be great for some reverse stamping too.  I have many design ideas for this plate, now I just have to find the time to create them.


Ladyqueen.com offers a large variety of stamping plates all at very reasonable prices.  This plate, JQ-L17, is currently listed for $5.32, which is a very good price for all the images it has.  While you are checking out there stamping plates be sure to check out their Hot Sales, Special Prices, New Arrivals, and Top Trends for the latest and greatest in nail art supplies and accessories.


In addition to their already great prices, they offer free shipping worldwide, and you can use my code: QJXS15 for 15% off of your purchase.


I hope you enjoyed this design as much as I have, and found the review useful.  Thanks for stopping by, see you next time.


Your Fellow Plebe,


Social Gadgets

Random Nail Art

Background