Monday, February 8, 2016

Holo Matte Hearts

Hello Lovelies!  Happy Monday to you all!  Today, I have a super quick nail art design for you.  I recently won a lovely giveaway from I.AM...Custom Color Cosmetics and I couldn't wait to use some of my goodies, so I threw together this quick mani using some of my prizes (not all items used are from the giveaway)...


Materials I used:
Basecoat - Dream Polish 'Smooth Gem'
Pink Holo - Glisten & Glow 'Raspberry Margarita'
Quick drying topcoat - Glisten & Glow 'HK Girl'
Heart shaped nail vinyls from Nails Redesigned
Matte polish - Bad Bitch Polish 'Masker'

After applying my protective ridge filler base coat, I applied two coats of bright pink holo polish.  I topped this with a layer of quick drying topcoat, because I am using vinyls to create my design.


Once, my topcoat was dry, I applied a couple of heart outline vinyls to my ring finger.  I applied a layer of matte polish over top, and than immediately removed the vinyls.  When working with vinyls or tapes and a matte polish, it is important to work quickly to prevent pulling.  I recommend if you are doing multiple fingers to work one finger at a time.


I repeated this process on my pinky finger, as well.  Then I performed a bit of cleanup with gentle acetone and a brush.  I did not apply any topcoat to my pinky or ring finger because I didn't want to negate the matte affect.


I love this color combination, the dark teal green and the bright pink really pop.  I also like the contrasting finishes too.  This makes a great Valentine's Day mani or just a cute mani to wear any ol' time.  I hope you enjoyed this nail art design.  Thanks for stopping by, see you next time.


Your Fellow Plebe,


Friday, February 5, 2016

Pride and Prejudice and Zombies Inspired Nails

Hello Lovelies! Today, I have some nails that were inspired by the book and the new release of the movie, "Pride and Prejudice and Zombies" by Jane Austen.  I have been a fan of Jane Austen's novels every since they have been published, so I am super excited about the movie.  I mean who doesn't love the idea of some strong zombie ass-kicking women taking care of business.  I also thought this would be fitting for this week's Love/Hate sponging WNAC.  Plus, I also got some new pretties from I.AM...Custom Color Cosmetics that I just couldn't wait to use.


Materials I used:
Base coat - IAMCCC Cement Sticky Base Coat
Polishes - IAMCCC 'Venus' and 'Freyja' (from her most recent Love Mythos Collection)
Liquid tape - So Much Goodness 'Purple Nurple'
Make up sponge
Stamping plate - Pueen image plate 22
Stamping polish - Mundo de Unas 'Gold'
Stamper and scraper - Fab Ur Nails XL Gold Stamper set
Blood spatter polish - Pueen 'Super Instense - So Red'
Drinking straw
Topcoat - IAMCCC 'Diamond Pro'

After applying my base coat (which I always do, to protect my nails from excessive staining), I applied one coat of 'Freyja' the lighter of the two colors of my sponged background.  I prepped my fingers with some liquid tape, for easier clean up.  Using a makeup sponge, I dabbed 'Venus' and 'Freyja' in a spotted pattern over each nail.  I then removed the nail tape, before proceeding with this design.


I love this combination already, and I feel just a bit guilty about covering it up.  This has a very soft feminine touch to it and just look at all those lovely gold flakies.


After, struggling with the dilemma of covering this beautiful background for a little while, I stamped a rose pattern image from Pueen plate 22 with gold stamping polish over all my nails.


I think this looks just like Victorian wallpaper, which is exactly what I was going for.  I really could have stopped here and called this a completed mani, but...


Since, this nail art is inspired by "Pride and Prejudice and Zombies" it only seems right to add a little gore.  I once again prepped my fingers with So Much Goodness 'Purple Nurple' and using a drinking straw and Pueen 'Super Intense - So Red', I blood spattered all over my pretty Victorian wallpaper nails.


As usual I had a bit of clean up to do, so I used gentle acetone and a brush to clean up.  I didn't apply the liquid nail tape far enough up my finger so I used a cotton swab and acetone to clean the polish from my fingers.  I then applied a quick drying super glossy topcoat to finish off this mani.


For those of you who know me personally, can probably guess that I am absolutely in love with these nails.  They encompass everything I love, soft pretty nail art, a classic Victorian theme, and just a touch of gore!  For me they couldn't be anymore perfect!


I think these are perfect for the WNAC too, because they encompass both elements of love and hate.  The romantic Victorian print for all you lovers out there, and the gore for all you haters.  Of course, if you're anything like me this mani shows nothing but love.  I'm curious what you think?  Do you see a love mani or a hate mani?


I hope you enjoyed this beautifully gory nail art design.  Thanks for stopping by, see you next time.


Your Fellow Plebe,


Monday, February 1, 2016

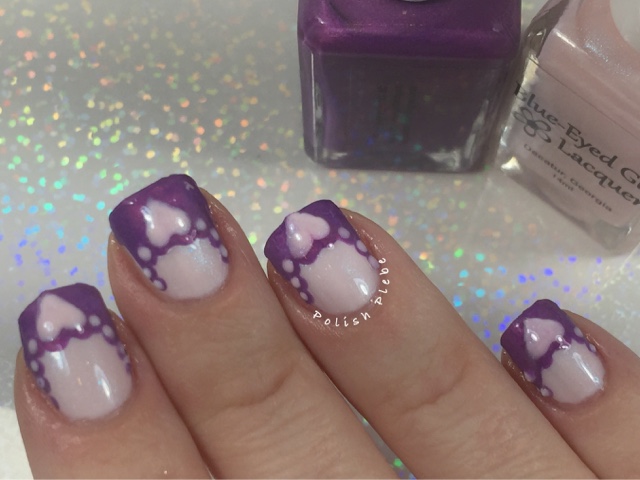
French Tips Made Easy with UberChic Mat

Hello Lovelies!  Since, I've owned my UberChic Mat I have been trying to find different ways to use it.  I absolutely love it to make decals, which really help create consistent designs on both hands.  I personally have a hard time creating French Tip designs that even on all my nails.  So, I had this great idea to use my Uber Chic Mat to create French Tip decals.


Materials I used:
Basecoat - Dream Polish 'Smooth Gem'
Uber Chic Mat
Polishes - Blue-Eyed Girl Lacquer 'Cherry Blossom,' & 'Wanna Fall in Love Tonight'
Dotting tools
Topcoat - Glisten & Glow 'HK Girl'

I began with two perfectly beautiful coats of 'Cherry Blossom,' one of my favorite BEGL, on all my nails.


Using the curved nail outlines on my Uber Chic Mat, I traced the outline of the tip with my secondary color 'Wanna Fall in Love Tonight'.  Using a medium dotting tool I placed two dots center of the curve using the same color, I then switched to a smaller dotting tool and placed dots on either side of the larger dots.  Using 'Cherry Blossom' I created a heart over the top of the center dots and placed smaller dots over each dot along the edge, creating a lace like edge.


Once dry, I removed the French Tip decals from the mat and applied them to my nails using a topcoat as an adhesive.  I performed a bit of clean up and applied a final layer of topcoat.


If you don't have an Uber Chic Mat or something similar (there are so many different variations in the market now), you can do the same thing by printing a nail outline (click link for google search) and use a plastic baggy or cellophane over top to create your decals.


I hope you enjoyed this nail art design and found the tutorial useful.  Thanks for stopping by, see you next time.

Your Fellow Plebe,


Social Gadgets

Random Nail Art

Background